论文: Stacked Hourglass Networks for Human Pose Estimation
Demo Code
论文阅读 - Stacked Hourglass Networks for Human Pose Estimation
- Project - Home
- Torch - Demo Code -- pose-hg-demo
- Torch - Training code -- pose-hg-train
- Pre-trained model
pose-hg-demo主要包含文件及文件夹内容:

这里基于Docker、python和pose-hg-demo.
1. 拉取Torch7镜像
sudo nvidia-docker pull registry.cn-hangzhou.aliyuncs.com/docker_learning_aliyun/torch:v1
2. 运行 Demo on MPII Human Pose dataset
下载MPII Human Pose dataset,并将图片放在 images 文件夹.
sudo nvidia-docker run -it --rm -v /path/to/pose-hg-demo-master:/media registry.cn-hangzhou.aliyuncs.com/docker_learning_aliyun/torch:v1

# 进入Torch镜像
root@8f1548fc3b34:~/torch#
cd /media  # 即主机中的 pose-hg-demo-master
th main.lua predict-test # 得到人体姿态估计结果,并保存在'preds/test.h5'中
利用下面的python脚本可视化人体姿态结果:
#!/usr/bin/env python
import h5py
import scipy.misc as scm
import matplotlib.pyplot as plt

test_images = open('../annot/test_images.txt','r').readlines()
images_path = './images/'

f = h5py.File('./preds/test.h5','r')
preds = f['preds'][:]
f.close()

assert len(test_images) == len(preds)
for i in range(len(test_images)):
    filename = images_path + test_images[i][:-1]
    im = scm.imread(filename)
    pose = preds[i]

    plt.axis('off')
    plt.imshow(im)

    for i in range(16):
        if pose[i][0] > 0 and pose[i][1] > 0:
            plt.scatter(pose[i][0], pose[i][1], marker='o', color='r', s=15)
    plt.show()

print 'Done.'
3. 自定义图片的人体姿态估计
由于MPII Human Pose Dataset提供了图片中人体scale和center的标注信息,因此可以直接采用pose-hg-demo提供方式处理:
inputImg = crop(img, center, scale, rot, res)
不过,对于一张或多张图片,未知图片中人体scal和center信息时,需要单独处理,这里,处理思路是: 首先检测人体框(这里未给出实现过程),再采用Python对图片与处理,作为网络输入.
- Python预处理图片的程序
#!/usr/bin/env python
import os
import numpy as np
import cv2
import matplotlib.pyplot as plt
import scipy

if __name__ == '__main__':
    orig_img_path = '/orig/images/path/'
    new_img_path = '/new/images/path_256/'

    boxsize = 256
    files = os.listdir(orig_img_path)
    for file in files:
        if file[-4:] == '.jpg':
            orig_img_name = orig_img_path + file
            if(os.path.isfile(orig_img_name)):
                img = cv2.imread(orig_img_name)
                height,width = float(img.shape[0]), float(img.shape[1])
                scale = min(boxsize/height, boxsize/width)

                img_resize = cv2.resize(img, (0, 0), fx=scale, fy=scale, interpolation=cv2.INTER_LANCZOS4)
                #plt.imshow(img_resize); plt.show()
                h, w = img_resize.shape[0], img_resize.shape[1]

                pad_up = abs(int((boxsize - h) / 2))  # up
                pad_down = abs(boxsize - h - pad_up)  # down
                pad_left = abs(int((boxsize - w) / 2))  # left
                pad_right = abs(boxsize - w - pad_left)  # right

                pad_img = np.lib.pad(img_resize, ((pad_up, pad_down), (pad_left, pad_right), (0, 0)), 'constant',
                                     constant_values=0)

                new_img_name = new_img_path + file
                cv2.imwrite(new_img_name, pad_img)

    print 'Done.'
3.1 估计单张图片中人体姿态 - demo.lua
require 'paths'
paths.dofile('util.lua')
paths.dofile('img.lua')

-- Load pre-trained model
m = torch.load('umich-stacked-hourglass.t7')

-- Set up input image
local im = image.load('image/' .. arg[1])

-- Get network output
local out = m:forward(im:view(1,3,256,256):cuda())
cutorch.synchronize()
local hms = out[#out][1]:float()
hms[hms:lt(0)] = 0
--print(hms:size())

-- Get predictions (hm and img refer to the coordinate space)
if hms:size():size() == 3 then
    hms = hms:view(1, hms:size(1), hms:size(2), hms:size(3))
end

---- Get locations of maximum activations
local max, idx = torch.max(hms:view(hms:size(1), hms:size(2), hms:size(3) * hms:size(4)), 3)
local preds = torch.repeatTensor(idx, 1, 1, 2):float()
preds[{{}, {}, 1}]:apply(function(x) return (x - 1) % hms:size(4) + 1 end)
preds[{{}, {}, 2}]:add(-1):div(hms:size(3)):floor():add(.5)

collectgarbage()

-- Save predictions
local predFile = hdf5.open('preds/pred.h5', 'w')
predFile:write('preds', preds)
predFile:write('img', im)
predFile:close()
3.2 批量图片中人体姿态估计 - demo_multi.lua
这个需要在 util.lua 中新增函数loadImageNames:
function loadImageNames(fileName)
    a = {}
    -- Load in image file names
    a.images = {}
    local namesFile = io.open(fileName)
    local idxs = 1
    for line in namesFile:lines() do
        print(line)
        a.images[idxs] = line
        idxs = idxs + 1
    end
    namesFile:close()
    a.nsamples = idxs-1

    return a
end
demo_multi.lua:
require 'paths'
paths.dofile('util.lua')
paths.dofile('img.lua')

--------------------------------------------------------------------------------
-- Initialization
--------------------------------------------------------------------------------
a =  loadImageNames(arg[1])

m = torch.load('umich-stacked-hourglass.t7')   -- Load pre-trained model

 -- Displays a convenient progress bar
idxs = torch.range(1, a.nsamples)
nsamples = idxs:nElement()

xlua.progress(0,nsamples)
preds = torch.Tensor(nsamples,16,2)
imgs = torch.Tensor(nsamples,3,256,256)

--------------------------------------------------------------------------------
-- Main loop
--------------------------------------------------------------------------------
for i = 1,nsamples do
    -- Set up input image
    --print(a['images'][idxs[i]])
    local im = image.load('image/' .. a['images'][idxs[i]])

    -- Get network output
    local out = m:forward(im:view(1,3,256,256):cuda())
    cutorch.synchronize()
    local hms = out[#out][1]:float()
    hms[hms:lt(0)] = 0

    -- Get predictions (hm and img refer to the coordinate space)
    if hms:size():size() == 3 then
    hms = hms:view(1, hms:size(1), hms:size(2), hms:size(3))
    end

    ---- Get locations of maximum activations
    local max, idx = torch.max(hms:view(hms:size(1), hms:size(2), hms:size(3) * hms:size(4)), 3)
    local preds_img = torch.repeatTensor(idx, 1, 1, 2):float()
    preds_img[{{}, {}, 1}]:apply(function(x) return (x - 1) % hms:size(4) + 1 end)
    preds_img[{{}, {}, 2}]:add(-1):div(hms:size(3)):floor():add(.5)

    preds[i]:copy(preds_img)
    imgs[i]:copy(im)

    xlua.progress(i,nsamples)

    collectgarbage()
end

-- Save predictions
local predFile = hdf5.open('preds/preds.h5', 'w')
predFile:write('preds', preds)
predFile:write('imgs', imgs)
predFile:close()
3.3 利用Python可视化结果:
#!/usr/bin/env python
import h5py
import scipy.misc as scm
import matplotlib.pyplot as plt

f = h5py.File('./preds/preds.h5','r')
imgs = f['imgs'][:]
preds = f['preds'][:]
f.close()

assert len(imgs) == len(preds)
for i in range(len(imgs)):
    pose = preds[i]*4  # 输入图片是 256×256,输出是64×64,4倍处理
    img = imgs[i].transpose(1,2,0)
    plt.axis('off')
    plt.imshow(img)
    for i in range(16):
        if pose[i][0] > 0 and pose[i][1] > 0:
            plt.scatter(pose[i][0], pose[i][1], marker='o', color='r', s=15)
    plt.show()

print 'Done.'
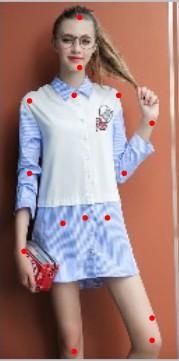
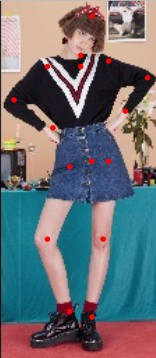
结果如下:
3 条评论
预训练模型文件在项目网站上找不到了,请问作者有保存到预训练模型吗?若有保存可否给我发一份?十分感谢
:lol:
:smile: