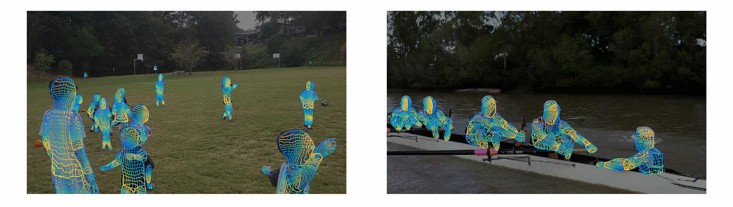
Facebook 发布的 DensePose 效果确实再次令人惊艳,一如 Detectron.

Github - DensePose
HomePage - densepose.org
Paper-2018
DensePose-RCNN 基于 Detectron 框架 和 Caffe2.
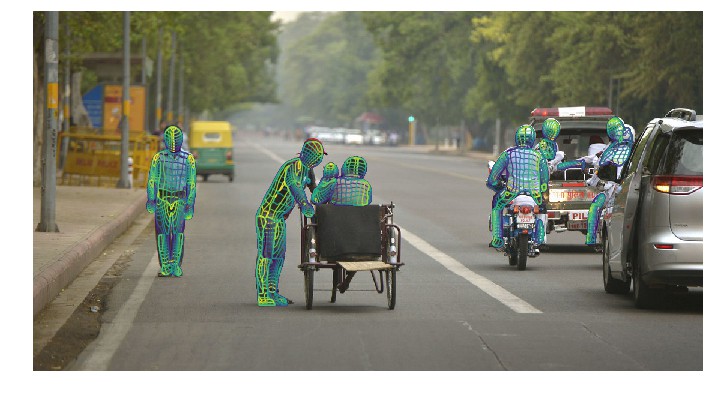
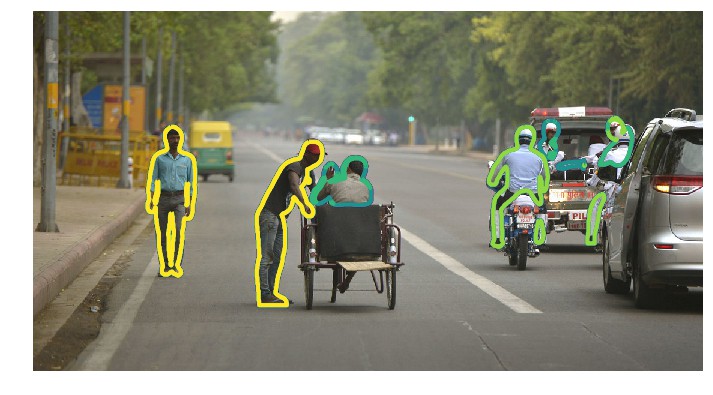
密集人体姿态估计的目标是,将RGB图片中所有人体像素点映射到人肢体的三维曲面.
如图: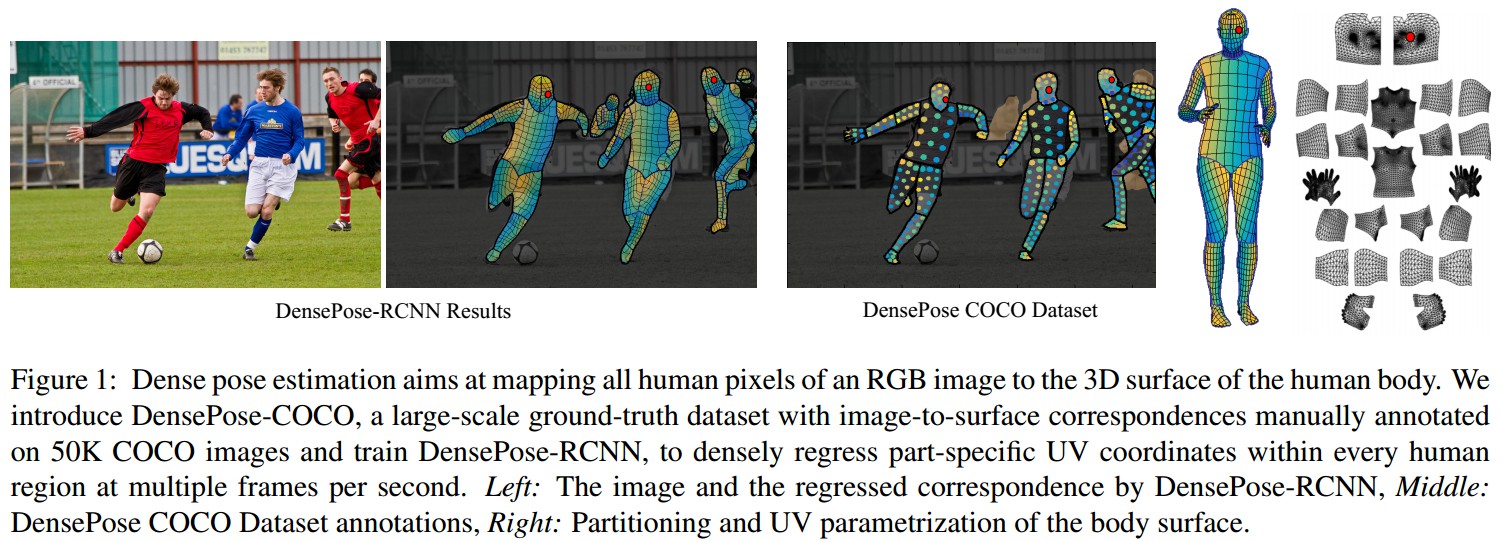
论文里介绍了 DensePose-COCO 数据集,其是在 50K COCO 图片上手工标注的图片-表面(image-to-surface)对应的大规模数据集.
1. DensePose 安装
1.1. Caffe2 和 Detectron 安装
需要先安装 Caffe2 和 Detectron.
环境:
- NVIDIA GPU, Linux, Python2
- Caffe2,
- COCO API
- numpy>=1.13
- pyyaml>=3.12
- matplotlib
- opencv-python>=3.2
- setuptools
- Cython
- mock
- scipy
- h5py
- memory_profiler
注意:
- Detectron Ops 还没有 CPU 实现,当前只支持 GPU 系统.
- Detecton 在 CUDA8.0 和 cuDNN 6.0.21 上测试.
安装 Caffe2 和 Deterctron 是否成功:
# To check if Caffe2 build was successful
python2 -c 'from caffe2.python import core' 2>/dev/null && echo "Success" || echo "Failure"
# 输出:Success

# To check if Caffe2 GPU build was successful
# This must print a number > 0 in order to use Detectron
python2 -c 'from caffe2.python import workspace; print(workspace.NumCudaDevices())'
# 输出:1
1.2 DensePose 安装
[1] - 克隆项目:
# DENSEPOSE=/path/to/clone/densepose
git clone https://github.com/facebookresearch/densepose $DENSEPOSE
[2] - 安装 Python 依赖库:
sudo pip install -r $DENSEPOSE/requirements.txt[3] - 设置 Python 模块,并测试 Detectron - SpatialNarrowAsOp test:
cd $DENSEPOSE && make
python2 $DENSEPOSE/detectron/tests/test_spatial_narrow_as_op.py
[4] - 创建自定义 Ops 库,并测试自定义 Op:
cd $DENSEPOSE && make ops
python2 $DENSEPOSE/detectron/tests/test_zero_even_op.py
安装成功.
1.3. DensePose Docker 安装
因为需要用到 NVIDIA 显卡,需要安装 nvidia-docker,可参考:Docker - 基于NVIDIA-Docker的Caffe-GPU环境搭建
DensePose 提供的 Dockerfile.
# Use Caffe2 image as parent image
FROM caffe2/caffe2:snapshot-py2-cuda9.0-cudnn7-ubuntu16.04

RUN mv /usr/local/caffe2 /usr/local/caffe2_build
ENV Caffe2_DIR /usr/local/caffe2_build

ENV PYTHONPATH /usr/local/caffe2_build:${PYTHONPATH}
ENV LD_LIBRARY_PATH /usr/local/caffe2_build/lib:${LD_LIBRARY_PATH}

# Clone the Detectron repository
RUN git clone https://github.com/facebookresearch/densepose /densepose

# Install Python dependencies
RUN pip install -r /densepose/requirements.txt

# Install the COCO API
RUN git clone https://github.com/cocodataset/cocoapi.git /cocoapi
WORKDIR /cocoapi/PythonAPI
RUN make install

# Go to Densepose root
WORKDIR /densepose

# Set up Python modules
RUN make

# [Optional] Build custom ops
RUN make ops- 创建 DensePose 镜像:
cd $DENSEPOSE/docker
sudo docker build -t densepose:c2-cuda9-cudnn7 .
运行镜像图片测试:
sudo nvidia-docker run --rm -it densepose:c2-cuda9-cudnn7 python2 detectron/tests/test_batch_permutation_op.py1.4. 下载 DensePose 数据
[1] - train/evaluate DensePose 数据:
cd $DENSEPOSE/DensePoseData
bash get_densepose_uv.sh
[2] - 训练数据集 - DensePose-COCO dataset:
bash get_DensePose_COCO.sh[3] - evaluation 数据:
bash get_eval_data.sh1.5. COCO 数据集设置
在 datasets/data 创建 COCO 数据集链接:
ln -s /path/to/coco $DENSEPOSE/detectron/datasets/data/coco创建 DensePose-COCO 数据集链接:
ln -s $DENSEPOSE/DensePoseData/DensePose_COCO/densepose_coco_2014_minival.json $DENSEPOSE/detectron/datasets/data/coco/annotations/
ln -s $DENSEPOSE/DensePoseData/DensePose_COCO/densepose_coco_2014_train.json $DENSEPOSE/detectron/datasets/data/coco/annotations/
ln -s $DENSEPOSE/DensePoseData/DensePose_COCO/densepose_coco_2014_valminusminival.json $DENSEPOSE/detectron/datasets/data/coco/annotations/
本地的 COCO 数据集 /path/to/coco 的组织形式应该类似于:
coco
|_ coco_train2014
|  |_ <im-1-name>.jpg
|  |_ ...
|  |_ <im-N-name>.jpg
|_ coco_val2014
|_ ...
|_ annotations
   |_ instances_train2014.json
   |_ ...
2. DensePose 的测试与训练
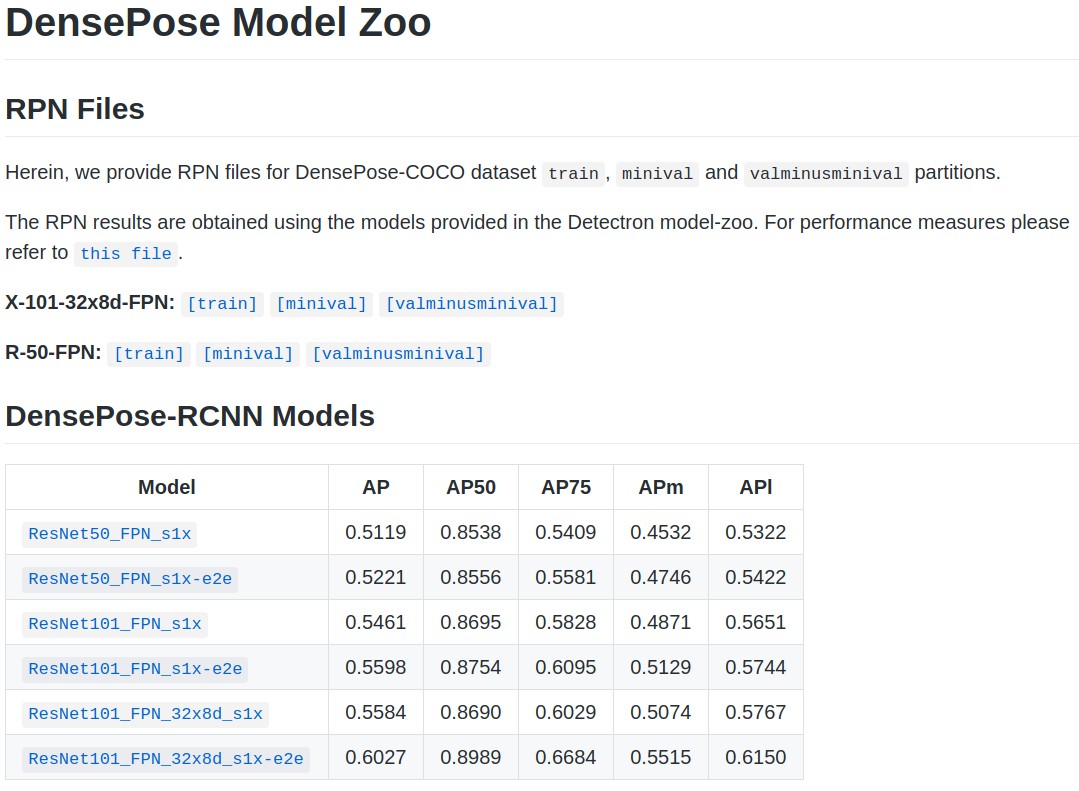
[[DensePose Model Zoo]](https://github.com/facebookresearch/DensePose/blob/master/MODEL_ZOO.md)
2.1. 利用 DensePose 预训练模型测试图片
类似于 Detectron.
预训练模型:end-to-end trained DensePose-RCNN model with a ResNet-101-FPN backbone.
测试单张图片:
python2 tools/infer_simple.py \
    --cfg configs/DensePose_ResNet101_FPN_s1x-e2e.yaml \
    --output-dir DensePoseData/infer_out/ \
    --image-ext jpg \
    --wts https://s3.amazonaws.com/densepose/DensePose_ResNet101_FPN_s1x-e2e.pkl \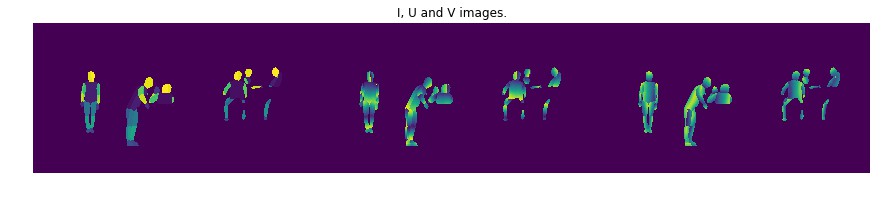
DensePoseData/demo_data/demo_im.jpg--wts- 指定的模型 URL,自动下载模型--output-dir- 输出的可视化结果保存路径,包括三个文件,.jpg.pdf,_INDS.png和_IUV.png.
输出的两张 png 图片的可视化,可以参考 - DensePose-RCNN-Visualize-Results.ipynb
import numpy
import cv2
import matplotlib.pyplot as plt
import numpy as np

im  = cv2.imread('../DensePoseData/demo_data/demo_im.jpg')
IUV = cv2.imread('../DensePoseData/infer_out/demo_im_IUV.png')
INDS = cv2.imread('../DensePoseData/infer_out/demo_im_INDS.png',  0)

# I, U 和 V images 可视化
fig = plt.figure(figsize=[15,15])
plt.imshow(   np.hstack((IUV[:,:,0]/24. ,IUV[:,:,1]/256. ,IUV[:,:,2]/256.))  )
plt.title('I, U and V images.')
plt.axis('off') ; plt.show()

# UV 场的等值线可视化
fig = plt.figure(figsize=[12,12])
plt.imshow( im[:,:,::-1] )
plt.contour( IUV[:,:,1]/256.,10, linewidths = 1 )
plt.contour( IUV[:,:,2]/256.,10, linewidths = 1 )
plt.axis('off') ; plt.show()

# 人体前景FG mask 可视化
fig = plt.figure(figsize=[12,12])
plt.imshow( im[:,:,::-1] )
plt.contour( INDS, linewidths = 4 )
plt.axis('off') ; plt.show()
依次输出:
2.2. 利用 DensePose 预训练模型在测试数据集上
采用单张 GPU 测试,在 coco_2014_minval 测试数据集上:
python2 tools/test_net.py \
        --cfg configs/DensePose_ResNet101_FPN_s1x-e2e.yaml \
        TEST.WEIGHTS https://s3.amazonaws.com/densepose/DensePose_ResNet101_FPN_s1x-e2e.pkl \
        NUM_GPUS 1
2.3. DensePose 模型训练
在 DensePose-COCO 数据集上进行模型训练.
DensePose 提供的预训练模型是采用 8 GPUs 进行的.
类似于 Detectron,DensePose 也采用线性缩放来适应不同的学习策略.
参考论文 - [Accurate, Large Minibatch SGD: Training ImageNet in 1 Hour]()
基于 ResNet-50-FPN backbone 的 DensePose-RCNN 训练:
python2 tools/train_net.py \
        --cfg configs/DensePose_ResNet50_FPN_single_GPU.yaml \
        OUTPUT_DIR /tmp/detectron-output
15 条评论
densepose怎么在视频中测试呀?
最简单的方法,将视频作为图片帧处理.
你好,由于2020年Pytorch不支持python2.7,请问你的DensePose项目还能运行吗?能否给我一版本你的Pytorch的文档。我能否在安装的过程中,和你请教相关的DensePose安装的问题。
可以下载历史版本的 pytorch 试试.
在什么地方下载呢?我一直找不见下载pytorch源码的网址。能加个qq和你请教问题吗?我的是946320212
pip 安装指定版本即可.
我能加你的qq或者微信吗,pytorch哪一个版本能够运行Densepose?希望能够和你请教相关的问题,万分感谢!!!
这个用基于 pytorch 和 detectron2 版的. 这个 pytorch≥1.4 版本.https://github.com/facebookresearch/detectron2/tree/master/projects/DensePose
大佬你好,请问是不是本地得有coco数据集
训练是要有训练数据集
hello,关于DensePose 模型训练想问个小问题哈,输入的图片是原始图片还是已经经过标注有标注点结果的图片呢?期待您百忙中能够回复,谢谢~
代码里的有数据加载的实现,可参考https://github.com/facebookresearch/DensePose/blob/master/detectron/datasets/json_dataset.py
谢谢您的回复,我现在想要做一个用于标注原始图片的平台,请问哪里可以看到原始标注数据集的格式呢?谢谢~~
DensePose-COCO-Visualize.ipynb
太感谢了~