Elasticsearch 是一个分布式、RESTful 风格的搜索和数据分析引擎,能够解决不断涌现出的各种用例.
1. ElasticSearch 基本概念
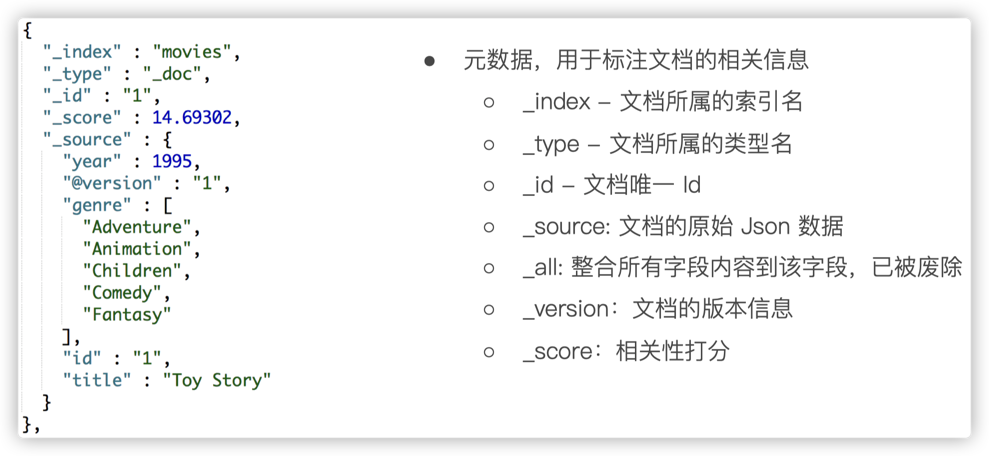
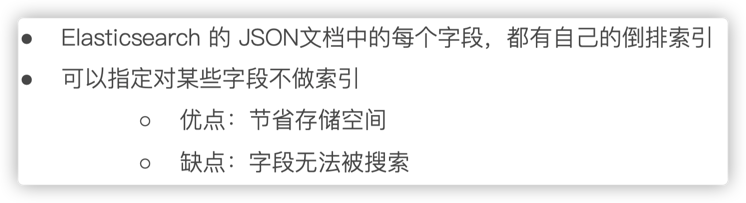
1.1. 文档(Document)

JSON 文档:

1.2. 文档的元数据
1.3. 索引(index)
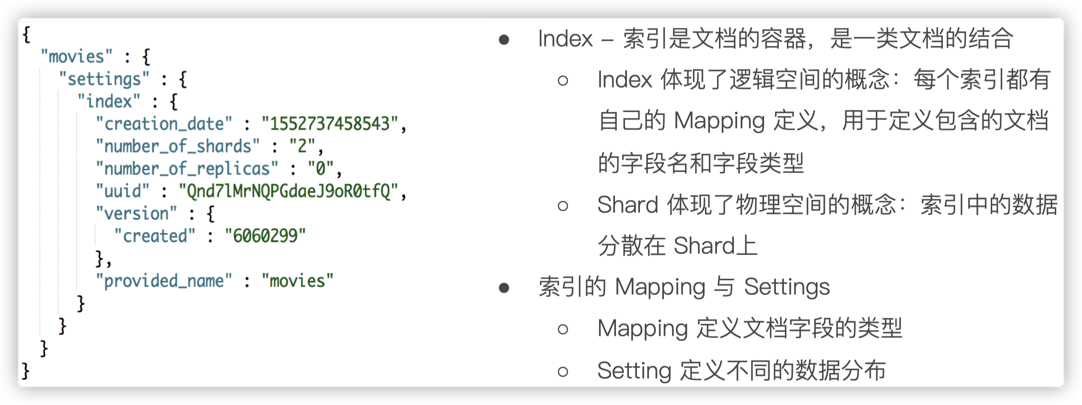
索引的不同语意:

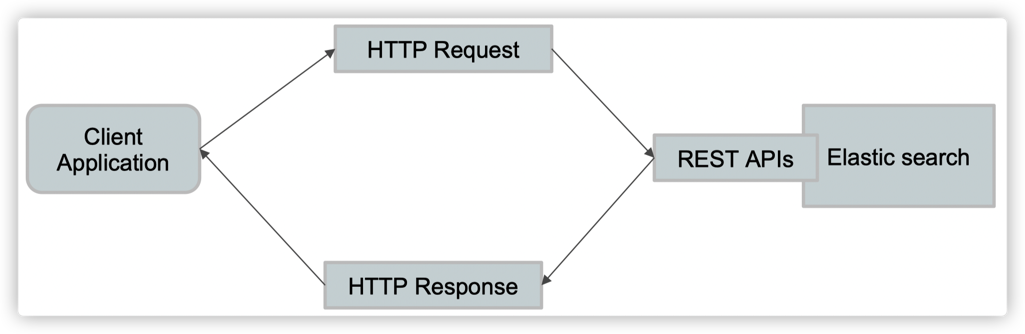
1.4. REST API
1.5. 倒排
1.5.1. 图书和搜索引擎的类比

1.5.2. 正排索引

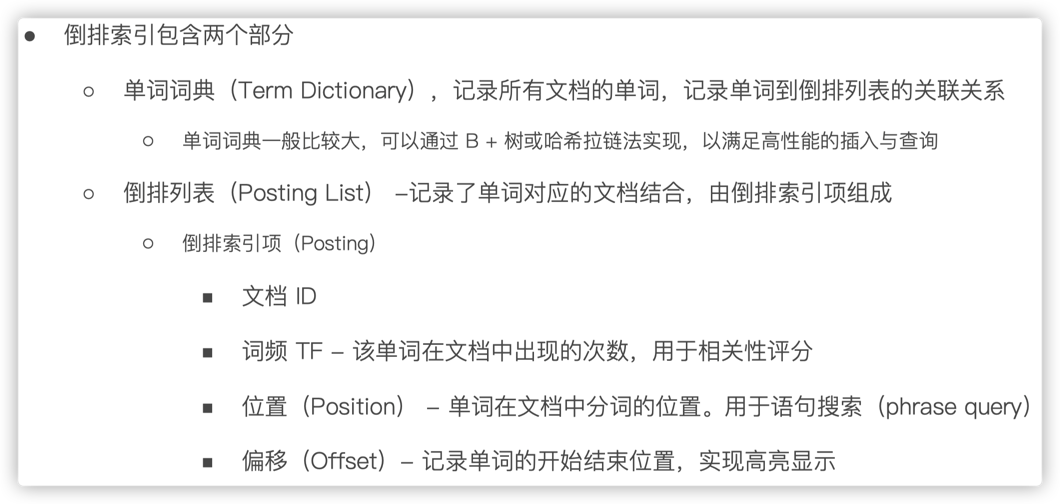
1.5.3. 倒排索引的核心组成
1.5.4. 示例 - Elasticsearch
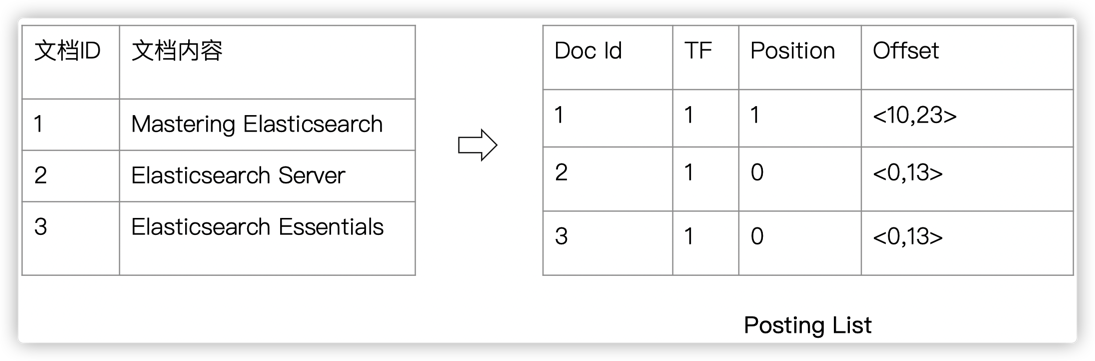
1.5.5. 倒排索引
2. Docker 中部署 ElasticSearch
传统方式安装 ElasticSearch,一般是从官网下载安装包,在宿主机进行手工解压编译安装. 但还是稍显繁琐.
这里采用 Docker 的方式. 以 ElasticSearch 7.9.2 为例.
Install Elasticsearch with Docker
拉取镜像
docker pull elasticsearch:7.9.2
#docker pull docker.elastic.co/elasticsearch/elasticsearch:7.9.2
2.1. 开发模式运行
创建用户定义网络,以便于连接到相同网络的其它服务的运行,如 Kibana:
docker network create elasticsearch_network运行 ElasticSearch:
docker run -d --name elasticsearch_dev --net elasticsearch_network -p 9200:9200 -p 9300:9300 -e "discovery.type=single-node" elasticsearch:7.9.2其中,
[1] - --name - 指的是创建的容器的名称
[2] - -d - 标识后台运行 -
[3] - -net host - 指为这个容器指定的网络组为host
[4] - -p - 标识端口映射,宿主机端口:容器端口
[5] - -e "discovery.type=single-node" - 指定单节点模式运行
2.2. Docker 中插件安装
https://www.elastic.co/guide/en/elasticsearch/plugins/current/intro.html
插件安装需要在 ElasticSearch 容器内部进行,首先,进入容器:
docker exec -it 镜像名 /bin/bash
#或
docker exec -it [容器_ID] /bin/bash
这里以 IK 分词器插件为例,Github-medcl/elasticsearch-analysis-ik 中,选择与 ElasticSearch 版本对应的插件版本.
安装如,
./bin/elasticsearch-plugin install https://github.com/medcl/elasticsearch-analysis-ik/releases/download/v7.9.2/elasticsearch-analysis-ik-7.9.2.zip安装成功后,可以查看安装的插件列表:
./bin/elasticsearch-plugin list注:如果业务固定,更推荐基于 es 的镜像制作一个带插件的 es 镜像
注 - 分词器:
[1] - https://github.com/microbun/elasticsearch-thulac-plugin
[2] - https://www.elastic.co/guide/cn/elasticsearch/guide/current/icu-tokenizer.html
2.3. Docker 中部署 Kibana
Kibana 是 Elasticsearch优秀的可视化的开源分析工具.
这里采用 Docker 方式部署 Kinaba. (注:Kibana 和 ElasticSearch 一定要保持版本一致.)
Running Kibana on Docker
拉取镜像:
docker pull kibana:7.9.2kibana.yml:
server.name: kibana
server.host: "0"
elasticsearch.hosts: [ "http://192.168.1.7:9200" ]
运行镜像:
docker run -d --name kibana_dev -v /path/to/kibana.yml:/usr/share/kibana/config/kibana.yml --net elasticsearch_network -p 5601:5601 kibana:7.9.2

docker run -d --name kibana_dev -e ELASTICSEARCH_URL=http://192.168.1.7:9200 -p 5601:5601 kibana:7.9.2
http://192.168.1.7:5601/ 即可访问 kibana.
3.ElasticSearch - curl
所有其他语言可以使用 RESTful API 通过端口 9200 和 Elasticsearch 进行通信,可以用 web 客户端访问 Elasticsearch . 也可以使用 curl 命令来和 Elasticsearch 交互.
Elasticsearch 为Groovy、JavaScript、.NET、 PHP、 Perl、 Python 和 Ruby 等编程语言提供了官方客户端,还有很多社区提供的客户端和插件,所有这些都可以在 Elasticsearch Clients 中找到.
一个 Elasticsearch 请求和任何 HTTP 请求一样由若干相同的部件组成:
curl -X<VERB> '<PROTOCOL>://<HOST>:<PORT>/<PATH>?<QUERY_STRING>' -d '<BODY>'其中,<> 参数说明如:
| 标识 | 说明 |
|---|---|
| VERB | 适当的 HTTP 方法 或 谓词 : GET、 POST、 PUT、 HEAD 或者 DELETE。 |
| PROTOCOL | http 或者 https(如果在 Elasticsearch 前面有一个 https 代理) |
| HOST | Elasticsearch 集群中任意节点的主机名,或者用 localhost 代表本地机器上的节点。 |
| PORT | 运行 Elasticsearch HTTP 服务的端口号,默认是 9200 。 |
| PATH | API 的终端路径(例如 _count 将返回集群中文档数量)。Path 可能包含多个组件,例如:_cluster/stats 和 _nodes/stats/jvm 。 |
| QUERY_STRING | 任意可选的查询字符串参数 (例如 ?pretty 将格式化地输出 JSON 返回值,使其更容易阅读) |
| BODY | 一个 JSON 格式的请求体 (如果请求需要的话) |
3.1. 文档的CRUD

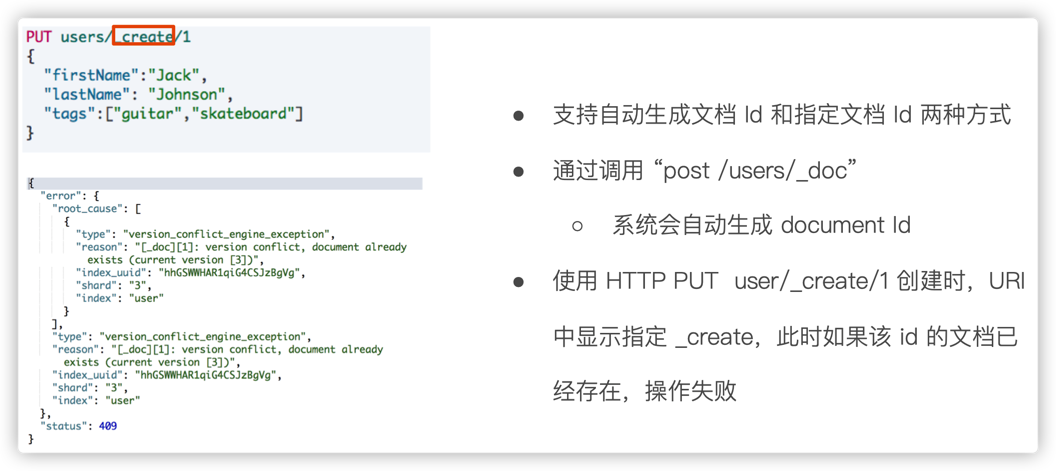
3.2. Create 一个文档
3.3. Get 一个文档

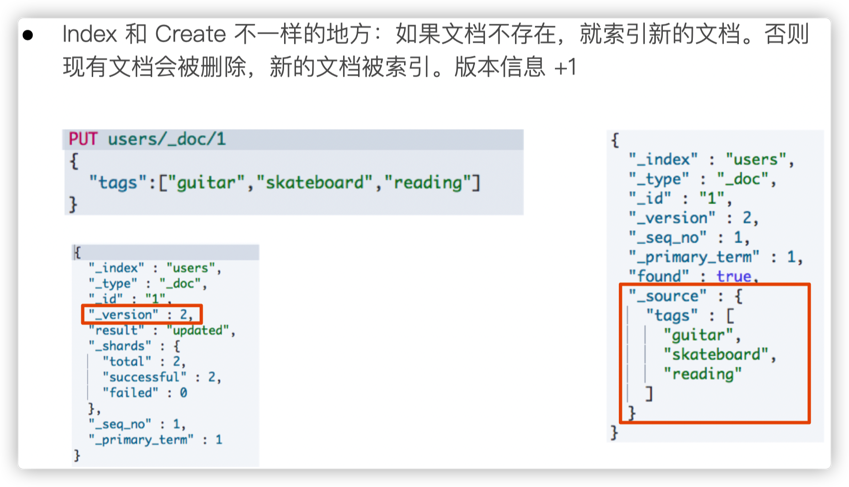
3.4. Index 文档
3.5. Update 文档

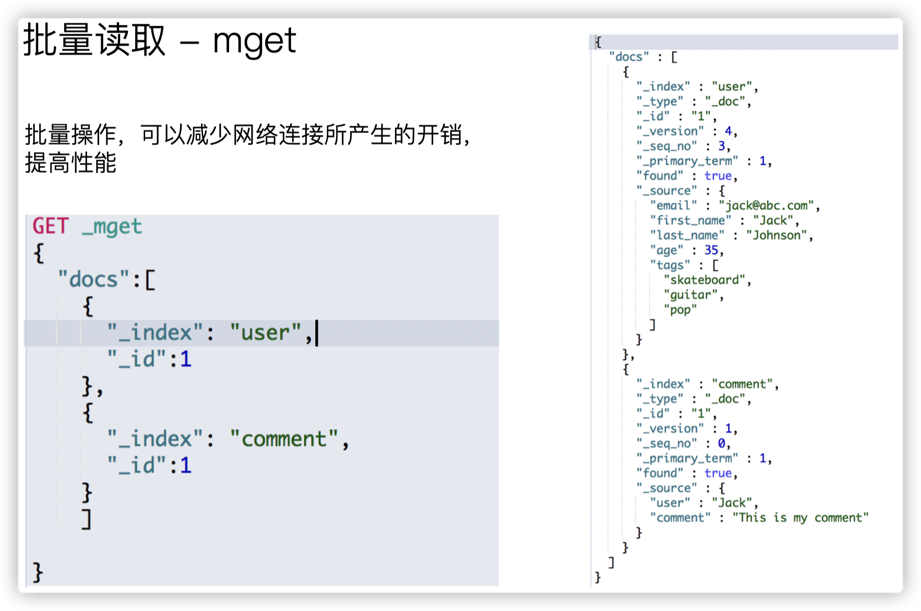
3.6. mget 批量读取
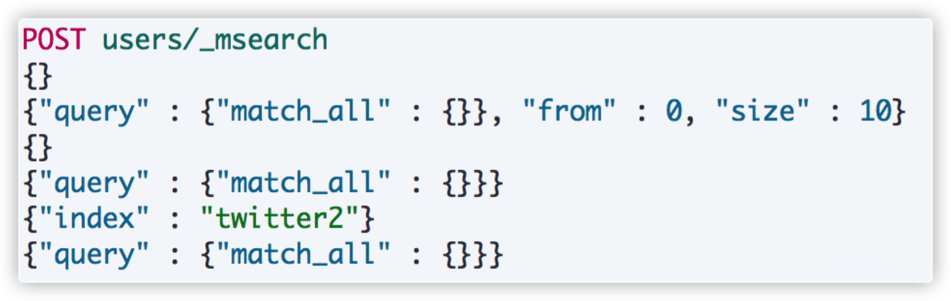
3.7. msearch 批量查询
示例如,计算集群中文档的数量:
curl -XGET 'http://localhost:9200/_count?pretty' -d '
{
    "query": {
        "match_all": {}
    }
}
'
Elasticsearch 返回一个 HTTP 状态码(例如:200 OK)和(除HEAD请求)一个 JSON 格式的返回值。前面的 curl 请求将返回一个像下面一样的 JSON 体:
{
    "count" : 0,
    "_shards" : {
        "total" : 5,
        "successful" : 5,
        "failed" : 0
    }
}
https://www.elastic.co/guide/cn/elasticsearch/guide/current/_talking_to_elasticsearch.html
3.1. 示例 - IK 分词器使用
https://github.com/medcl/elasticsearch-analysis-ik
[1] - 创建索引(index)
curl -XPUT http://localhost:9200/index[2] - 创建映射(mapping)
curl -XPOST http://localhost:9200/index/_mapping -H 'Content-Type:application/json' -d'
{
        "properties": {
            "content": {
                "type": "text",
                "analyzer": "ik_max_word",
                "search_analyzer": "ik_smart"
            }
        }

}'
[3] - 索引文档
curl -XPOST http://localhost:9200/index/_create/1 -H 'Content-Type:application/json' -d'
{"content":"美国留给伊拉克的是个烂摊子吗"}
'

curl -XPOST http://localhost:9200/index/_create/2 -H 'Content-Type:application/json' -d'
{"content":"公安部:各地校车将享最高路权"}
'

curl -XPOST http://localhost:9200/index/_create/3 -H 'Content-Type:application/json' -d'
{"content":"中韩渔警冲突调查:韩警平均每天扣1艘中国渔船"}
'

curl -XPOST http://localhost:9200/index/_create/4 -H 'Content-Type:application/json' -d'
{"content":"中国驻洛杉矶领事馆遭亚裔男子枪击 嫌犯已自首"}
'
[4] - 高亮查询
curl -XPOST http://localhost:9200/index/_search  -H 'Content-Type:application/json' -d'
{
    "query" : { "match" : { "content" : "中国" }},
    "highlight" : {
        "pre_tags" : ["<tag1>", "<tag2>"],
        "post_tags" : ["</tag1>", "</tag2>"],
        "fields" : {
            "content" : {}
        }
    }
}
'
返回结果,如:
{
    "took": 14,
    "timed_out": false,
    "_shards": {
        "total": 5,
        "successful": 5,
        "failed": 0
    },
    "hits": {
        "total": 2,
        "max_score": 2,
        "hits": [
            {
                "_index": "index",
                "_type": "fulltext",
                "_id": "4",
                "_score": 2,
                "_source": {
                    "content": "中国驻洛杉矶领事馆遭亚裔男子枪击 嫌犯已自首"
                },
                "highlight": {
                    "content": [
                        "<tag1>中国</tag1>驻洛杉矶领事馆遭亚裔男子枪击 嫌犯已自首 "
                    ]
                }
            },
            {
                "_index": "index",
                "_type": "fulltext",
                "_id": "3",
                "_score": 2,
                "_source": {
                    "content": "中韩渔警冲突调查:韩警平均每天扣1艘中国渔船"
                },
                "highlight": {
                    "content": [
                        "均每天扣1艘<tag1>中国</tag1>渔船 "
                    ]
                }
            }
        ]
    }
}
4. ElasticSearch - python
通过 Pip 安装 ElasticSearch 客户端,如:
pip install elasticsearch异步客户端:
pip install elasticsearch[async]参考:
示例如:
from elasticsearch import Elasticsearch

esclient = Elasticsearch(['localhost:9200'])
response = esclient.search(
  index='social-*',
  body={
    "query": {
      "match": {
        "message": "myProduct"
      }
    },
    "aggs": {
      "top_10_states": {
        "terms": {
          "field": "state",
          "size": 10
        }
      }
    }
  }
)
常用命令如下:
4.1. 文档索引
建立文档索引,需要指定三个信息:index,idx 和 body.
示例一,如:
from datetime import datetime
from elasticsearch import Elasticsearch

es = Elasticsearch()

body = {
    'author': 'author_name',
    'text': 'Interensting content...',
    'timestamp': datetime.now(),
}
res = es.index(index="test-index", id=1, body=body)
print(res['result'])
示例2,如:
#创建索引,若存在即忽略
#指定建立的类型,所用分词器,是否建立索引等,即预先定义好字段
body = {
    'mappings': {
            'properties': {
                'uuid':{
                    'type':'keyword',
                    'index':'true'
                    },
                'url':{
                    'type':'text',
                    'index':'false'
                    },
                'title': {
                    'type': 'text',
                    'index':'true',
                    'analyzer': 'ik_max_word',
                    'search_analyzer':'ik_max_word'
                    },
                'text':{
                    'type': 'text',
                    'index':'true',
                    'analyzer': 'ik_max_word',
                    'search_analyzer':'ik_max_word'
                    }
                }
            }
        }
es.indices.create(index='test',ignore=400,body=body)
#插入数据
actions={
        'uuid':data_id,
        'url':data_url,
        'title':data_title,
        'text':data_text
        }
es.index(index="test",body = actions)
4.2. 文档读取
文档读取,需要指定其 index 和 id。
res = es.get(index="test-index", id=1)
print(res['_source'])
4.3. 索引刷新
对索引进行刷新(refresh).
es.indices.refresh(index="test-index")4.4. 文档搜索
采用 search() 返回与查询相匹配的结果.
示例一,如:
res = es.search(index="test-index", body={"query": {"match_all": {}}})
print("Got %d Hits:" % res['hits']['total']['value'])
for hit in res['hits']['hits']:
    print("%(timestamp)s %(author)s: %(text)s" % hit["_source"])
示例二,如:
body_query = {
    "query":{
        "match":{
            "text":"运动"
        }
    }
}
res=es.search(index="test",size='200')
#按条件查询数目
query_str={'query':{'match':{'cgdsId': cgds_code}}}
total_num_data= es.count(index=index, body=query_str)['count']
4.5. 文档更新
文档更新(update),需要指定三个信息:index,id 和 body.
from datetime import datetime
from elasticsearch import Elasticsearch

es = Elasticsearch()

doc = {
    'author': 'author_name',
    'text': 'Interensting modified content...',
    'timestamp': datetime.now(),
}
res = es.update(index="test-index", id=1, body=doc)
print(res['result'])
4.6. 文档删除
文档删除,需要指定其 index 和 id.
es.delete(index="test-index", id=1)参考
[1] - Docker 中部署 ElasticSearch 以及安装 IK 分词器插件