Detectron 的 Pytorch 1.0 版本.
maskrcnn-benchmark 是在 PyTorch 1.0 版本框架实现的,实例分割和目标检测算法的快速、模块化开源实现,如 Faster R-CNN 和 Mask R-CNN 算法.
特点:
[1] - 基于 PyTorch 1.0
RPN,Faster R-CNN 和 Mask R-CNN 的实现,精度与 Detectron 相比,差不多,甚至超过后者.
[2] - 速度非常快 very fast
训练时,相比于 Detectron,速度快了 2x 倍;相比于 mmdetection 速度快了 30%.
[3] - 内存占用更少 Memory efficient
训练时,与 mmdetection 相比,GPU 显存少了大约 500 MB.
[4] - 支持多GPU训练和推断 Multi-GPU training and inference
[5] - 批量化推断 Batched inference
在每张 GPU 显卡上,每个batch可以多张图像进行推断.
[6] - 支持 CPU 推断 CPU support for inference
能够在 CPU 上进行推断. 例如,webcam demo.
[7] - 提供了参考 Mask R-CNN 和 Faster R-CNN 预训练模型和对应的 1x schedule 配置参数.
1. maskrcnn-benchmark 安装
项目安装说明 - INSTALL.md
maskrcnn-benchmark 基于 PyTorch 1.0,提供的安装说明是基于 PyTorch 1.0 nightly release 版本. 不过现在 PyTorch 1.0 正式版已经发布,这里采用了 PyTorch 1.0 正式版,Ubuntu16.04.
1.1 Ubuntu 环境下的安装
sudo pip3 install torch torchvision其它依赖项:
sudo pip3 install ninja yacs cython matplotlib

#安装 pycocotools
cd $INSTALL_DIR
git clone https://github.com/cocodataset/cocoapi.git
cd cocoapi/PythonAPI
sudo python setup.py build_ext install

#安装 apex
cd $INSTALL_DIR
git clone https://github.com/NVIDIA/apex.git
cd apex
sudo python setup.py install --cuda_ext --cpp_ext
maskrcnn-benchmark 安装:
cd maskrcnn-benchmark/
# 安装相关 lib,创建软连接,可进行修改.
sudo python3 setup.py build develop
1.2 Docker 镜像(只支持Linux)
默认镜像的创建:CUDA=9.0/CUDNN=7:
sudo nvidia-docker build -t maskrcnn-benchmark docker/其它 CUDA 和 CUDNN 版本的镜像:
sudo nvidia-docker build -t maskrcnn-benchmark --build-arg CUDA=9.2 --build-arg CUDNN=7 docker/ 镜像创建,并在 jupyter notebook 中运行镜像:
sudo nvidia-docker build -t maskrcnn-benchmark-jupyter docker/docker-jupyter/
sudo nvidia-docker run -td -p 8888:8888 -e PASSWORD=<password> -v <host-dir>:<container-dir> maskrcnn-benchmark-jupyter
其中,password 用于登录 jupyter notebook.
2. Model_Zoo 和 Baselines
硬件环境:
- 8 NVIDIA V100 GPUs
软件环境:
- PyTorch version: 1.0.0a0+dd2c487
- CUDA 9.2
- CUDNN 7.1
- NCCL 2.2.13-1
2.1 End-to-end Faster and Mask R-CNN baselines
这里的 baselines 模型的训练采用了与 Detectron 相同的参数配置. 如 Detectron,检测模型的权重初始化采用了 ImageNet 的 Caffe2 预训练权重.
预训练模型(model id) 如下:
| backbone | type | lr sched | im / gpu | train mem(GB) | inference time(s/im) | box AP | mask AP | model id |
|---|---|---|---|---|---|---|---|---|
| R-50-C4 | Fast | 1x | 1 | 5.8 | 0.17130 | 34.8 | - | 6358800 |
| R-50-FPN | Fast | 1x | 2 | 4.4 | 0.12580 | 36.8 | - | 6358793 |
| R-101-FPN | Fast | 1x | 2 | 7.1 | 0.143149 | 39.1 | - | 6358804 |
| X-101-32x8d-FPN | Fast | 1x | 1 | 7.6 | 0.209965 | 41.2 | - | 6358717 |
| R-50-C4 | Mask | 1x | 1 | 5.8 | 0.17796 + 0.028 | 35.6 | 31.5 | 6358801 |
| R-50-FPN | Mask | 1x | 2 | 5.2 | 0.12966 + 0.034 | 37.8 | 34.2 | 6358792 |
| R-101-FPN | Mask | 1x | 2 | 7.9 | 0.15384 + 0.034 | 40.1 | 36.1 | 6358805 |
| X-101-32x8d-FPN | Mask | 1x | 1 | 7.8 | 0.21739 + 0.034 | 42.2 | 37.8 | 6358718 |
2.2 与 Detectron 和 mmdetection 对比
Detectron 和 mmdetection相对比,进行分析,包括训练速度,训练显存占用,精度等.
2.2.1 训练速度
如下表,表格里的值为 seconds/iteration,值越小越好.
| type | Detectron (P100) | mmdetection (V100) | maskrcnn_benchmark (V100) |
|---|---|---|---|
| Faster R-CNN R-50 C4 | 0.566 | - | 0.4036 |
| Faster R-CNN R-50 FPN | 0.544 | 0.554 | 0.3530 |
| Faster R-CNN R-101 FPN | 0.647 | - | 0.4591 |
| Faster R-CNN X-101-32x8d FPN | 0.799 | - | 0.7007 |
| Mask R-CNN R-50 C4 | 0.620 | - | 0.4520 |
| Mask R-CNN R-50 FPN | 0.889 | 0.690 | 0.4536 |
| Mask R-CNN R-101 FPN | 1.008 | - | 0.5665 |
| Mask R-CNN X-101-32x8d FPN | 0.961 | - | 0.7562 |
2.2.2 训练显存占用
如下表,值越小越好.
| type | Detectron (P100) | mmdetection (V100) | maskrcnn_benchmark (V100) |
|---|---|---|---|
| Faster R-CNN R-50 C4 | 6.3 | - | 5.8 |
| Faster R-CNN R-50 FPN | 7.2 | 4.9 | 4.4 |
| Faster R-CNN R-101 FPN | 8.9 | - | 7.1 |
| Faster R-CNN X-101-32x8d FPN | 7.0 | - | 7.6 |
| Mask R-CNN R-50 C4 | 6.6 | - | 5.8 |
| Mask R-CNN R-50 FPN | 8.6 | 5.9 | 5.2 |
| Mask R-CNN R-101 FPN | 10.2 | - | 7.9 |
| Mask R-CNN X-101-32x8d FPN | 7.7 | - | 7.8 |
2.2.3 精度
如下表,值越高越好.
| type | Detectron (P100) | mmdetection (V100) | maskrcnn_benchmark (V100) |
|---|---|---|---|
| Faster R-CNN R-50 C4 | 34.8 | - | 34.8 |
| Faster R-CNN R-50 FPN | 36.7 | 36.7 | 36.8 |
| Faster R-CNN R-101 FPN | 39.4 | - | 39.1 |
| Faster R-CNN X-101-32x8d FPN | 41.3 | - | 41.2 |
| Mask R-CNN R-50 C4 | 35.8 & 31.4 | - | 35.6 & 31.5 |
| Mask R-CNN R-50 FPN | 37.7 & 33.9 | 37.5 & 34.4 | 37.8 & 34.2 |
| Mask R-CNN R-101 FPN | 40.0 & 35.9 | - | 40.1 & 36.1 |
| Mask R-CNN X-101-32x8d FPN | 42.1 & 37.3 | - | 42.2 & 37.8 |
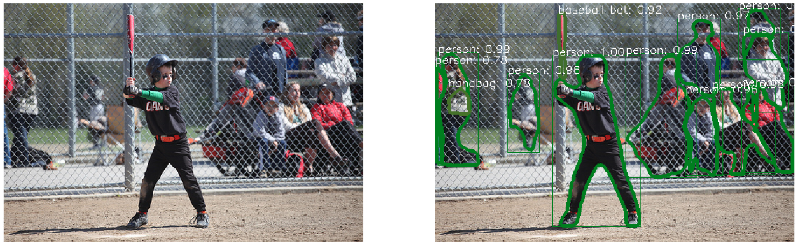
3. Mask R-CNN demo
#!--*-- coding:utf-8 --*--

import matplotlib.pyplot as plt
import matplotlib.pylab as pylab

import requests
from io import BytesIO
from PIL import Image
import numpy as np

pylab.rcParams['figure.figsize'] = 20, 12

from maskrcnn_benchmark.config import cfg
from predictor import COCODemo


# 参数配置文件
config_file = "../configs/caffe2/e2e_mask_rcnn_R_50_FPN_1x_caffe2.yaml"

cfg.merge_from_file(config_file)
cfg.merge_from_list(["MODEL.DEVICE", "cpu"])
cfg.MODEL.WEIGHT = '../pretrained/e2e_mask_rcnn_R_50_FPN_1x.pth'

coco_demo = COCODemo(cfg, min_image_size=800, confidence_threshold=0.7, )

if False:
    # imgurl = "http://farm3.staticflickr.com/2469/3915380994_2e611b1779_z.jpg"
    # response = requests.get(imgurl)
    # pil_image = Image.open(BytesIO(response.content)).convert("RGB")
else:
    imgfile = './test/2417959.jpg'
    pil_image = Image.open(imgfile).convert("RGB")

image = np.array(pil_image)[:, :, [2, 1, 0]]

# forward predict
predictions = coco_demo.run_on_opencv_image(image)

# vis
plt.subplot(1, 2, 1)
plt.imshow(image[:,:,::-1])
plt.axis('off')

plt.subplot(1, 2, 2)
plt.imshow(predictions[:,:,::-1])
plt.axis('off')
plt.show()
如:
4. 模型训练
4.1 在 COCO 数据集上训练
采用 Detectron 的 minival 和 valminusminival数据集进行模型训练.
建立数据集软连接:
# COCO 数据集:
cd ~/github/maskrcnn-benchmark
mkdir -p datasets/coco
ln -s /path_to_coco_dataset/annotations datasets/coco/annotations
ln -s /path_to_coco_dataset/train2014 datasets/coco/train2014
ln -s /path_to_coco_dataset/test2014 datasets/coco/test2014
ln -s /path_to_coco_dataset/val2014 datasets/coco/val2014
# Pascal voc 数据集:
ln -s /path_to_VOCdevkit_dir datasets/voc
也可以配置自定义数据集路径. 对此,需要修改 maskrcnn_benchmark/config/paths_catalog.py 中数据集保存的路径位置.
也可以新建 paths_catalog.py 文件,来实现相同的两个类classes,然后,在训练时,作为配置参数 PATHS_CATALOG 进行传递.
4.2 单 GPU 训练
该项目里提供的大部分配置文件是默认在 8 张 GPUs 进行训练的. 为了能够在只有较少 GPUs 时运行,还提供了少量单 GPU 训练配置参数文件等.
[1] - 直接运行如下命令:
python /path_to_maskrcnn_benchmark/tools/train_net.py
                    --config-file "/path/to/config/file.yaml"
该命令应该是可以正常运行的,且很类似于在 multi-GPU 的训练. 但,其缺点在于,会占用更多的 GPU 显存. 其原因是,在配置文件中,global batch size 是根据 GPUs 数量进行划分的;如果只有单张 GPU,则,意味着其 batch size 是 8x 的,可能会导致出现显存不足的问题.
如果显存足够的话,这是最简单的方案.
[2] - 修改 cfg参数:
如果遇到显存不足的问题,可以减少 global batch size. 不过还需要同时修改学习率(learning rate)、迭代次数和学习率调度(learning rate schedule) 等.
如,Mask R-CNN R-50 FPN with the 1x schedule:
python tools/train_net.py
    --config-file "configs/e2e_mask_rcnn_R_50_FPN_1x.yaml"
    SOLVER.IMS_PER_BATCH 2
    SOLVER.BASE_LR 0.0025
    SOLVER.MAX_ITER 720000
    SOLVER.STEPS "(480000, 640000)"
    TEST.IMS_PER_BATCH 1
参考了 scheduling rules from Detectron.
注:这里已经讲迭代次数乘以了8x 倍,学习率调度也乘以了 8x 倍.,学习率除以了 8x 倍.
此外,还修改了测试阶段的 batch size,这通常并不是必须的,因为测试阶段需要的显存比训练阶段的要少很多.
4.3 多 GPUs 训练
内部采用了 torch.distributed.launch 来进行多GPUs 训练. 该 PyTorch 辅助函数可以提供与 GPUs 数量一致的 Python 进程(processes),且每个 Python 进程只使用单个 GPU.
export NGPUS=8
python -m torch.distributed.launch
    --nproc_per_node=$NGPUS
    /path_to_maskrcnn_benchmark/tools/train_net.py
    --config-file "path/to/config/file.yaml"
4.4 添加自定义数据集
采用 COCO-style 格式的数据集形式. 如:
class MyDataset(object):
    def __init__(self, ...):
        # as you would do normally

    def __getitem__(self, idx):
        # load the image as a PIL Image
        image = ...

        # load the bounding boxes as a list of list of boxes
        # in this case, for illustrative purposes, we use
        # x1, y1, x2, y2 order.
        boxes = [[0, 0, 10, 10], [10, 20, 50, 50]]
        # and labels
        labels = torch.tensor([10, 20])

        # create a BoxList from the boxes
        boxlist = BoxList(boxes, image.size, mode="xyxy")
        # add the labels to the boxlist
        boxlist.add_field("labels", labels)

        if self.transforms:
            image, boxlist = self.transforms(image, boxlist)

        # return the image, the boxlist and the idx in your dataset
        return image, boxlist, idx

    def get_img_info(self, idx):
        # get img_height and img_width. This is used if
        # we want to split the batches according to the aspect ratio
        # of the image, as it can be more efficient than loading the
        # image from disk
        return {"height": img_height, "width": img_width}
也可以添加其它的 fields 到 boxlist,如,segmentation masks(采用 structures.segmentation_mask.SegmentationMask),以及其它自定义实例类型.
COCODataset 的具体实现 - maskrcnn_benchmark/data/datasets/coco.py.5. Abstractions
ABSTRACTIONS.md.
该项目里涉及的主要抽象.
5.1 ImageList
PyTorch 中,网络输入的第一维通常是 batchsize 维,因此,同一个 batch 的所有样本具有相同的 height 和 width.
但是,为了支持在同一个 batch 内的图片能够是不同尺寸和长宽比(aspect ratios)的,该项目新建了 ImageList 类,其能够内部支持 batch 内不同尺寸的图像. 所有的图片进行了补零(padding with zeros),以确保图像尺寸相同,并可以可以根据第一维进行 batch 化. 补零前的图像原始尺寸保存在 image_sizes属性中,batch 化后的张量保存在 tensors 中.
该项目提供了一个工具函数 - to_image_list,其输入支持不同的类型,如,tensors 列表,并返回 ImageList 对象.
from maskrcnn_benchmark.structures.image_list import to_image_list

images = [torch.rand(3, 100, 200), torch.rand(3, 150, 170)]
batched_images = to_image_list(images)

# it is also possible to make the final batched image be a multiple of a number
batched_images_32 = to_image_list(images, size_divisible=32)
5.2 BoxList
BoxList 类保存了特定图像的边界框数据,bounding boxes,Nx4 tensor,以及图像的尺寸,(width, height) 数组.
此外,还包含了关于边界框几何变换的方法,如,裁剪cropping,缩放scaling 和翻转flipping.
BoxList的输入边界框格式,支持两种形式:
- [1] - xyxy - 每个 box 记为 x1, x2, y1, y2 坐标的形式.
- [2] - xywh - 每个 box 记为 x1, y1, w, h 的形式.
另外,每个 BoxList实例还可以包含每个边界框的任意新增信息,如,labels,可见性visibility,概率值probability scores 等.
BoxList 的创建,例如:
width = 100
height = 200
boxes = [
  [0, 10, 50, 50],
  [50, 20, 90, 60],
  [10, 10, 50, 50]
]
# create a BoxList with 3 boxes
bbox = BoxList(boxes, image_size=(width, height), mode='xyxy')

# perform some box transformations, has similar API as PIL.Image
bbox_scaled = bbox.resize((width * 2, height * 3))
bbox_flipped = bbox.transpose(FLIP_LEFT_RIGHT)

# add labels for each bbox
labels = torch.tensor([0, 10, 1])
bbox.add_field('labels', labels)

# bbox also support a few operations, like indexing
# here, selects boxes 0 and 2
bbox_subset = bbox[[0, 2]]
39 条评论
大佬您好,请问我安装完运行的时候到这里
from maskrcnn_benchmark.config import cfg
from predictor import COCODemo出现no moudle named maskrcnn_benchmark 是为什么呀,求解答,谢谢啦
可能是路径找不到,可以 sudo python setup.py install 试试; 或者添加一行将路径添加到代码里.
请问,我不想使用预训练模型要怎么进行修改呢?
修改下 config 文件的 WEIGHT 参数.
博主您好,我想请教一下,我希望仅仅用maskrcnn来做分割。如果我保留RPN部分的分类及回归的损失,还有后面的mask分支的损失和分类的损失,但是舍弃后面的回归损失(box),不知道这样是否可行呢,非常期待您的回复,谢谢了
你好 我也是只做分割 请问你的跑出来了吗
maskrcnn 主要是用于实例分割的,对于语义分割并没有明显优势. mask 后的损失函数是 0 和 1 二值的. 依赖的是bbox检测技术来确定的类别. 相当于用目标检测技术来处理分类任务了.
博主你好,我想请教一下,如果只做分割和分类,就是不训练Lbox部分可以吗,谢谢了
box 部分还是需要的,可以看下网络结构部分. 涉及到 RoI.
就是保留RPN部分的box,到head那就不要了
博主你好,请教一个问题,请问如何只用maskrcnn方法来做目标检测,不做分割,因为我现在的数据集是只包含检测框信息,请问labelimg数据集如何转换成所需的coco类型,训练时设置哪些参数,可以保证模型只进行检测框的训练?感谢博主
你好,请问这个问题你解决了吗?
只做目标检测,采用 faster_rcnn_*.yaml 的 config 文件即可. 定制数据集根据 coco 格式的特点格式化. 训练可以根据具体的硬件环境、数据集情况调整 yaml 文件里的训练参数.
谢谢,按照你说的在试试,谢谢博主
最后想请问一下读取每张图片得到的矩阵保存在哪儿的啊?我没找到
run_on_opencv_image 这个函数里面.
请问这个函数在哪个文件里面呢?
呃呃,稍微看下源码就找到了,demo/predictor.py
如果想要修改nms的计算公式是只用修改csrc/nms_cpu.cpp就行了吗?
有 NMS 的 cpu 实现-csrc/cpu/nms_cpu.cpp 和 gpu 实现 csrc/cuda/nms.cu
nms.cu中devIoU大于阈值后的 t |= 1ULL << i; 这句话是为啥啊,给t赋值为2的i次方是为什么呢?在第61行
这个涉及到 cuda 编程的部分暂时没有深入研究.
就是nms在重叠度达到一定值的时候直接将其置信度置为0,如果不想置为0该修改哪儿呢
请问目标检测提取出候选框进行分类的代码是在哪个文件中呢?
print下 model 可以看到模型结构,roi_heads 子网络里面
这个属于网络修改吧,打印出来默认的结构,找到你要插入网络的位置.
maskrcnn-benchmark/crsc
您好,请问大概训练了几十个iter之后就出现IndexError: list index out of range 这个错,请问您知道怎么解决吗
有没有确认下数据集是否正确?
你好,咨询下预测图片类型比如person怎么展示出来的呢
图片类型是检测到的目标物体的类别吗?加上文字即可,如opencv 的 cv2.text() 函数
你好,我想问一下怎么返回测试时框的位置坐标,怎么提取出来,在哪里可以看到
在 predictor.py 脚本里可以看到相关的函数.
不知道是不是这一段,不过怎么将数据提出来
# reshape prediction (a BoxList) into the original image size
你说的数据提取出来是什么?拿到 box 的信息?
博主您好,非常棒的关于maskrcnn-benchmark基本使用的分享。有个不明白的部分,想请教一下,R-50-C4中的R-50是resnet-50,那C4是指的是什么?|
是 resnet50 的结构 body network.