原文:Ultimate Guide: Building a Mask R-CNN Model for Detecting Car Damage (with Python codes)
计算机视觉的应用越来越令人惊奇. 从视频目标检测,到计算人流量. 似乎对于计算机视觉来说没有很大的挑战性.
计算机视觉一个很具吸引力的应用是,场景中每个像素的识别,以用于不同的,非常有用的目标应用.
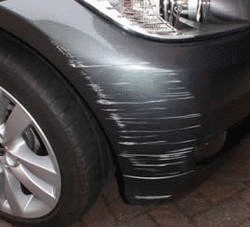
这里针对一个应用场景:构建一个 Mask R-CNN 模型,以检测汽车表面的损坏区域.
其可用于,保险公司针对用户上传的汽车损坏图片进行快速理赔;或者,二手车场景中汽车表面摩擦情况;又或者是,二手车抵押贷款等.
1. Mask R-CNN 简介
Mask R-CNN 是一种实例分割模型,识别每个目标实例的像素级位置.
"实例分割" 意味着,对场景内的每个独立目标实例进行分割,不管实例是否属于相同的目标类别. 如识别每个 cars,persons 等.
例如下图,COCO 数据集 训练的 Mask R-CNN GIF 图.
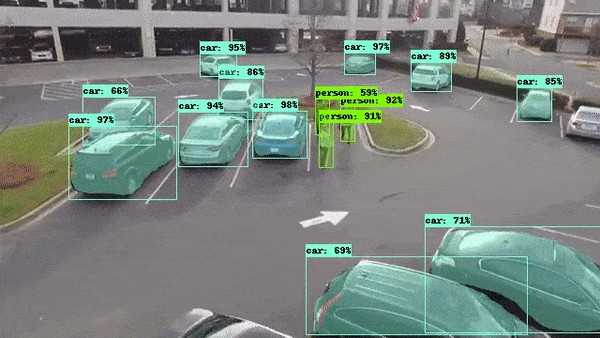
Mask R-CNN 不同于传统的 Faster R-CNN 等目标检测模型,除了识别目标实例的类别和其对应的边界框位置,Mask R-CNN 还会对目标实例边界框内目标实例进行像素级识别. 其可用于,如:
- 自动驾驶车辆需要准确识别道路的精确像素位置;其它车辆也需要精确像素位置,以避免碰撞.
机器人需要识别待抓起的目标的精确像素位置(Amazon 的无人配送机也会用到).
COCO 数据集上 Mask R-CNN 模型训练的最简单方式是采用 Tensorflow Object Detection API.
Tensorflow - 目标检测 API 使用
Using Tensorflow Object Detection to do Pixel Wise Classification
2. Mask R-CNN 工作原理
Mask R-CNN 可以看作是 Faster R-CNN 目标检测(类别 + 边界框) 和 FCN(像素级分割) 的结合. 如图:
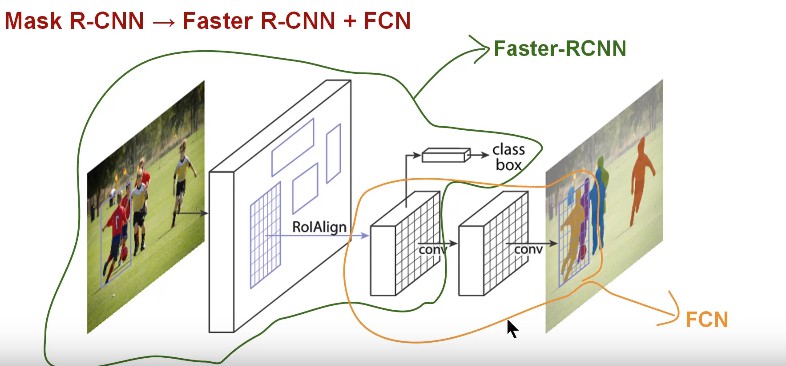
Mask R-CNN 理解上很简单:Faster R-CNN 对于每个候选目标有两个输出,类别标签和边界框偏移;新增的 FCN 分支则输出目标的 Mask. 二值 Mask 表示在边界框内的每个像素是否属于目标实例.
新增的 Mask 输出不同于类别和边界框输出,其需要提取更精细的目标实例的空间层次. 因此,Mask R-CNN 采用了 FCN 网络:
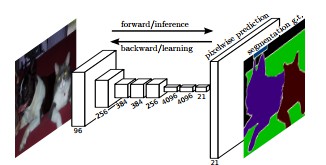
FCN 是语义分割的流行算法. 其采用多个 Conv 和 Max-pool 层来首先将输入图片尺寸压缩到原始尺寸的 1/32.;然后在压缩后的分辨率粒度进行像素类别预测;最后采用上采样和 deconv 层将压缩尺寸恢复到原始的图片尺寸.
简单来说,Mask R-CNN 可以说是 Faster R-CNN 和 FCN 两个网络的组合. 模型的 loss 函数是分类,边界框和 Mask 预测的总和.
Mask R-CNN 还进行了额外处理,以提升其比 FCN 更精确的像素识别. 具体细节参考论文 Mask R-CNN.
3. 构建车辆表面损坏检测的 Mask R-CNN 模型
虽然 Tensorflow - 目标检测 API 也提供了 Mask R-CNN 模型构建方法,但这里还是推荐基于 matterport/Mask_RCNN 构建 Mask R-CNN 模型.
3.1 数据收集
这里从 Google 收集了 66 张表面损坏的汽车图片(50 张训练,16 张验证). 如:

3.2 数据标注
Mask R-CNN 模型的训练,需要手工标注图片中汽车标签损坏区域. 这里采用 VGG Image Annotator — v 1.0.6 标注工具,html 版本.
多边形 Mask 标注,如:
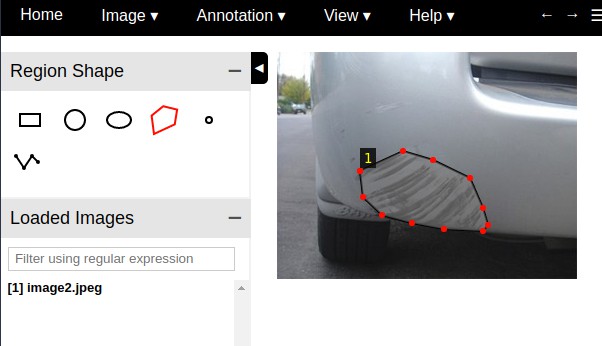
数据标注后,可以下载标注结果,保存为 json 格式.
这里的图片和标注数据集 - damage_detection_images.
3.3 模型训练
克隆 Matterport Mask R-CNN’ repository— https://github.com/matterport/Mask_RCNN 后,编写图片和标注数据加载函数.
主要基于 Matterport 提供的 balloon.py 进行修改,添加加载图片和标注数据函数,并添加到 CustomDataset 类.
class CustomDataset(utils.Dataset):

    def load_custom(self, dataset_dir, subset):
        """Load a subset of the Balloon dataset.
        dataset_dir: Root directory of the dataset.
        subset: Subset to load: train or val
        """
        # Add classes. We have only one class to add.
        self.add_class("damage", 1, "damage")

        # Train or validation dataset?
        assert subset in ["train", "val"]
        dataset_dir = os.path.join(dataset_dir, subset)

        # Load annotations
        # VGG Image Annotator saves each image in the form:
        # { 'filename': '28503151_5b5b7ec140_b.jpg',
        #   'regions': {
        #       '0': {
        #           'region_attributes': {},
        #           'shape_attributes': {
        #               'all_points_x': [...],
        #               'all_points_y': [...],
        #               'name': 'polygon'}},
        #       ... more regions ...
        #   },
        #   'size': 100202
        # }
        # We mostly care about the x and y coordinates of each region
        annotations1 = json.load(open(os.path.join(dataset_dir, "via_region_data.json")))
        # print(annotations1)
        annotations = list(annotations1.values())  # don't need the dict keys

        # The VIA tool saves images in the JSON even if they don't have any
        # annotations. Skip unannotated images.
        annotations = [a for a in annotations if a['regions']]

        # Add images
        for a in annotations:
            # print(a)
            # Get the x, y coordinaets of points of the polygons that make up
            # the outline of each object instance. There are stores in the
            # shape_attributes (see json format above)
            polygons = [r['shape_attributes'] for r in a['regions'].values()]

            # load_mask() needs the image size to convert polygons to masks.
            # Unfortunately, VIA doesn't include it in JSON, so we must read
            # the image. This is only managable since the dataset is tiny.
            image_path = os.path.join(dataset_dir, a['filename'])
            image = skimage.io.imread(image_path)
            height, width = image.shape[:2]

            self.add_image(
                "damage",  ## for a single class just add the name here
                image_id=a['filename'],  # use file name as a unique image id
                path=image_path,
                width=width, height=height,
                polygons=polygons)

    def load_mask(self, image_id):
        """Generate instance masks for an image.
       Returns:
        masks: A bool array of shape [height, width, instance count] with
            one mask per instance.
        class_ids: a 1D array of class IDs of the instance masks.
        """
        # If not a balloon dataset image, delegate to parent class.
        image_info = self.image_info[image_id]
        if image_info["source"] != "damage":
            return super(self.__class__, self).load_mask(image_id)

        # Convert polygons to a bitmap mask of shape
        # [height, width, instance_count]
        info = self.image_info[image_id]
        mask = np.zeros([info["height"], info["width"], len(info["polygons"])],
                        dtype=np.uint8)
        for i, p in enumerate(info["polygons"]):
            # Get indexes of pixels inside the polygon and set them to 1
            rr, cc = skimage.draw.polygon(p['all_points_y'], p['all_points_x'])
            mask[rr, cc, i] = 1

        # Return mask, and array of class IDs of each instance. Since we have
        # one class ID only, we return an array of 1s
        return mask.astype(np.bool), np.ones([mask.shape[-1]], dtype=np.int32)
完整 python 脚本 - custom.py
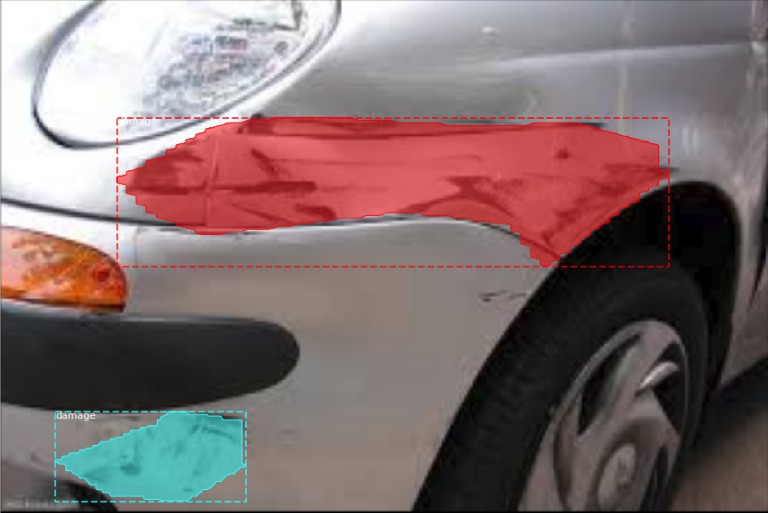
inspect_custom_data.ipynb 在图片上可视化 mask 标注,如图:
模型训练时,采用 COCO 数据集上预训练模型作为断点,进行迁移学习.
## Train a new model starting from pre-trained COCO weights
python3 custom.py train --dataset=/path/to/datasetfolder --weights=coco

## Resume training a model that you had trained earlier
python3 custom.py train --dataset=/path/to/datasetfolder --weights=last
单张 GPU,模型训练 10 个 epochs,耗时 20-30 分钟.
3.4 模型验证
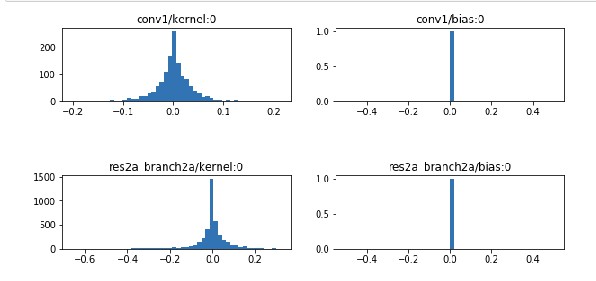
inspect_custom_weights.ipynb 可以对模型权重进行可视化检查.
在该 notebook 中设置模型训练的最后一个断点模型文件. 有助于对权重和偏置的分布进行安全性检查. 例如:
3.5 图片测试与预测
inspect_custom_model.ipynb 提供了对 train/val 数据集中的图片进行模型测试,并可视化预测结果. 例如:

结果可以看出,构建的 Mask R-CNN 模型很好的检测除了汽车表面的损坏区域. 深度学习真强大!
Mask R-CNN 是目标检测的进化版本,检测精度更高.
23 条评论
现在是不是有出来了新的图像分割算法,平时有什么学习的好方法,能不能专门写一篇关于平时怎么学习的博客,推荐几个学习的微信公众号等!
是的,图像分割也是很热门的一个方向. 学习是指工程还是学术?
几十个数据竟能训练出这么好的效果,真的不错啊! 一直以为数据少效果就会不好,网上的数据集虽然多都是上万个,但是自己做具体应用的时候又不是网上那些数据集。 我想问一下,就是做一个具体的应用,比如说就是检测您这个博客中,车面有刮痕,是不是就不能用网上哪些与车刮痕不相关的数据(比如说街景)来做学习迁移呀。学习迁移是不是自己做的具体应用的数据要和网上数据类似才能用呀?
对于分割类的任务而言,可以认为是将图片每个像素点作为样本,一张800x800的图片,就有 64W 个像素点样本了,所以一般而言,分割的数据相比于分类、检测任务要求要小一些. 数据源具有相同的分布情况,理论上是最佳的. 如果完全不同的数据分布,迁移学习可能是反作用的.
如果我要做工业上的应用,但我自己关于工业上的数据又非常少,都是自己去拍的一些照片,网络上又没有工业上的一些数据(好像网络上的数据集基本上都是与我们生活相关的一些图片(比如街景动物,交通工具等),这样我也不能运用网络上这些与我工业应用相差很大的数据和迁移学习应用,这样我做工业上的应用是不是效果就不好呀?
工业应用可能并一定要精度最高,可能更依赖于环境、稳定性和鲁棒性.
谢谢博主,就是说我们做的应用与网络上的图片数据不相似的时候,就不要用网络上的数据来进行迁移学习是吧?
如果数据分布完全不同,可能就不必要采用迁移学习;但有时候数据分布是否相似,需要实际操作下才能确认.
请问,如何训练模型(python3 custom.py train --dataset=/path/to/datasetfolder --weights=coco这是文中提到的)要怎么输入命令呢
怎么输入命令??
怎么训练自己的模型?运行inspect_custom_weights.ipynb 这个的时候,出现了缺少mask_rcnn_coco.h5的错误
膜拜博主,正在研究中
FileNotFoundError: [Errno 2] No such file or directory: '/path/to/datasetfolder\train\via_region_data.json'
这是啥错误
via_region_data.json 文件的路径没有设置对
应该在哪里设置的。这个从github 下载下来就没改过路径
要下载标注的数据集,文章里有下载链接.
大哥现在就一个地没整明白,训练的权重在哪里文件夹中
是 imagenet 预训练权重,还是模型训练保存的权重?
imagenet 权重 - https://github.com/matterport/Mask_RCNN/blob/master/mrcnn/model.py 中 get_imagenet_weights 函数.
博主,.json文件要放在哪个目录下面啊?
放到设置的 dataset_dir 路径
训练数据这么少,效果竟然也可以,٩(ˊᗜˋ*)و
是啊,深度学习有时候说不清的神奇.