原文:Create your own COCO-style datasets
将自己的数据转化为 COCO-style 图片标注格式.

深度学习世界中,数据为王(King),而合适的数据格式则可能正是王后(Queen),或者至少是 J(Jack) 或 10. 不管怎么说,正确的数据格式都是很重要的.
在辛辛苦苦收集好图片和标注好所有物体后,必须决定采用何种格式来保存数据信息. 与其它需要担心的事情相比,这貌似并不是大的决定,但如果想要快速的检查不同模型在数据集上的表现,则,选择数据格式则是必不可少的.
2014 年为微软创建了 COCO(Common Objects in Context) 数据集以有助于目标识别和场景理解的深入研究.
COCO 是较早的大规模数据集之一,其不仅用边界框(bounding boxes) 标注了物体,而其标注的边界框已经成为新检测模型测试的 benchmark.
COCO 数据集保存标注信息的格式已经成为一种标注. 如果可以将自己的数据集转换为对应的 COCO-style 格式,则可以尝试很多深度学习模型的实现.
这也就是创建 pycococreator 库的原因.
pycococreator 关注于所有的标注格式细节,并有助于将数据集转换为 COCO 格式.
以 squares,triangles 和 circles 形状检测数据集为例.
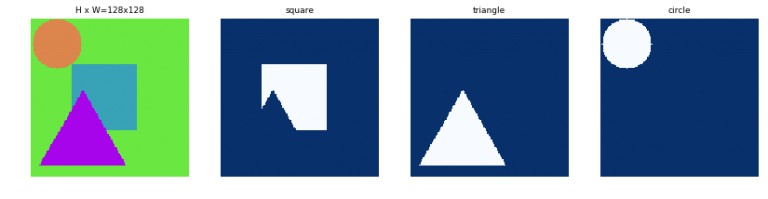
形状图片和对应的物体masks.
形状数据集共有 500 张 128x128 px 的 jpeg 图片,包含不同颜色背景上,不同颜色和尺寸的 squares,triangles 和 circles. 另外还标注了每个形状的二值 mask,并保存为 png.
png 的二值 mask 格式相对容易理解和创建. 这就是在使用 pycococreate 创建 COCO-style 数据集前,自己的数据集中采用 png 的原因.
但,"如果 png 这么容易理解,为什么不直接采用 png 二值 mask 格式呢?"
记住,将数据集转换为 COCO-style 的原因不是为了最佳的表示标注图片,而是应为大家都普遍使用.
例如,假设自己的图片和标注的路径结构为:
    shapes
    └───train
        └───annotations
        │    │<image_id>_<object_class_name>_<annotation_id>.png
        │    │...
        └───<subset><year>;
             │<image_id>.jpeg
│...其中,subset 是 “shapes_train”, year 是 “2018”, object_class_name 是 “square”, “triangle”, “circle”.
另外,通常还会划分 validate 和 test 数据集.
COCO 采用 JSON(JavaScript Object Notation) 来编码数据集信息. 根据是否有物体实例(object instances),物体关键点(object keypoints),图像标题(image captions),COCO 会有几种变形形式.
物体实例形式类似于:
{
 "info": info,
 "licenses": [license],
 "categories": [category],
 "images": [image],
 "annotations": [annotation]
}
“info”, “licenses”, “categories” 和 “images” 列表是直接创建的. 但,“annotations” 的创建需要一点技巧. 幸运的是,pycococreater 能够帮助处理.
先从简单的入手. 先采用 python 列表和字典来描述数据集,然后导出到 json.
    INFO = {
        "description": "Example Dataset",
        "url": "https://github.com/waspinator/pycococreator",
        "version": "0.1.0",
        "year": 2018,
        "contributor": "waspinator",
        "date_created": datetime.datetime.utcnow().isoformat(' ')
    }

    LICENSES = [
        {
            "id": 1,
            "name": "Attribution-NonCommercial-ShareAlike License",
            "url": "http://creativecommons.org/licenses/by-nc-sa/2.0/"
        }
    ]

    CATEGORIES = [
        {
            'id': 1,
            'name': 'square',
            'supercategory': 'shape',
        },
        {
            'id': 2,
            'name': 'circle',
            'supercategory': 'shape',
        },
        {
            'id': 3,
            'name': 'triangle',
            'supercategory': 'shape',
        },
    ]
然后,继续处理图片和标注数据. 所要做的就是,对每张 jpeg 图片和其对应的 pngs 标注信息处理,并利用 pycococreator 来生成正确的格式化项.
    # filter for jpeg images
        for root, _, files in os.walk(IMAGE_DIR):
            image_files = filter_for_jpeg(root, files)

            # go through each image
            for image_filename in image_files:
                image = Image.open(image_filename)
                image_info = pycococreatortools.create_image_info(
                    image_id, os.path.basename(image_filename), image.size)
                coco_output["images"].append(image_info)

                # filter for associated png annotations
                for root, _, files in os.walk(ANNOTATION_DIR):
                    annotation_files = filter_for_annotations(root, files, image_filename)

                    # go through each associated annotation
                    for annotation_filename in annotation_files:

                        if 'square' in annotation_filename:
                            class_id = 1
                        elif 'circle' in annotation_filename:
                            class_id = 2
                        else:
                            class_id = 3

                        category_info = {'id': class_id,
                                         'is_crowd': 'crowd' in image_filename}
                        binary_mask = np.asarray(Image.open(annotation_filename)
                            .convert('1')).astype(np.uint8)

                        annotation_info = pycococreatortools.create_annotation_info(
                            segmentation_id,
                            image_id,
                            category_info,
                            binary_mask,
                            image.size,
                            tolerance=2)
                        if annotation_info is not None:
coco_output["annotations"].append(annotation_info)其中,image_info = pycococreatortools.create_image_info(image_id, os.path.basename(image_filename), image.size) 创建图片项;annotation_info = pycococreatortools.create_annotation_info(segmentation_id, image_id, category_info, binary_mask, image.size, tolerance=2) 创建标注数据信息项.
COCO 支持两种类型的标注,其格式取决于标注的是单个物体(single object) 还是密集物体("crowd" objects).
单个物体的标注是沿着物体边界的点列表进行编码的.
密集物体的标注是采用column-major RLE (Run Length Encoding) 进行标注的.
RLE 是一种压缩方法,其工作原理是将重复值替换为重复次数( works by replaces repeating values by the number of times they repeat). 例如,0 0 1 1 1 0 1 则会变为 2 3 1 1. Column-major 仅表示沿着列从上倒下的读取二值 mask 数组,而不是沿着行从左到右的读取.
pycococreatortools.create_annotation_info() 中的 tolerance 参数表示了用于记录单个物体的轮廓精度. 该参数数值越大,则标注的质量越低,但文件大小也越小. 一般采用 tolerance=2.
当 COCO-style 数据集创建好以后,既可以采用 COCOAPI 进行测试与可视化. 根据 [Jupyter Notebook in the pycococreator repo] 示例,可以得出类似于下面的可视化:
COCO API 的可视化输出.
完整脚本 - shapes_to_coco.py.py
形状训练数据集 - shapes_train_dataset
综上,类似地,可以将自己的数据集转换为 COCO-style 格式.
相关资源
[1] - pycococreator
[2] - COCO
Original Microsoft COCO paper
COCO API
[3] - Annotation tools
Label Me
[4] - Deep learning implementations with COCO support
YOLO
Luminoth