TensorFlow 提供了一个 ipynb notebook - TF-Slim Walkthrough,介绍了针对不同任务采用 TF-Slim 的神经网络定义,训练和评估.
主要包括内容有:
- TF-Slim 安装与配置
- 采用 TF-Slim 创建第一个神经网络
- 采用 TF-Slim 读取数据
- CNN 训练
- 采用预训练模型
1. TF-Slim 安装与配置
TensorFlow 安装后,测试 TF-Slim 是否安装成功:
python -c "import tensorflow.contrib.slim as slim; eval = slim.evaluation.evaluate_once"
虽然这里是采用 TF-Slim 处理图像分类问题,还需要安装 TF-Slim 图像模型库 tensorflow/models/research/slim. 假设该库的安装路径为 TF_MODELS.
添加 TF_MODELS/research/slim 到 python path.
导入 Python 模块:
from __future__ import absolute_import
from __future__ import division
from __future__ import print_function

import matplotlib.pyplot as plt
import math
import numpy as np
import tensorflow as tf
import time

from datasets import dataset_utils

# Main slim library
from tensorflow.contrib import slim
2. 采用 TF-Slim 创建第一个神经网络
以一个简单多层感知机(Multilayer Perceptron, MLP) 解决回归问题为例.
该 MLP 模型有 2 个隐藏层,模型输出是单个节点.
当函数调用时,会创建很多节点node,并自动调价到当前作用域内的全局 TF Graph 中.
当创建带有可调参数的网络层(如,FC层)时,会自动创建参数变量节点,并添加到 Graph 中,
采用变量作用域(variable scope) 来将所有的节点放于通用名字,因此 Graph 具有分层结构.
这有助于在 tensorboard 中可视化 TF Graph,及相关变量的查询.
正如 arg_scope中所定义,FC 层都采用相同的 L2 weight decay 和 ReLU 激活.
(不过,最终的网络层复写了这些默认值,使用了相同的激活函数).
此外,示例了在第一个全连接层FC1 后如何添加 Dropout 层.
在测试时,不需要 dropout 节点,而是采用了平均激活(average activations).
因此,需要知道该模型是处于 training 或 testing 阶段,因为在两种情况下的计算图是不同的.(虽然保存着模型参数的变量variables 是共享的,具有相同的变量名/作用域 name/scope.)
2.1 定义回归模型
def regression_model(inputs, is_training=True, scope="deep_regression"):
    """
    创建回归模型

    Args:
        inputs: A node that yields a `Tensor` of size [batch_size, dimensions].
        is_training: Whether or not we're currently training the model.
        scope: An optional variable_op scope for the model.

    Returns:
        predictions: 1-D `Tensor` of shape [batch_size] of responses.
        end_points: A dict of end points representing the hidden layers.
    """
    with tf.variable_scope(scope, 'deep_regression', [inputs]):
        end_points = {}
        # Set the default weight _regularizer and acvitation for each fully_connected layer.
        with slim.arg_scope([slim.fully_connected],
                            activation_fn=tf.nn.relu,
                            weights_regularizer=slim.l2_regularizer(0.01)):

            # Creates a fully connected layer from the inputs with 32 hidden units.
            net = slim.fully_connected(inputs, 32, scope='fc1')
            end_points['fc1'] = net

            # Adds a dropout layer to prevent over-fitting.
            net = slim.dropout(net, 0.8, is_training=is_training)

            # Adds another fully connected layer with 16 hidden units.
            net = slim.fully_connected(net, 16, scope='fc2')
            end_points['fc2'] = net

            # Creates a fully-connected layer with a single hidden unit. Note that the
            # layer is made linear by setting activation_fn=None.
            predictions = slim.fully_connected(net, 1, activation_fn=None, scope='prediction')
            end_points['out'] = predictions

            return predictions, end_points
2.2 创建模型/查看模型结构
with tf.Graph().as_default():
    # Dummy placeholders for arbitrary number of 1d inputs and outputs
    inputs = tf.placeholder(tf.float32, shape=(None, 1))
    outputs = tf.placeholder(tf.float32, shape=(None, 1))

    # 创建模型
    predictions, end_points = regression_model(inputs) # 添加nodes(tensors) 到 Graph.

    # 打印每个 tensor 的 name 和 shape.
    print("Layers")
    for k, v in end_points.items():
        print('name = {}, shape = {}'.format(v.name, v.get_shape()))

    # 打印参数节点(parameter nodes) 的 name 和 shape(值还未初始化)
    print("\n")
    print("Parameters")
    for v in slim.get_model_variables():
        print('name = {}, shape = {}'.format(v.name, v.get_shape()))
2.3 随机生成 1d 回归数据
def produce_batch(batch_size, noise=0.3):
    xs = np.random.random(size=[batch_size, 1]) * 10
    ys = np.sin(xs) + 5 + np.random.normal(size=[batch_size, 1], scale=noise) # 添加了随机噪声
    return [xs.astype(np.float32), ys.astype(np.float32)]

x_train, y_train = produce_batch(200)
x_test, y_test = produce_batch(200)
plt.scatter(x_train, y_train)
2.4 拟合模型
模型训练需要指定 loss 函数和 optimizer,再采用 slim.
slim.learning.train 函数主要工作:
- 对于每次迭代,评估
train_op,其采用 optimizer 应用到当前 minibatch 数据,更新参数. 同时,更新global_step. - 周期性地保存模型断点到指定路径. 有助于根据断点文件重新训练.
def convert_data_to_tensors(x, y):
    inputs = tf.constant(x)
    inputs.set_shape([None, 1])

    outputs = tf.constant(y)
    outputs.set_shape([None, 1])
    return inputs, outputs

# 采用均方差 loss 训练回归模型.
ckpt_dir = '/tmp/regression_model/'

with tf.Graph().as_default():
    tf.logging.set_verbosity(tf.logging.INFO) # 日志信息

    inputs, targets = convert_data_to_tensors(x_train, y_train)

    # 模型创建
    predictions, nodes = regression_model(inputs, is_training=True)

    # 添加 loss 函数到 Graph
    loss = tf.losses.mean_squared_error(labels=targets, predictions=predictions)

    # 总 loss 是定义的 loss 加上任何正则 losses.
    total_loss = slim.losses.get_total_loss()

    # 设定 optimizer,并创建 train op:
    optimizer = tf.train.AdamOptimizer(learning_rate=0.005)
    train_op = slim.learning.create_train_op(total_loss, optimizer)

    # 在会话Session 内运行模型训练.
    final_loss = slim.learning.train(
        train_op,
        logdir=ckpt_dir,
        number_of_steps=5000,
        save_summaries_secs=5,
        log_every_n_steps=500)

print("Finished training. Last batch loss:", final_loss)
print("Checkpoint saved in %s" % ckpt_dir)
2.5 采用多个 loss 函数训练模型
在某些任务场景中,需要同时优化多个目标.
TF-Slim 提供了易用的多个 losses 计算.
(这里,示例未优化 total loss,但是给出了如何计算)
with tf.Graph().as_default():
    inputs, targets = convert_data_to_tensors(x_train, y_train)
    predictions, end_points = regression_model(inputs, is_training=True)

    # 添加多个 losses 节点到 Graph.
    mean_squared_error_loss = tf.losses.mean_squared_error(labels=targets, predictions=predictions)
    absolute_difference_loss = slim.losses.absolute_difference(predictions, targets)

    # 下面两种计算 total loss 的方式是等价的.
    regularization_loss = tf.add_n(slim.losses.get_regularization_losses())
    total_loss1 = mean_squared_error_loss + absolute_difference_loss + regularization_loss

    # 默认情况下,Regularization Loss 被包括在 total loss 中.
    # 有益于 training, 但不益于 testing.
    total_loss2 = slim.losses.get_total_loss(add_regularization_losses=True)

    # 初始化变量
    init_op = tf.global_variables_initializer()

    with tf.Session() as sess:
        sess.run(init_op) # 采用随机权重初始化参数.

        total_loss1, total_loss2 = sess.run([total_loss1, total_loss2])

        print('Total Loss1: %f' % total_loss1)
        print('Total Loss2: %f' % total_loss2)

        print('Regularization Losses:')
        for loss in slim.losses.get_regularization_losses():
            print(loss)

        print('Loss Functions:')
        for loss in slim.losses.get_losses():
            print(loss)
2.6 加载保存的训练进行预测
with tf.Graph().as_default():
    inputs, targets = convert_data_to_tensors(x_test, y_test)

    # 创建模型结构. (后面再加载参数.)
    predictions, end_points = regression_model(inputs, is_training=False)

    # 创建会话,从断点文件恢复参数.
    sv = tf.train.Supervisor(logdir=ckpt_dir)
    with sv.managed_session() as sess:
        inputs, predictions, targets = sess.run([inputs, predictions, targets])

plt.scatter(inputs, targets, c='r');
plt.scatter(inputs, predictions, c='b');
plt.title('red=true, blue=predicted')
2.7 测试集上计算评估度量 metrics
TF-Slim 术语中,losses 用于优化,但 metrics 仅用于评估,二者可能不一样,比如 precision & recall.
例如,计算的均方差误差和平均绝对值误差度量.
每个 metric 声明创建了几个局部变量(必须通过 tf.initialize_local_variables() 初始化),并同时返回 value_op 和 update_op.
在评估时,value_op 返回当前 metric 值. update_op 加载一个新的 batch 数据,获得预测值,并在返回当前 metric 值之前累积计算 metric 统计结果.
value 节点和 update 节点保存为 2 个字典里.
创建 metric 节点之后,即可传递到 slim.evaluation,重复地评估这些节点多次.
最后,打印每个 metric 的最终值.
with tf.Graph().as_default():
    inputs, targets = convert_data_to_tensors(x_test, y_test)
    predictions, end_points = regression_model(inputs, is_training=False)

    # Specify metrics to evaluate:
    names_to_value_nodes, names_to_update_nodes = slim.metrics.aggregate_metric_map({
      'Mean Squared Error': slim.metrics.streaming_mean_squared_error(predictions, targets),
      'Mean Absolute Error': slim.metrics.streaming_mean_absolute_error(predictions, targets)
    })

    # Make a session which restores the old graph parameters, and then run eval.
    sv = tf.train.Supervisor(logdir=ckpt_dir)
    with sv.managed_session() as sess:
        metric_values = slim.evaluation.evaluation(
            sess,
            num_evals=1, # Single pass over data
            eval_op=names_to_update_nodes.values(),
            final_op=names_to_value_nodes.values())

    names_to_values = dict(zip(names_to_value_nodes.keys(), metric_values))
    for key, value in names_to_values.items():
      print('%s: %f' % (key, value))
3. 采用 TF-Slim 读取数据
采用 TF-Slim 读取数据主要包括两个部分:
- Dataset - 数据集描述
- DatasetDataProvider - 真实数据读取的必要操作.
3.1 Dataset
TF-Slim Dataset 包含了数据集的描述信息,用于数据读取,例如,数据文件列表,以及数据编码方式.
此外,还包含一些元数据(metadata),包括类别标签,train/test 划分的数据集大小,数据集提供的张量描述等. 例如,某些数据集包含图片images 和标签labels,其它边界框标注等.
Dataset 对象允许针对不同的数据内容和编码类型使用相同的 API.
TF-Slim [Dataset] 对于存储为 TFRecords 文件 的数据甚为有效,其中,每个 record 包含一个 tf.train.Example protocol buffer.
TF-Slim 采用一致约定,用于每个 Example record 的 keys 和 vaules 的命名.
3.2 DatasetDataProvider
TF-Slim DatasetDataProvider 是用于从数据集真实读取数据的类Class. 非常适合训练过程不同方式的数据读取.
例如,DatasetDataProvider 是单线程或多线程.
如果数据是多个文件的分片,DatasetDataProvider 可以序列的读取每个文件,或者同时从每个文件读取.
3.3 示例:Flowers 数据集
这里给出了将几个常用图片数据集转换为 TFRecord 格式的脚本,以及用于读取的 Dataset 描述.
- Flowers TFRecord 格式数据集下载:
import tensorflow as tf from datasets import dataset_utils url = "http://download.tensorflow.org/data/flowers.tar.gz" flowers_data_dir = '/tmp/flowers' if not tf.gfile.Exists(flowers_data_dir): tf.gfile.MakeDirs(flowers_data_dir) dataset_utils.download_and_uncompress_tarball(url, flowers_data_dir) - Flowers TFRecord 部分数据可视化
from datasets import flowers
import tensorflow as tf

from tensorflow.contrib import slim

with tf.Graph().as_default():
    dataset = flowers.get_split('train', flowers_data_dir)
    data_provider = slim.dataset_data_provider.DatasetDataProvider(
        dataset, common_queue_capacity=32, common_queue_min=1)
    image, label = data_provider.get(['image', 'label'])

    with tf.Session() as sess:
        with slim.queues.QueueRunners(sess):
            for i in range(4):
                np_image, np_label = sess.run([image, label])
                height, width, _ = np_image.shape
                class_name = name = dataset.labels_to_names[np_label]

                plt.figure()
                plt.imshow(np_image)
                plt.title('%s, %d x %d' % (name, height, width))
                plt.axis('off')
                plt.show()
4. CNN 训练
基于一个简单 CNN 网络训练图片分类器.
4.1 模型定义
def my_cnn(images, num_classes, is_training):  # is_training is not used...
    with slim.arg_scope([slim.max_pool2d], kernel_size=[3, 3], stride=2):
        net = slim.conv2d(images, 64, [5, 5])
        net = slim.max_pool2d(net)
        net = slim.conv2d(net, 64, [5, 5])
        net = slim.max_pool2d(net)
        net = slim.flatten(net)
        net = slim.fully_connected(net, 192)
        net = slim.fully_connected(net, num_classes, activation_fn=None)
        return net
4.2 对随机生成图片应用模型
import tensorflow as tf

with tf.Graph().as_default():
    # 该模型可以处理任何大小的输入,因为第一层是卷积层.
    # 模型的大小是由 image_node 第一次传递到 my_cnn 函数时来决定的.
    # 一旦初始化了变量,所有权重矩阵的大小都会固定.
    # 由于全连接层,所有后续的图片必须具有与第一张图片具有相同的尺寸大小.
    batch_size, height, width, channels = 3, 28, 28, 3
    images = tf.random_uniform([batch_size, height, width, channels], maxval=1)

    # 创建模型
    num_classes = 10
    logits = my_cnn(images, num_classes, is_training=True)
    probabilities = tf.nn.softmax(logits)

    #随机初始化变量,包括参数初始化.
    init_op = tf.global_variables_initializer()

    with tf.Session() as sess:
        # 运行 init_op, 计算模型输出,并打印结果:
        sess.run(init_op)
        probabilities = sess.run(probabilities)

print('Probabilities Shape:')
print(probabilities.shape)  # batch_size x num_classes

print('\nProbabilities:')
print(probabilities)

print('\nSumming across all classes (Should equal 1):')
print(np.sum(probabilities, 1)) # Each row sums to 1
4.3 在 Flowers 数据集训练模型
TF-Slim 的 learning.py 中 training 函数的使用.
首先,创建 load_batch 函数,从数据集加载 batchs 数据.
然后,训练模型一次,评估结果.
from preprocessing import inception_preprocessing
import tensorflow as tf

from tensorflow.contrib import slim


def load_batch(dataset, batch_size=32, height=299, width=299, is_training=False):
    """
    加载单个 bacth 的数据.

    Args:
      dataset: The dataset to load.
      batch_size: The number of images in the batch.
      height: The size of each image after preprocessing.
      width: The size of each image after preprocessing.
      is_training: Whether or not we're currently training or evaluating.

    Returns:
      images: A Tensor of size [batch_size, height, width, 3], image samples that have been preprocessed.
      images_raw: A Tensor of size [batch_size, height, width, 3], image samples that can be used for visualization.
      labels: A Tensor of size [batch_size], whose values range between 0 and dataset.num_classes.
    """
    data_provider = slim.dataset_data_provider.DatasetDataProvider(
        dataset, common_queue_capacity=32,
        common_queue_min=8)
    image_raw, label = data_provider.get(['image', 'label'])

    # Preprocess image for usage by Inception.
    image = inception_preprocessing.preprocess_image(image_raw, height, width, is_training=is_training)

    # Preprocess the image for display purposes.
    image_raw = tf.expand_dims(image_raw, 0)
    image_raw = tf.image.resize_images(image_raw, [height, width])
    image_raw = tf.squeeze(image_raw)

    # Batch it up.
    images, images_raw, labels = tf.train.batch(
          [image, image_raw, label],
          batch_size=batch_size,
          num_threads=1,
          capacity=2 * batch_size)

    return images, images_raw, labels


##
from datasets import flowers

# This might take a few minutes.
train_dir = '/tmp/tfslim_model/'
print('Will save model to %s' % train_dir)

with tf.Graph().as_default():
    tf.logging.set_verbosity(tf.logging.INFO)

    dataset = flowers.get_split('train', flowers_data_dir)
    images, _, labels = load_batch(dataset)

    # 创建模型:
    logits = my_cnn(images, num_classes=dataset.num_classes, is_training=True)

    # loss 函数:
    one_hot_labels = slim.one_hot_encoding(labels, dataset.num_classes)
    slim.losses.softmax_cross_entropy(logits, one_hot_labels)
    total_loss = slim.losses.get_total_loss()

    # 创建 summaries,以可视化训练进程:
    tf.summary.scalar('losses/Total Loss', total_loss)

    # 设定 optimizer, 创建 train op:
    optimizer = tf.train.AdamOptimizer(learning_rate=0.01)
    train_op = slim.learning.create_train_op(total_loss, optimizer)

    # 开始训练:
    final_loss = slim.learning.train(
      train_op,
      logdir=train_dir,
      number_of_steps=1, # For speed, we just do 1 epoch
      save_summaries_secs=1)

    print('Finished training. Final batch loss %d' % final_loss)
4.4 评估度量 metrics
以预测准确率(prediction accuracy) 和 top5 分类准确率为例.
from datasets import flowers

# This might take a few minutes.
with tf.Graph().as_default():
    tf.logging.set_verbosity(tf.logging.DEBUG)

    dataset = flowers.get_split('train', flowers_data_dir)
    images, _, labels = load_batch(dataset)

    logits = my_cnn(images, num_classes=dataset.num_classes, is_training=False)
    predictions = tf.argmax(logits, 1)

    # metrics 定义:
    names_to_values, names_to_updates = slim.metrics.aggregate_metric_map({
        'eval/Accuracy': slim.metrics.streaming_accuracy(predictions, labels),
        'eval/Recall@5': slim.metrics.streaming_recall_at_k(logits, labels, 5),
    })

    print('Running evaluation Loop...')
    checkpoint_path = tf.train.latest_checkpoint(train_dir)
    metric_values = slim.evaluation.evaluate_once(
        master='',
        checkpoint_path=checkpoint_path,
        logdir=train_dir,
        eval_op=names_to_updates.values(),
        final_op=names_to_values.values())

    names_to_values = dict(zip(names_to_values.keys(), metric_values))
    for name in names_to_values:
        print('%s: %f' % (name, names_to_values[name]))
5. 采用预训练模型
神经网络模型参数量比较大时,表现最佳,且是比较灵活的函数逼近器.
但是,也就是需要在大规模数据集上进行训练.
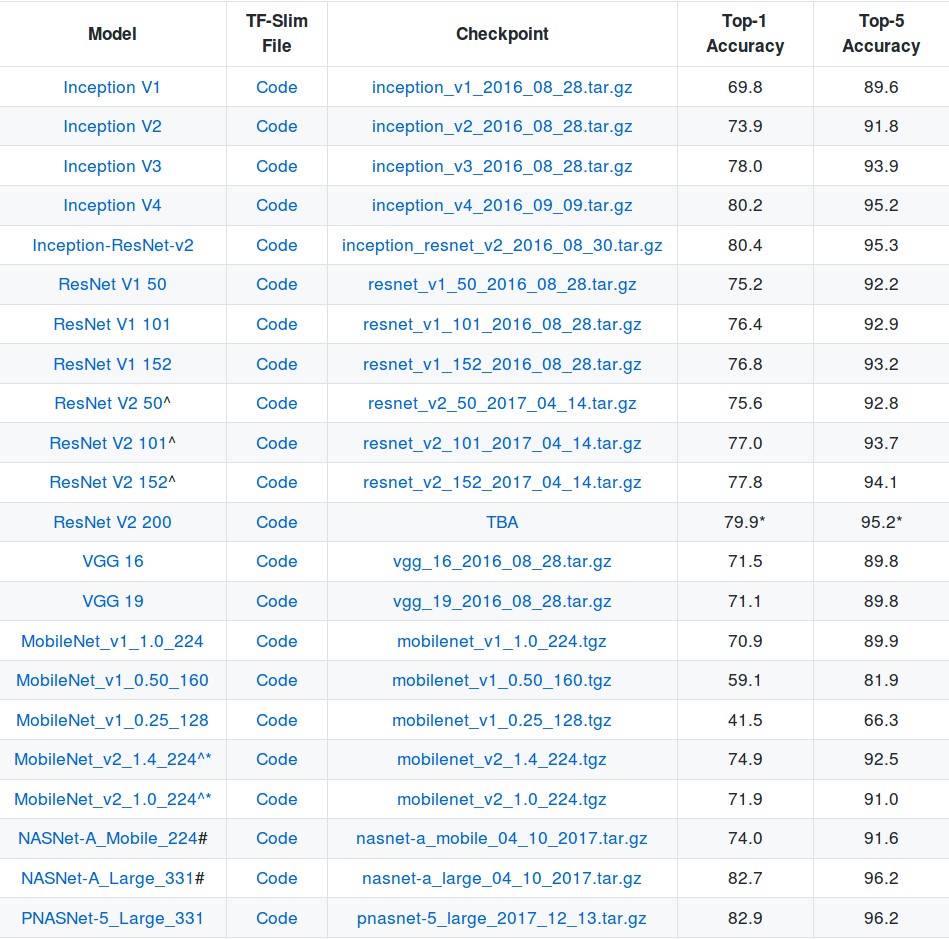
由于训练比较耗时,TensorFlow 提供和很多预训练模型,如 Pre-trained Models:
基于开源的预训练模型,可以在其基础上进一步应用到具体场景.
例如,一般是修改最后的 pre-softmax层,根据具体任务修改权重初始化,类别标签数等.
对于小数据集而言,十分有帮助.
下面 [inception-v1] 的例子,虽然 [inception-v3] 表现更好,但前者速度更快.
VGG 和 ResNet 的最后一层是 1000 维输出,而不是 10001 维.
ImageNet 数据集提供了一个背景类background class,但 VGG 和 ResNet 没有用到该背景类.
下面给出 Inception V1 和 VGG-16 预训练模型的示例.
5.1 下载 Inception V1 断点文件
from datasets import dataset_utils

url = "http://download.tensorflow.org/models/inception_v1_2016_08_28.tar.gz"
checkpoints_dir = '/tmp/checkpoints'

if not tf.gfile.Exists(checkpoints_dir):
    tf.gfile.MakeDirs(checkpoints_dir)

dataset_utils.download_and_uncompress_tarball(url, checkpoints_dir)
5.2 应用 Inception V1 预训练模型
假设已经将每张图片尺寸调整为模型断点对应的尺寸.
import numpy as np
import os
import tensorflow as tf

try:
    import urllib2 as urllib
except ImportError:
    import urllib.request as urllib

from datasets import imagenet
from nets import inception
from preprocessing import inception_preprocessing

from tensorflow.contrib import slim

image_size = inception.inception_v1.default_image_size # 输入图片尺寸

with tf.Graph().as_default():
    url = 'https://upload.wikimedia.org/wikipedia/commons/7/70/EnglishCockerSpaniel_simon.jpg'
    image_string = urllib.urlopen(url).read()
    image = tf.image.decode_jpeg(image_string, channels=3)
    processed_image = inception_preprocessing.preprocess_image(image, image_size, image_size, is_training=False)
    processed_images  = tf.expand_dims(processed_image, 0)

    # 创建模型, 采用默认的 arg scope 作用域来配置 batch norm 参数.
    with slim.arg_scope(inception.inception_v1_arg_scope()):
        logits, _ = inception.inception_v1(processed_images, num_classes=1001, is_training=False)
    probabilities = tf.nn.softmax(logits)

    init_fn = slim.assign_from_checkpoint_fn(
        os.path.join(checkpoints_dir, 'inception_v1.ckpt'),
        slim.get_model_variables('InceptionV1'))

    with tf.Session() as sess:
        init_fn(sess)
        np_image, probabilities = sess.run([image, probabilities])
        probabilities = probabilities[0, 0:]
        sorted_inds = [i[0] for i in sorted(enumerate(-probabilities), key=lambda x:x[1])]

    plt.figure()
    plt.imshow(np_image.astype(np.uint8))
    plt.axis('off')
    plt.show()

    names = imagenet.create_readable_names_for_imagenet_labels()
    for i in range(5):
        index = sorted_inds[i]
        print('Probability %0.2f%% => [%s]' % (probabilities[index] * 100, names[index]))
5.3 下载 VGG-16 断点文件
from datasets import dataset_utils
import tensorflow as tf

url = "http://download.tensorflow.org/models/vgg_16_2016_08_28.tar.gz"
checkpoints_dir = '/tmp/checkpoints'

if not tf.gfile.Exists(checkpoints_dir):
    tf.gfile.MakeDirs(checkpoints_dir)

dataset_utils.download_and_uncompress_tarball(url, checkpoints_dir)
5.4 应用 VGG-16 预训练模型
注意:1000 个类别而不是 1001.
import numpy as np
import os
import tensorflow as tf

try:
    import urllib2
except ImportError:
    import urllib.request as urllib

from datasets import imagenet
from nets import vgg
from preprocessing import vgg_preprocessing

from tensorflow.contrib import slim

image_size = vgg.vgg_16.default_image_size

with tf.Graph().as_default():
    url = 'https://upload.wikimedia.org/wikipedia/commons/d/d9/First_Student_IC_school_bus_202076.jpg'
    image_string = urllib.urlopen(url).read()
    image = tf.image.decode_jpeg(image_string, channels=3)
    processed_image = vgg_preprocessing.preprocess_image(image, image_size, image_size, is_training=False)
    processed_images  = tf.expand_dims(processed_image, 0)

    # Create the model, use the default arg scope to configure the batch norm parameters.
    with slim.arg_scope(vgg.vgg_arg_scope()):
        # 1000 classes instead of 1001.
        logits, _ = vgg.vgg_16(processed_images, num_classes=1000, is_training=False)
    probabilities = tf.nn.softmax(logits)

    init_fn = slim.assign_from_checkpoint_fn(
        os.path.join(checkpoints_dir, 'vgg_16.ckpt'),
        slim.get_model_variables('vgg_16'))

    with tf.Session() as sess:
        init_fn(sess)
        np_image, probabilities = sess.run([image, probabilities])
        probabilities = probabilities[0, 0:]
        sorted_inds = [i[0] for i in sorted(enumerate(-probabilities), key=lambda x:x[1])]

    plt.figure()
    plt.imshow(np_image.astype(np.uint8))
    plt.axis('off')
    plt.show()

    names = imagenet.create_readable_names_for_imagenet_labels()
    for i in range(5):
        index = sorted_inds[i]
        # Shift the index of a class name by one.
        print('Probability %0.2f%% => [%s]' % (probabilities[index] * 100, names[index+1]))
5.5 在新数据集上 fine-tune 模型
基于 Flower 数据集 fine-tune Inception 模型.
# Note that this may take several minutes.

import os

from datasets import flowers
from nets import inception
from preprocessing import inception_preprocessing

from tensorflow.contrib import slim
image_size = inception.inception_v1.default_image_size


def get_init_fn():
    """Returns a function run by the chief worker to warm-start the training."""
    checkpoint_exclude_scopes=["InceptionV1/Logits", "InceptionV1/AuxLogits"]  #原输出层

    exclusions = [scope.strip() for scope in checkpoint_exclude_scopes]

    variables_to_restore = []
    for var in slim.get_model_variables():
        for exclusion in exclusions:
            if var.op.name.startswith(exclusion):
                break
        else:
            variables_to_restore.append(var)

    return slim.assign_from_checkpoint_fn(
        os.path.join(checkpoints_dir, 'inception_v1.ckpt'),
        variables_to_restore)


train_dir = '/tmp/inception_finetuned/'

with tf.Graph().as_default():
    tf.logging.set_verbosity(tf.logging.INFO)

    dataset = flowers.get_split('train', flowers_data_dir)
    images, _, labels = load_batch(dataset, height=image_size, width=image_size)

    # Create the model, use the default arg scope to configure the batch norm parameters.
    with slim.arg_scope(inception.inception_v1_arg_scope()):
        logits, _ = inception.inception_v1(images, num_classes=dataset.num_classes, is_training=True)

    # Specify the loss function:
    one_hot_labels = slim.one_hot_encoding(labels, dataset.num_classes)
    slim.losses.softmax_cross_entropy(logits, one_hot_labels)
    total_loss = slim.losses.get_total_loss()

    # Create some summaries to visualize the training process:
    tf.summary.scalar('losses/Total Loss', total_loss)

    # Specify the optimizer and create the train op:
    optimizer = tf.train.AdamOptimizer(learning_rate=0.01)
    train_op = slim.learning.create_train_op(total_loss, optimizer)

    # Run the training:
    final_loss = slim.learning.train(train_op,
                                     logdir=train_dir,
                                     init_fn=get_init_fn(),
                                     number_of_steps=2)


print('Finished training. Last batch loss %f' % final_loss)
5.6 应用新数据集的 fine-tune 模型
import numpy as np
import tensorflow as tf
from datasets import flowers
from nets import inception

from tensorflow.contrib import slim

image_size = inception.inception_v1.default_image_size
batch_size = 3

with tf.Graph().as_default():
    tf.logging.set_verbosity(tf.logging.INFO)

    dataset = flowers.get_split('train', flowers_data_dir)
    images, images_raw, labels = load_batch(dataset, height=image_size, width=image_size)

    # Create the model, use the default arg scope to configure the batch norm parameters.
    with slim.arg_scope(inception.inception_v1_arg_scope()):
        logits, _ = inception.inception_v1(images, num_classes=dataset.num_classes, is_training=True)

    probabilities = tf.nn.softmax(logits)

    checkpoint_path = tf.train.latest_checkpoint(train_dir)
    init_fn = slim.assign_from_checkpoint_fn(checkpoint_path,
                                             slim.get_variables_to_restore())

    with tf.Session() as sess:
        with slim.queues.QueueRunners(sess):
            sess.run(tf.initialize_local_variables())
            init_fn(sess)
            np_probabilities, np_images_raw, np_labels = sess.run([probabilities, images_raw, labels])

            for i in range(batch_size):
                image = np_images_raw[i, :, :, :]
                true_label = np_labels[i]
                predicted_label = np.argmax(np_probabilities[i, :])
                predicted_name = dataset.labels_to_names[predicted_label]
                true_name = dataset.labels_to_names[true_label]

                plt.figure()
                plt.imshow(image.astype(np.uint8))
                plt.title('Ground Truth: [%s], Prediction [%s]' % (true_name, predicted_name))
                plt.axis('off')
                plt.show()
4 条评论
slim.evaluation中没有evaluation函数,可以用evaluate_once。
感谢,这个应该是早一段时间自己学习用了,现在随着版本更新会有变化. 会自己再回头整理下,再次感谢!
2.7小节有问题,4.4小节是正确的
感谢感谢.