原文:Getting Started with PyTorch Image Models (timm): A Practitioner’s Guide - 2022.02.02
Github: rwightman/pytorch-image-models
PyTorch Image Models(timm) 是一个优秀的图像分类 Python 库,其包含了大量的图像模型(Image Models)、Optimizers、Schedulers、Augmentations 等等.
timm 提供了参考的 training 和 validation 脚本,用于复现在 ImageNet 上的训练结果;以及更多的 官方文档 和 timmdocs project.
但,由于 timm 的功能之多,所以在定制使用时很难知道如何入手. 这里主要进行概述.
pip install timm==0.5.41. Models
timm 提供了大量的模型结构集合,而且很多模型都包含了预训练权重,或 PyTorch 训练、或从Jax和TensorFlow中移植,很方便下载使用.
模型列表:https://paperswithcode.com/lib/timm
查看模型列表:
#打印 timm 提供的模型列表
print(timm.list_models())
print(len(timm.list_models())) #739

#带有预训练权重的模型列表
print(timm.list_models(pretrained=True))
print(len(timm.list_models(pretrained=True))) #592其中,timm.list_models() 函数:
list_models(filter='', module='', pretrained=False, exclude_filters='', name_matches_cfg=False)查看特定族模型,如:
print(timm.list_models('gluon_resnet*'))
print(timm.list_models('*resnext*', 'resnet') )
print(timm.list_models('resnet*', pretrained=True))
1.1. create_model 一般用法
timm 创建模型最简单的方式是采用 create_model.
以 Resnet-D 模型为例(Bag of Tricks for Image Classification For Convolutional Neural Networks paper),其是Resnet 的一种变形,其采用 average pool 进行下采样.
model = timm.create_model('resnet50d', pretrained=True)
print(model)

#查看模型配置参数
print(model.default_cfg)
'''
{'url': 'https://github.com/rwightman/pytorch-image-models/releases/download/v0.1-weights/resnet50d_ra2-464e36ba.pth',
 'num_classes': 1000,
 'input_size': (3, 224, 224),
 'pool_size': (7, 7),
 'crop_pct': 0.875,
 'interpolation': 'bicubic',
 'mean': (0.485, 0.456, 0.406),
 'std': (0.229, 0.224, 0.225),
 'first_conv': 'conv1.0',
 'classifier': 'fc',
 'architecture': 'resnet50d'}
'''
1.2. create_model 修改输入通道
timm models 有个非常有用的特点,其可以处理任意通道数量的输入图像. 这是很多其他库所不具备的. 其实现原理可参考:
https://fastai.github.io/timmdocs/models#So-how-is-timm-able-to-load-these-weights?
model = timm.create_model('resnet50d', pretrained=True, in_chans=1)
print(model)

#test, single channel image
x = troch.randn(1, 1, 224, 224)

out = model(x)
print(out.shape) #torch.Size([1, 1000])
1.3. create_model 定制模型
timm create_model 函数提供了很多参数,用于模型定制,函数定义如:
create_model(model_name, pretrained=False, checkpoint_path='', scriptable=None, exportable=None, no_jit=None, **kwargs)**kwargs 示例参数如,
global_pool- 定义最终分类层所采用的 global pooling 类型. 取决于网络结构是否用到了全局池化层.drop_rate- 设定训练时的 dropout 比例,默认是 0.num_classes- 输出类别数
1.3.1. 修改类别数
查看当前模型输出层:
#如果输出层是 fc,则如
print(model.fc)
#Linear(in_features=2048, out_features=1000, bias=True)

#通用方式,查看输出层,
print(model.get_classifier())
修改输出层类别数:
model = timm.create_model('resnet50d', pretrained=True, num_classes=10)
print(model)
print(model.get_classifier())
#Linear(in_features=2048, out_features=10, bias=True)
如果完全不需要创建最后一层,可以将 num_classes 设为 0,模型将用恒等函数作为最后一层,其对于查看倒数第二层的输出有用.
model = timm.create_model('resnet50d', pretrained=True, num_classes=0)
print(model)
print(model.get_classifier())
#Identity()
1.3.2. Global pooling
在 model.default_cfg 中出现的 pool_size 设置,说明了在分类器前用到了一个全局池化层,如:
print(model.global_pool)
#SelectAdaptivePool2d (pool_type=avg, flatten=Flatten(start_dim=1, end_dim=-1))其中,pool_type 支持:
avg- 平均池化max- 最大池化avgmax- 平均池化和最大池化的求和,加权 0.5catevgmax- 沿着特征维度的平均池化和最大池化的输出的拼接,特征维度会翻倍''- 不采用 pooling,其被替换为恒等操作(Identity)
pool_types = ['avg', 'max', 'avgmax', 'catavgmax', '']
x = torch.randn(1, 3, 224, 224)

for pool_type in pool_types:
    model = timm.create_model('resnet50d', pretrained=True, num_classes=0, global_pool=pool_type)
    model.eval()
    out = model(x)
    print(out.shape)
1.3.3. 修改已有模型
如,
model = timm.create_model('resnet50d', pretrained=True)
print(f'[INFO]Original Pooling: {model.global_pool}')
print(f'[INFO]Original Classifier: {model.get_classifier}')

model = model.reset_classifier(10, 'max')
print(f'[INFO]Modified Pooling: {model.global_pool}')
print(f'[INFO]Modified Classifier: {model.get_classifier}')
1.3.4. 创建新的分类 head
虽然单个线性层已经足够得到比较好的结果,但有些时候需要更大的分类 head 来提升性能.
model = timm.create_model('resnet50d', pretrained=True, num_classes=10, global_pool='catavgmax')
print(model)

num_in_features = model.get_classifier().in_features
print(num_in_features)

model.fc = nn.Sequential(
    nn.BatchNorm1d(num_in_features),
    nn.Linear(in_features=num_in_features, out_features=512, bias=False),
    nn.ReLU(),
    nn.BatchNorm1d(512),
    nn.Dropout(0.4),
    nn.Linear(in_features=512, out_features=10, bias=False))
model.eval()
x = troch.randn(1, 3, 224, 224)
out = model(x)
print(out.shape)
1.4. 特征提取
timm 提供了很多不同类型网络中间层的机制,其有助于作为特征提取以应用于下游任务.
1.4.1. 最终特征图
from PIL import Image
import matplotlib.pyplot as plt
import numpy as np
import torch

image = Image.open('test.jpg')
image = torch.as_tensor(np.array(image, dtype=np.float32)).transpose(2, 0)[None]

model = timm.create_model("resnet50d", pretrained=True)
print(model.default_cfg)

#如,只查看最终特征图,这里是池化层前的最后一个卷积层的输出
feature_output = model.forward_features(image)

def vis_feature_output(feature_output):
    plt.imshow(feature_output[0]).transpose(0, 2).sum(-1).detach().numpy())
    plt.show()
#
vis_feature_output(feature_output)
1.4.2. 多种特征输出
model = timm.create_model("resnet50d", pretrained=True, features_only=True)

print(model.feature_info.module_name())
#['act1', 'layer1', 'layer2', 'layer3', 'layer4']

print(model.feature_info.reduction())
#[2, 4, 8, 16, 32]

print(model.feature_info.channels())
#[64, 256, 512, 1024, 2048]

out = model(image)
print(len(out)) # 5
for o in out:
    print(o.shape)
    plt.imshow(o[0].transpose(0, 2).sum(-1).detach().numpy())
    plt.show()
1.4.3. 采用 Torch FX
TorchVision 新增了一个 FX 模块,其更便于获得输入在前向计算过程中的中间变换. 通过符号性的追踪前向方法,以生成一个图,途中的每个节点表示一个操作. 由于节点是易读的,其可以很方便的准确指定到具体节点.
#torchvision >= 0.11.0
from torchvision.models.feature_extraction import get_graph_node_names, create_feature_extractor

model = timm.create_model("resnet50d", pretrained=True, exportable=True)

nodes, _ = get_graph_node_names(model)
print(nodes)

features = {'layer1.0.act2': 'out'}
feature_extractor = create_feature_extractor(model, return_nodes=features)
print(feature_extractor)

out = feature_extractor(image)
plt.imshow(out['out'][0].transpose(0, 2).sum(-1).detach().numpy())
plt.show()
1.5. 模型导出不同格式
模型训练后,一般推荐将模型导出为优化的格式,以进行推断.
1.5.1. 导出 TorchScript
https://pytorch.org/docs/stable/jit.html
https://pytorch.org/tutorials/beginner/Intro_to_TorchScript_tutorial.html
model = timm.create_model("resnet50d", pretrained=True, scriptable=True)
model.eval() #重要

scripted_model = torch.jit.script(model)
print(scripted_model)
print(scripted_model(torch.rand(8, 3, 224, 224)).shape)
1.5.2. 导出 ONNX
Open Neural Network eXchange (ONNX)
https://pytorch.org/docs/master/onnx.html
model = timm.create_model("resnet50d", pretrained=True, exportable=True)
model.eval() #重要

x = torch.randn(2, 3, 224, 224, requires_grad=True)
torch_out = model(x)

#Export the model
torch.onnx.export(model,                   #模型
                 x,                        #输入
                 'resnet50d.onnx',         #模型导出路径
                  export_params=True,      #模型文件存储训练参数权重
                  opset_version=10,        #ONNX 版本
                  do_constant_folding=True,#是否执行不断折叠优化
                  input_names=['input'],   #输入名
                  output_names=['output'], #输出名
                  dynamic_axes={'input': {0: 'batch_size'},
                               'output': {0: 'batch_size'}}
                 )

#验证导出模型
import onnx

onnx_model = onnx.load('resnet50d.onnx')
onnx.checker.check_model(onnx_model)

traced_model = torch.jit.trace(model, torch.rand(8, 3, 224, 224))
type(traced_model)

print(traced_model(torch.rand(8, 3, 224, 224)).shape)
2. Augmentations
timm 的数据格式与 TorchVision 类似,PIL 图像作为输入.
from timm.data.transforms_factory import create_transform

print(create_transform(224, ))
'''
Compose(
    Resize(size=256, interpolation=bilinear, max_size=None, antialias=None)
    CenterCrop(size=(224, 224))
    ToTensor()
    Normalize(mean=tensor([0.4850, 0.4560, 0.4060]), std=tensor([0.2290, 0.2240, 0.2250]))
)
'''

print(create_transform(224, is_training=True))
'''
Compose(
    RandomResizedCropAndInterpolation(size=(224, 224), scale=(0.08, 1.0), ratio=(0.75, 1.3333), interpolation=bilinear)
    RandomHorizontalFlip(p=0.5)
    ColorJitter(brightness=[0.6, 1.4], contrast=[0.6, 1.4], saturation=[0.6, 1.4], hue=None)
    ToTensor()
    Normalize(mean=tensor([0.4850, 0.4560, 0.4060]), std=tensor([0.2290, 0.2240, 0.2250]))
)

'''
2.1. RandAugment
对于新任务场景,很难确定要用到哪些数据增强. 且,鉴于如此多的数据增强策略,其组合数量更是庞大.
一种好的起点是,采用在其他任务上被验证有效的数据增强pipeline. 如,RandAugment
RandAugment,是一种自动数据增强方法,其从增强方法集合中均匀采样,如, equalization, rotation, solarization, color jittering, posterizing, changing contrast, changing brightness, changing sharpness, shearing, and translations,并按序应用其中的一些.
RandAugment: Practical automated data augmentation with a reduced search space
RandAugment 参数:
- N - 随机变换的数量( number of distortions uniformly sampled and applied per-image)
- M - 变换的幅度(distortion magnitude)
timm 中 RandAugment 是通过配置字符串来指定的,以 - 分割符.
m- 随机增强的幅度n- 每张图像进行的随机变换数,默认为 2.mstd- 标准偏差的噪声幅度mmax- 设置幅度的上界,默认 10w- 加权索引的概率(index of a set of weights to influence choice of operation)inc- 采用随幅度增加的数据增强,默认为 0
如,
rand-m9-n3-mstd0.5- 幅度为9,每张图像 3 种数据增强,mstd 为 0.5rand-mstd1-w0- mstd 为 1.0,weights 为 0,默认幅度m为10,每张图像 2 种数据增强
print(create_transform(224, is_training=True, auto_augment='rand-m9-mstd0.5'))
'''
Compose(
    RandomResizedCropAndInterpolation(size=(224, 224), scale=(0.08, 1.0), ratio=(0.75, 1.3333), interpolation=bilinear)
    RandomHorizontalFlip(p=0.5)
    RandAugment(n=2, ops=
    AugmentOp(name=AutoContrast, p=0.5, m=9, mstd=0.5)
    AugmentOp(name=Equalize, p=0.5, m=9, mstd=0.5)
    AugmentOp(name=Invert, p=0.5, m=9, mstd=0.5)
    AugmentOp(name=Rotate, p=0.5, m=9, mstd=0.5)
    AugmentOp(name=Posterize, p=0.5, m=9, mstd=0.5)
    AugmentOp(name=Solarize, p=0.5, m=9, mstd=0.5)
    AugmentOp(name=SolarizeAdd, p=0.5, m=9, mstd=0.5)
    AugmentOp(name=Color, p=0.5, m=9, mstd=0.5)
    AugmentOp(name=Contrast, p=0.5, m=9, mstd=0.5)
    AugmentOp(name=Brightness, p=0.5, m=9, mstd=0.5)
    AugmentOp(name=Sharpness, p=0.5, m=9, mstd=0.5)
    AugmentOp(name=ShearX, p=0.5, m=9, mstd=0.5)
    AugmentOp(name=ShearY, p=0.5, m=9, mstd=0.5)
    AugmentOp(name=TranslateXRel, p=0.5, m=9, mstd=0.5)
    AugmentOp(name=TranslateYRel, p=0.5, m=9, mstd=0.5))
    ToTensor()
    Normalize(mean=tensor([0.4850, 0.4560, 0.4060]), std=tensor([0.2290, 0.2240, 0.2250]))
)
'''
也可以通过 rand_augment_transform 函数来实现:
from timm.data.auto_augment import rand_augment_transform

tfm = rand_augment_transform(config_str='rand-m9-mstd0.5',
                             hparams={'img_mean': (124, 116, 104)})
print(tfm)
'''
RandAugment(n=2, ops=
    AugmentOp(name=AutoContrast, p=0.5, m=9, mstd=0.5)
    AugmentOp(name=Equalize, p=0.5, m=9, mstd=0.5)
    AugmentOp(name=Invert, p=0.5, m=9, mstd=0.5)
    AugmentOp(name=Rotate, p=0.5, m=9, mstd=0.5)
    AugmentOp(name=Posterize, p=0.5, m=9, mstd=0.5)
    AugmentOp(name=Solarize, p=0.5, m=9, mstd=0.5)
    AugmentOp(name=SolarizeAdd, p=0.5, m=9, mstd=0.5)
    AugmentOp(name=Color, p=0.5, m=9, mstd=0.5)
    AugmentOp(name=Contrast, p=0.5, m=9, mstd=0.5)
    AugmentOp(name=Brightness, p=0.5, m=9, mstd=0.5)
    AugmentOp(name=Sharpness, p=0.5, m=9, mstd=0.5)
    AugmentOp(name=ShearX, p=0.5, m=9, mstd=0.5)
    AugmentOp(name=ShearY, p=0.5, m=9, mstd=0.5)
    AugmentOp(name=TranslateXRel, p=0.5, m=9, mstd=0.5)
    AugmentOp(name=TranslateYRel, p=0.5, m=9, mstd=0.5))
'''
2.2. CutMix 和 Mixup
timm 的 Mixup 类,支持的不同混合策略有:
batch- CutMix vs Mixup selection, lambda, and CutMix region sampling are performed per batchpair- mixing, lambda, and region sampling are performed on sampled pairs within a batchelem- mixing, lambda, and region sampling are performed per image within batchhalf- the same as elementwise but one of each mixing pair is discarded so that each sample is seen once per epoch
Mixup 支持的数据增强有:
- mixup_alpha (float): mixup alpha value, mixup is active if > 0., (default: 1)
- cutmix_alpha (float): cutmix alpha value, cutmix is active if > 0. (default: 0)
- cutmix_minmax (List[float]): cutmix min/max image ratio, cutmix is active and uses this vs alpha if not None.
- prob (float): the probability of applying mixup or cutmix per batch or element (default: 1)
- switch_prob (float): the probability of switching to cutmix instead of mixup when both are active (default: 0.5)
- mode (str): how to apply mixup/cutmix params (default: batch)
- label_smoothing (float): the amount of label smoothing to apply to the mixed target tensor (default: 0.1)
- num_classes (int): the number of classes for the target variable
from timm.data import ImageDataset
from torch.utils.data import DataLoader

def create_dataloader_iterator():
    dataset = ImageDataset('pets/images', transform=create_transform(224, ))
    dl = iter(DataLoader(dataset, batch_size=2))

    return dl

dataloader = create_dataloader_iterator()
inputs, classes = next(dataloader)

#
out = torchvision.utils.make_grid(inputs)
imshow(out, title=[x.item() for x in classes])


#
from timm.data.mixup import Mixup

mixup_args = {'mixup_alpha': 1.,
             'cutmix_alpha': 1.,
             'prob': 1,
             'switch_prob': 0.5,
             'mode': 'batch',
             'label_smoothing': 0.1,
             'num_classes': 2}

mixup_fn = Mixup(**mixup_args)
mixed_inputs, mixed_classes = mixup_fn(inputs.to(torch.device('cuda:0')),
                                      classes.to(torch.device('cuda:0')))
out = torchvision.utils.make_grid(mixed_inputs)
imshow(out, title=mixed_classes)
3. Datasets
timm 中 create_dataset 函数期望有两个输入参数:
name- 指定待加载数据集的名字root- 数据集存放根目录
其支持不同的数据存储:
#TorchVision
ds = create_dataset('torch/cifar10', 'cifar10', download=True, split='train')
print(ds, type(ds))
print(ds[0])

#TensorFlow
ds = create_dataset('tfds/beans', 'beans', download=True, split='train[:10%]', batch_size=2, is_training=True)
print(ds)
ds_iter = iter(ds)
image, label = next(ds_iter)

#本地文件夹
ds = create_dataset(name='', root='imagenette/imagenette2-320.tar', transfor=create_transform(224))
image, label = ds[0]
print(image.shape)
3.1. ImageDataset 类
除了 create_dataset,timm 还提供了两个 ImageDataset 和 IterableImageDataset 以适应更多的场景.
from timm.data import ImageDataset

imagenette_ds = ImageDataset('imagenette/imagenette2-320/train')
print(len(imagenette_ds))
print(imagenette_ds.parser)
print(imagenette_ds.parser.class_to_idx)


from timm.data.parser.parser_image_in_tar import ParserImageTar

data_path = 'imagenette'
ds = ImageDataset(data_path, parser=ParserImageInTar(data_path))
3.1.1. 定制 Parser
参考 ParserImageFolder:
""" A dataset parser that reads images from folders

Folders are scannerd recursively to find image files. Labels are based
on the folder hierarchy, just leaf folders by default.

Hacked together by / Copyright 2020 Ross Wightman
"""
import os

from timm.utils.misc import natural_key

from .parser import Parser
from .class_map import load_class_map
from .constants import IMG_EXTENSIONS


def find_images_and_targets(folder, types=IMG_EXTENSIONS, class_to_idx=None, leaf_name_only=True, sort=True):
    labels = []
    filenames = []
    for root, subdirs, files in os.walk(folder, topdown=False, followlinks=True):
        rel_path = os.path.relpath(root, folder) if (root != folder) else ''
        label = os.path.basename(rel_path) if leaf_name_only else rel_path.replace(os.path.sep, '_')
        for f in files:
            base, ext = os.path.splitext(f)
            if ext.lower() in types:
                filenames.append(os.path.join(root, f))
                labels.append(label)
    if class_to_idx is None:
        # building class index
        unique_labels = set(labels)
        sorted_labels = list(sorted(unique_labels, key=natural_key))
        class_to_idx = {c: idx for idx, c in enumerate(sorted_labels)}
    images_and_targets = [(f, class_to_idx[l]) for f, l in zip(filenames, labels) if l in class_to_idx]
    if sort:
        images_and_targets = sorted(images_and_targets, key=lambda k: natural_key(k[0]))
    return images_and_targets, class_to_idx


class ParserImageFolder(Parser):
    def __init__(
            self,
            root,
            class_map=''):
        super().__init__()

        self.root = root
        class_to_idx = None
        if class_map:
            class_to_idx = load_class_map(class_map, root)
        self.samples, self.class_to_idx = find_images_and_targets(root, class_to_idx=class_to_idx)
        if len(self.samples) == 0:
            raise RuntimeError(
                f'Found 0 images in subfolders of {root}. Supported image extensions are {", ".join(IMG_EXTENSIONS)}')

    def __getitem__(self, index):
        path, target = self.samples[index]
        return open(path, 'rb'), target

    def __len__(self):
        return len(self.samples)

    def _filename(self, index, basename=False, absolute=False):
        filename = self.samples[index][0]
        if basename:
            filename = os.path.basename(filename)
        elif not absolute:
            filename = os.path.relpath(filename, self.root)
        return filename
如:
from pathlib import Path

from timm.data.parsers.parser import Parser


class ParserImageName(Parser):
    def __init__(self, root, class_to_idx=None):
        super().__init__()

        self.root = Path(root)
        self.samples = list(self.root.glob("*.jpg"))

        if class_to_idx:
            self.class_to_idx = class_to_idx
        else:
            classes = sorted(
                set([self.__extract_label_from_path(p) for p in self.samples]),
                key=lambda s: s.lower(),
            )
            self.class_to_idx = {c: idx for idx, c in enumerate(classes)}

    def __extract_label_from_path(self, path):
        return "_".join(path.parts[-1].split("_")[0:-1])

    def __getitem__(self, index):
        path = self.samples[index]
        target = self.class_to_idx[self.__extract_label_from_path(path)]
        return open(path, "rb"), target

    def __len__(self):
        return len(self.samples)

    def _filename(self, index, basename=False, absolute=False):
        filename = self.samples[index][0]
        if basename:
            filename = filename.parts[-1]
        elif not absolute:
            filename = filename.absolute()
        return filename

#
data_path = 'test'
ds = ImageDataset(data_path, parser=ParserImageName(data_path))
print(ds[0])
print(ds.parser.class_to_idx)
4. Optimizers
timm 支持的优化器有:
- SGD
- Adam
- AdamW
- AdamP
- RMSPropTF
- LAMB - FusedLAMB optimizer from Apex 的 PyTorch 版
- AdaBelief
- MADGRAD
- AdaHessian
import inspect
import timm.optim

optims_list = [cls_name for cls_name, cls_obj in inspect.getmembers(timm.optim) if inspect.isclass(cls_obj) if cls_name != 'Lookhead']
print(optims_list)
timm 中 create_optimizer_v2 函数.
import torch

model = torch.nn.Sequential(torch.nn.Linear(2, 1),
                           torch.nn.Flatten(0, 1))

optimizer = timm.optim.create_optimizer_v2(model, opt='sgd', lr=0.01, momentum=0.8)
print(optimizer, type(optimizer))
'''
SGD (
Parameter Group 0
    dampening: 0
    lr: 0.01
    momentum: 0.8
    nesterov: True
    weight_decay: 0.0
)
<class 'torch.optim.sgd.SGD'>
'''

optimizer = timm.optim.create_optimizer_v2(model, opt='lamb', lr=0.01, weight_decay=0.01)
print(optimizer, type(optimizer))
'''
Lamb (
Parameter Group 0
    always_adapt: False
    betas: (0.9, 0.999)
    bias_correction: True
    eps: 1e-06
    grad_averaging: True
    lr: 0.01
    max_grad_norm: 1.0
    trust_clip: False
    weight_decay: 0.0

Parameter Group 1
    always_adapt: False
    betas: (0.9, 0.999)
    bias_correction: True
    eps: 1e-06
    grad_averaging: True
    lr: 0.01
    max_grad_norm: 1.0
    trust_clip: False
    weight_decay: 0.01
)
<class 'timm.optim.lamb.Lamb'>
'''
手工创建优化器,如:
optimizer = timm.optim.RMSpropTF(model.parameters(), lr=0.01)4.1. 使用示例
# replace
# optimizer = torch.optim.Adam(model.parameters(), lr=0.01)

# with
optimizer = timm.optim.AdamP(model.parameters(), lr=0.01)

for epoch in num_epochs:
    for batch in training_dataloader:
        inputs, targets = batch
        outputs = model(inputs)
        loss = loss_function(outputs, targets)

        loss.backward()
        optimizer.step()
        optimizer.zero_grad()


#
optimizer = timm.optim.Adahessian(model.parameters(), lr=0.01)

is_second_order = (
    hasattr(optimizer, "is_second_order") and optimizer.is_second_order
)  # True

for epoch in num_epochs:
    for batch in training_dataloader:
        inputs, targets = batch
        outputs = model(inputs)
        loss = loss_function(outputs, targets)

        loss.backward(create_graph=second_order)
        optimizer.step()
        optimizer.zero_grad()
4.2. Lookahead
Lookahead Optimizer: k steps forward, 1 step back
optimizer = timm.optim.create_optimizer_v2(model.parameters(), opt='lookahead_adam', lr=0.01)
#或
timm.optim.Lookahead(optimizer, alpha=0.5, k=6)
optimizer.sync_lookahead()
示例如,
optimizer = timm.optim.AdamP(model.parameters(), lr=0.01)
optimizer = timm.optim.Lookahead(optimizer)

for epoch in num_epochs:
    for batch in training_dataloader:
        inputs, targets = batch
        outputs = model(inputs)
        loss = loss_function(outputs, targets)

        loss.backward()

        optimizer.step()
        optimizer.zero_grad()

    optimizer.sync_lookahead()
5. Schedulers
timm 支持的 Schedulers 有:
- StepLRScheduler: 每 n 次迭代衰减一次学习率,类似于 torch.optim.lr_scheduler.StepLR
- MultiStepLRScheduler: 设置特定迭代次数,衰减学习率,类似于 torch.optim.lr_scheduler.MultiStepLR
- PlateauLRScheduler: reduces the learning rate by a specified factor each time a specified metric plateaus; 类似于 torch.optim.lr_scheduler.ReduceLROnPlateau
- CosineLRScheduler: cosine decay schedule with restarts, 类似于 torch.optim.lr_scheduler.CosineAnnealingWarmRestarts
- TanhLRScheduler: hyberbolic-tangent decay schedule with restarts
- PolyLRScheduler: polynomial decay schedule
5.1. 使用示例
与PyTorch shceduler 不同的是,timm scheduler 每个 epoch 更新两次:
.step_update- 每次 optimizer 更新后调用..step- 每个 epoch 结束后调用
training_epochs = 300
cooldown_epochs = 10
num_epochs = training_epochs + cooldown_epochs

optimizer = timm.optim.AdamP(my_model.parameters(), lr=0.01)
scheduler = timm.scheduler.CosineLRScheduler(optimizer, t_initial=training_epochs)

for epoch in range(num_epochs):
    num_steps_per_epoch = len(train_dataloader)
    num_updates = epoch * num_steps_per_epoch

    for batch in training_dataloader:
        inputs, targets = batch
        outputs = model(inputs)
        loss = loss_function(outputs, targets)

        loss.backward()
        optimizer.step()
        scheduler.step_update(num_updates=num_updates)

        optimizer.zero_grad()

    scheduler.step(epoch + 1)
5.2. CosineLRScheduler
为了深入阐述 timm 所提供的参数选项,这里以 timm 默认训练脚本中所采用的 sheduler - CosineLRScheduler 为例.
timm 的 cosine scheduler 与 PyTorch 中的实现是不同的.
5.2.1. PyTorch CosineAnnealingWarmRestarts
CosineAnnealingWarmRestarts 需要设定如下参数:
- T_0 (int): Number of iterations for the first restart.
- T_mult (int): A factor that increases T_{i} after a restart. (Default:
1) - eta_min (float): Minimum learning rate. (Default:
0.) - last_epoch (int) — The index of last epoch. (Default:
-1)
#args
num_epochs=300
num_epoch_repeat=num_epochs//2
num_steps_per_epoch=10

def create_model_and_optimizer():
    model = torch.nn.Linear(2, 1)
    optimizer = torch.optim.SGD(model.parameters(), lr=0.05)
    return model, optimizer

#create learning rate scheduler
model, optimizer = create_model_and_optimizer()
scheduler = torch.optim.lr_scheduler.CosineAnnealingWarmRestarts(
            optimizer,
            T_0=num_epoch_repeat*num_steps_per_epoch,
            T_mult=1,
            eta_min=1e-6,
            last_epoch=-1)

#vis
import matplotlib.pyplot as plt

lrs = []
for epoch in range(num_epochs):
    for i in range(num_steps_per_epoch):
        scheduler.step()
    lrs.append(optimizer.param_groups[0]['lr'])
plt.plot(lrs)
plt.show()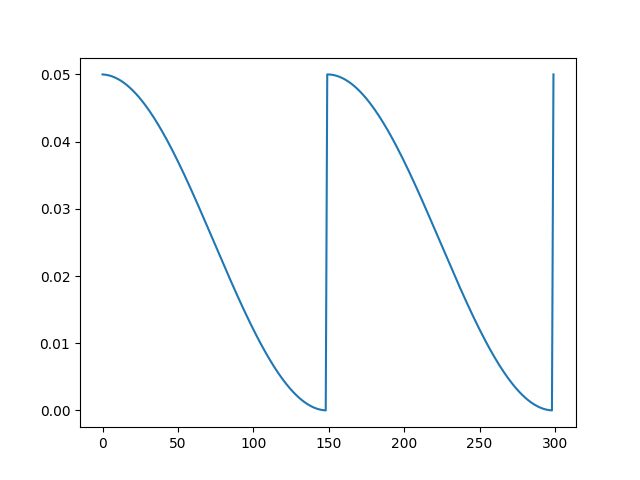
可以看出,lr 在 150 epoch 前保持衰减,而在第 150 epoch 时重启为初始值,并开始再次衰减.
5.2.2. timm CosineLRScheduler
timm CosineLRScheduler 需要设定如下参数:
- t_initial (int): Number of iterations for the first restart, this is equivalent to
T_0in torch’s implementation - lr_min (float): Minimum learning rate, this is equivalent to eta_min in torch’s implementation (Default:
0.) - cycle_mul (float): A factor that increases T_{i} after a restart, this is equivalent to T_mult in torch’s implementation (Default:
1) - cycle_limit (int): Limit the number of restarts in a cycle (Default:
1) - t_in_epochs (bool): Whether the number iterations is given in terms of epochs rather than the number of batch updates (Default:
True)
#args
num_epochs=300
num_epoch_repeat=num_epochs//2
num_steps_per_epoch=10

def create_model_and_optimizer():
    model = torch.nn.Linear(2, 1)
    optimizer = torch.optim.SGD(model.parameters(), lr=0.05)
    return model, optimizer

#create learning rate scheduler
model, optimizer = create_model_and_optimizer()
scheduler = timm.scheduler.CosineLRScheduler(
            optimizer,
            t_initial=num_epoch_repeat*num_steps_per_epoch,
            lr_min=1e-6,
            cycle_limit=num_epoch_repeat+1,
            t_in_epochs=False)
#or
scheduler = timm.scheduler.CosineLRScheduler(
            optimizer,
            t_initial=num_epoch_repeat,
            lr_min=1e-6,
            cycle_limit=num_epoch_repeat+1,
            t_in_epochs=True)

#vis
import matplotlib.pyplot as plt

lrs = []
for epoch in range(num_epochs):
    num_updates = epoch * num_steps_per_epoch
    for i in range(num_steps_per_epoch):
        num_updates += 1
        scheduler.step_update(num_updates=num_updates)
    scheduler.step(epoch+1)
    lrs.append(optimizer.param_groups[0]['lr'])
plt.plot(lrs)
plt.show()
示例策略:
scheduler = timm.scheduler.CosineLRScheduler(
            optimizer,
            t_initial=num_epoch_repeat*num_steps_per_epoch,
            cycle_mul=2.,
            cycle_limit=num_epoch_repeat+1,
            t_in_epochs=False)


scheduler = timm.scheduler.CosineLRScheduler(
            optimizer,
            t_initial=num_epoch_repeat*num_steps_per_epoch,
            lr_min=1e-5,
            cycle_limit=1)

scheduler = timm.scheduler.CosineLRScheduler(
            optimizer,
            t_initial=50,
            lr_min=1e-5,
            cycle_decay=0.8,
            cycle_limit=num_epoch_repeat+1)


scheduler = timm.scheduler.CosineLRScheduler(
            optimizer,
            t_initial=num_epoch_repeat*num_steps_per_epoch,
            lr_min=1e-5,
            k_decay=0.5,
            cycle_limit=num_epoch_repeat+1)

scheduler = timm.scheduler.CosineLRScheduler(
            optimizer,
            t_initial=num_epoch_repeat*num_steps_per_epoch,
            lr_min=1e-5,
            k_decay=2,
            cycle_limit=num_epoch_repeat+1)
5.2.3. 添加 warm up
如,设置 20 个 warm up epochs,
#args
num_epochs=300
num_epoch_repeat=num_epochs//2
num_steps_per_epoch=10

def create_model_and_optimizer():
    model = torch.nn.Linear(2, 1)
    optimizer = torch.optim.SGD(model.parameters(), lr=0.05)
    return model, optimizer

#create learning rate scheduler
scheduler = timm.scheduler.CosineLRScheduler(
            optimizer,
            t_initial=num_epoch_repeat,
            lr_min=1e-5,
            cycle_limit=num_epoch_repeat+1,
            warmup_lr_init=0.01,
            warmup_t=20)

#vis
import matplotlib.pyplot as plt

lrs = []
for epoch in range(num_epochs):
    num_updates = epoch * num_steps_per_epoch
    for i in range(num_steps_per_epoch):
        num_updates += 1
        scheduler.step_update(num_updates=num_updates)
    scheduler.step(epoch+1)
    lrs.append(optimizer.param_groups[0]['lr'])
plt.plot(lrs)
plt.show()
5.2.4. 添加 noise
#args
num_epochs=300
num_epoch_repeat=num_epochs//2
num_steps_per_epoch=10

def create_model_and_optimizer():
    model = torch.nn.Linear(2, 1)
    optimizer = torch.optim.SGD(model.parameters(), lr=0.05)
    return model, optimizer

#create learning rate scheduler
scheduler = timm.scheduler.CosineLRScheduler(
            optimizer,
            t_initial=num_epoch_repeat,
            lr_min=1e-5,
            cycle_limit=num_epoch_repeat+1,
            noise_range_t=(0, 150), #noise_range_t:噪声范围
            noise_pct=0.1) #noise_pct:噪声程度

#vis
import matplotlib.pyplot as plt

lrs = []
for epoch in range(num_epochs):
    num_updates = epoch * num_steps_per_epoch
    for i in range(num_steps_per_epoch):
        num_updates += 1
        scheduler.step_update(num_updates=num_updates)
    scheduler.step(epoch+1)
    lrs.append(optimizer.param_groups[0]['lr'])
plt.plot(lrs)
plt.show()
5.3. timm 默认设置
def create_model_and_optimizer():
    model = torch.nn.Linear(2, 1)
    optimizer = torch.optim.SGD(model.parameters(), lr=0.05)
    return model, optimizer

#create learning rate scheduler
model, optimizer = create_model_and_optimizer()

#args
training_epochs=300
cooldown_epochs=10
num_epochs=training_epochs + cooldown_epochs
num_steps_per_epoch=10

scheduler = timm.scheduler.CosineLRScheduler(
            optimizer,
            t_initial=training_epochs,
            lr_min=1e-6,
            t_in_epochs=True,
            warmup_t=3,
            warmup_lr_init=1e-4,
            cycle_limit=1) # no restart

#vis
import matplotlib.pyplot as plt

lrs = []
for epoch in range(num_epochs):
    num_updates = epoch * num_steps_per_epoch
    for i in range(num_steps_per_epoch):
        num_updates += 1
        scheduler.step_update(num_updates=num_updates)
    scheduler.step(epoch+1)
    lrs.append(optimizer.param_groups[0]['lr'])
plt.plot(lrs)
plt.show()
5.4. 其他 Scheduler
#TanhLRScheduler
scheduler = timm.scheduler.TanhLRScheduler(
            optimizer,
            t_initial=num_epoch_repeat,
            lr_min=1e-6,
            cycle_limit=num_epoch_repeat+1)

#PolyLRScheduler
scheduler = timm.scheduler.PolyLRScheduler(
            optimizer,
            t_initial=num_epoch_repeat,
            lr_min=1e-6,
            cycle_limit=num_epoch_repeat+1)

scheduler = timm.scheduler.PolyLRScheduler(
            optimizer,
            t_initial=num_epoch_repeat,
            lr_min=1e-6,
            cycle_limit=num_epoch_repeat+1,
            k_decay=0.5)

scheduler = timm.scheduler.PolyLRScheduler(
            optimizer,
            t_initial=num_epoch_repeat,
            lr_min=1e-6,
            cycle_limit=num_epoch_repeat+1,
            k_decay=2)
6. EMA 模型指数移动平均
EMA,Exponential Moving Average Model
模型训练时,一种好的方式是,将模型权重值设置为整个训练过程中所有参数的移动平均,而不是仅仅只采用最后一次增量更新的.
实际上,这往往是通过保持 EMA 来实现的,其是训练的模型副本.
不过,相比于每次更新 step 更新全量的模型参数,一般将这些参数设置为当前参数值和更新参数值的线性组合,公式如下:
$$ updated\_EMA\_model\_weights = decay * EMA\_model\_weights + (1. - decay) * updated\_model\_weights $$
如,
$$ updated\_EMA\_model\_weights = 0.99 * EMA\_model\_weights + 0.01 * updated\_model\_weights $$
timm 中 ModelEmaV2 示例,
model = create_model().to(gpu_device)
ema_model = timm.utils.ModelEmaV2(model, decay=0.9998)

for epoch in num_epochs:
    for batch in training_dataloader:
        inputs, targets = batch
        outputs = model(inputs)
        loss = loss_function(outputs, targets)

        loss.backward()
        optimizer.step()
        optimizer.zero_grad()

        ema_model.update(model)

    for batch in validation_dataloader:
        inputs, targets = batch
        outputs = model(inputs)
        validation_loss = loss_function(outputs, targets)

        ema_model_outputs = ema_model.module(inputs)
        ema_model_validation_loss = loss_function(ema_model_outputs, targets)