原文:Latent Space Exploration with StyleGAN2 - 2020.08.10
主要介绍 StyleGAN2 中潜空间(latent space)是什么,以及其能做什么.
StyleGAN2
关于 latent space + StyleGAN2 的博文:
- Latent Space Understanding - Ekin Tiu - Understanding Latent Space in Machine Learning
- StyleGAN2 结构 - Connor Shorten - StyleGAN2
- GANs 概述 + StyleGAN2 改变了什么 - akira - From GAN basic to StyleGAN2
注:
- https://github.com/AmarSaini/Epoching_StyleGan2_Setup
- 本文基于 TensorFlow 1.14
- 本文不过多关注于模型,采用官方的 StyleGan2 Repo
本文进行的结构:
[0] Set-Up 只运行一次
- 必要文件拉取
[1] - GANs 概览
- 回顾
zlatent vector、Generator 和 Discriminator - GANs vs VAEs
[2] - 生成人脸
- 采用官方 StyleGAN2 项目创建 Generator 输出
- 可视化生成输出的 latent codes.
[3] - Latent Codes 插值
- 采用 Generator 输出的 latent codes 得到人脸图像
[4] - 采用 landmark detection 方法进行人脸图像对齐
- 对齐(归一化)输入图像,以进行 latent space 投影(projection)
[5] - 将输入图像投影到 Latent Space
- 学习对齐后输入图像的 latent codes
- 投影的 latent codes 的插值
[6] - Latent Directions/Controls 修改投影图像
- 采用预先计算的 latent directions 来改变输入图像的人脸特征
[7] - Widget-App 交互
0. Set-Up
下载项目:
git clone https://github.com/AmarSaini/Epoching_StyleGan2_Setup.git项目处理:
import shutil
from pathlib import Path

repo_root = Path('Epoching_StyleGan2_Setup/')

# Pull contents out of the repo, into our current directory.
for content in repo_root.iterdir():
    shutil.move(str(content), '.')

shutil.rmtree(repo_root)
安装python依赖库:
pip install requests
pip install Pillow
pip install tqdm
pip install dlib
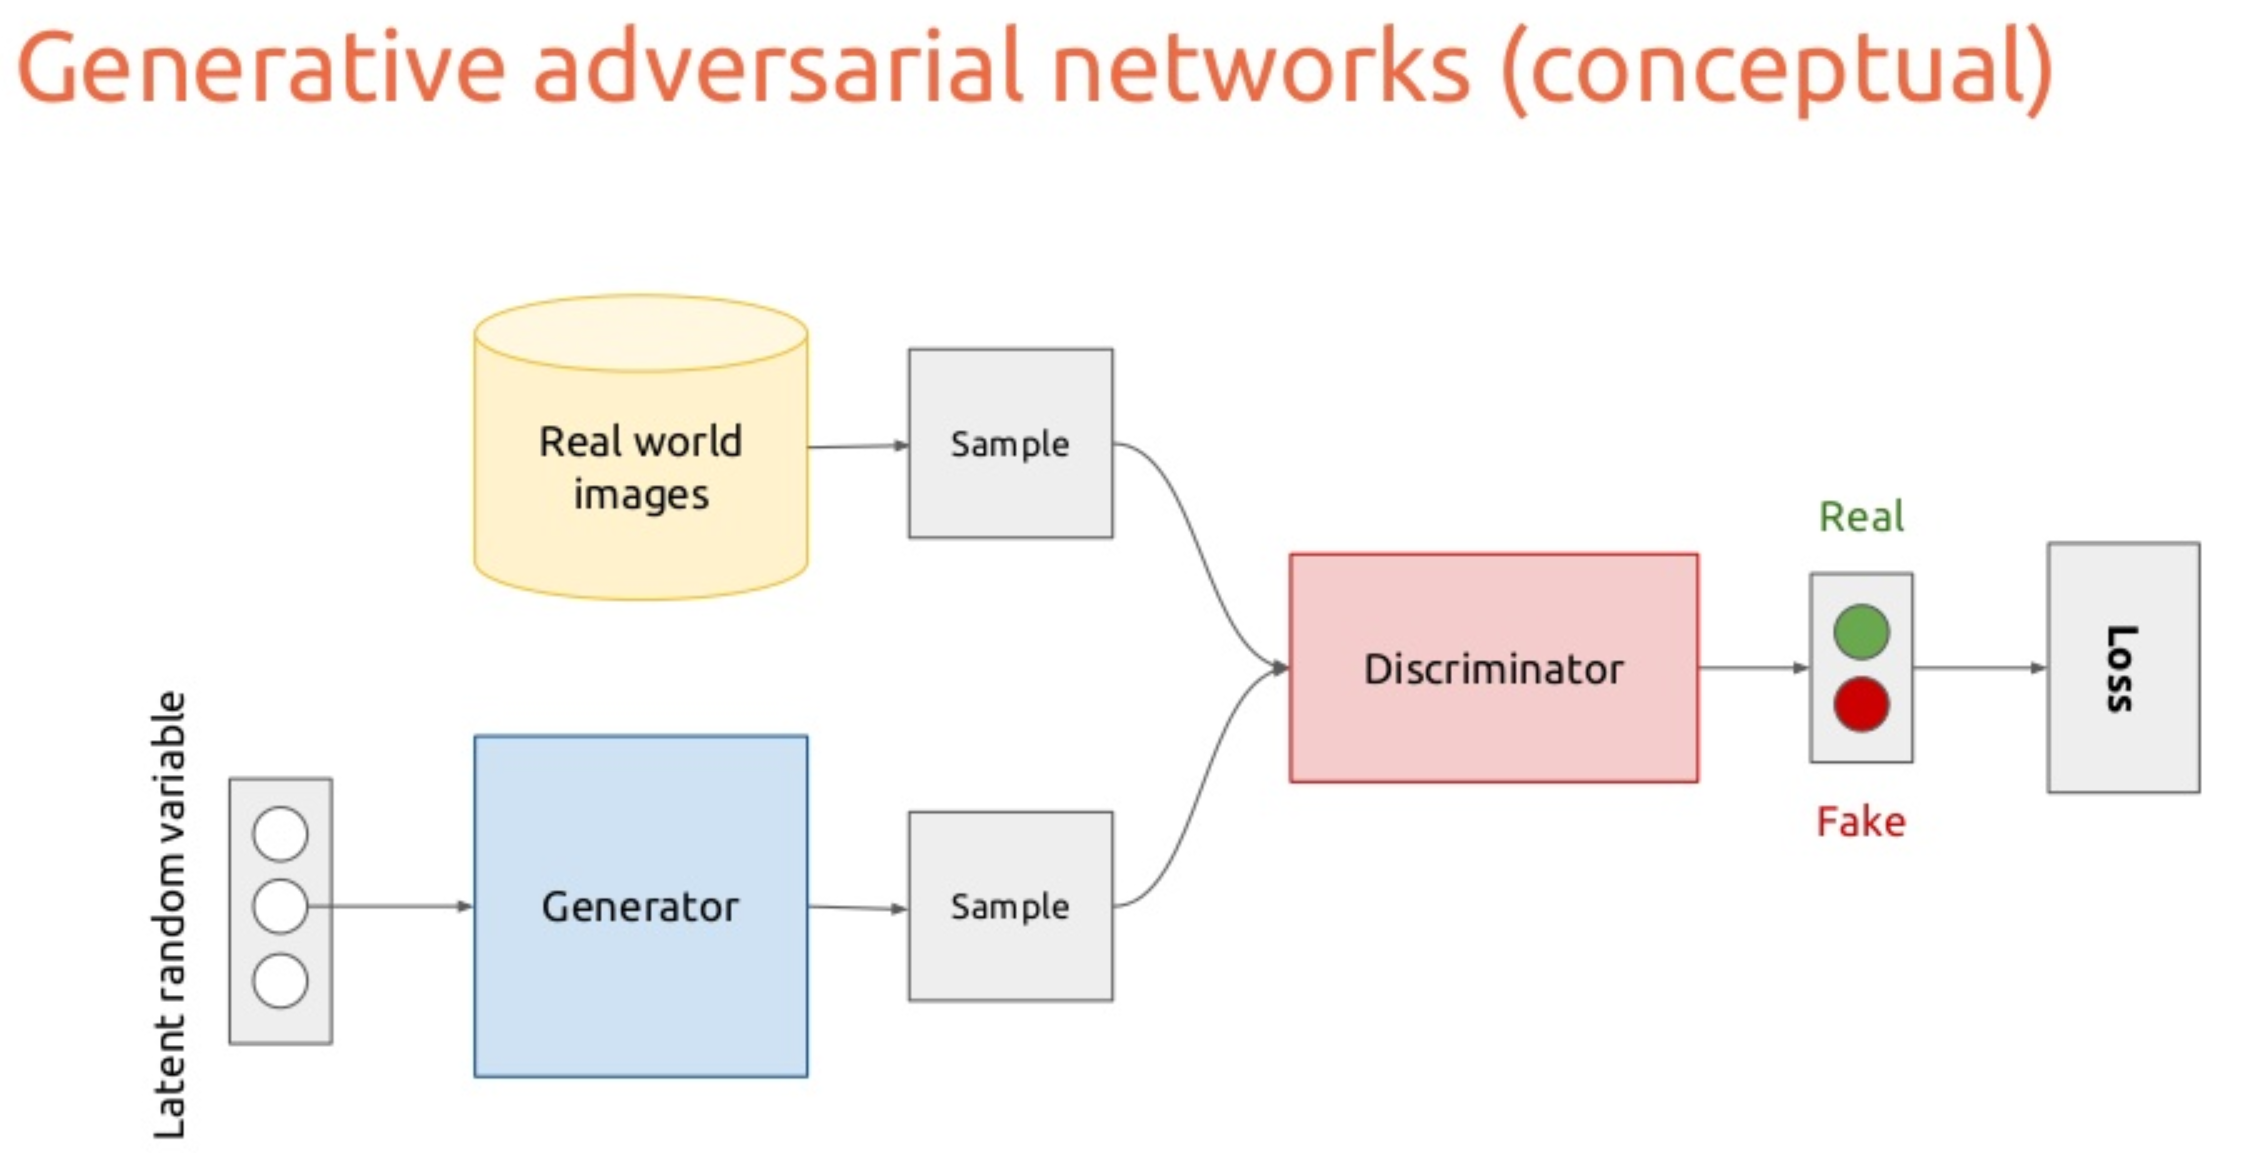
pip install tensorflow-gpu==1.141. GANs 概述
GANs,Generative Adversarial Networks,包含两个模型:
[1] - Generator
模型,将 latent code 转换为某种输出,如,人脸图像.
[2] - Discriminator
模型,判断某种输入,如,人脸图像,是真是假.
- Real: 图像来自于数据集
- Fake: 图像来自于 Generator
Generator 的输入是 latent code z,其可以是任意期望长度的向量,如,512维的向量.
- 训练时,latent code 是随机采样的,512 维的随机向量
- 当 latent code 随机采样时,称其为 latent random variable
- 神奇的 latent code 存储的信息,使得 Generator 生成特定的输出
- 如果可以找到特定输入的 latent code,则可以将其采用更少的数据来表示(如,将某人的图像表示为仅为 512 长度的 latent vector,相比于原始图像大小会小很多).
注:
- 不要混淆了 GANs 和 VAEs, Variational Auto-Encoders
- GANs 学习从 random latent vectors 中生成输出,其模型输入数据的分布;但不必须是输入数据的精确样本
- VAEs 将输入样本编码为 latent vectors,并学习将 latent vectors 解码为与原始样本最接近的形式
- GANs 与 VAEs 的最大不同是,GANs 的 Generator 从未看到过输入图像,因此,无法将图像自动转换为对应的 latent code. (即,投影 projection )
2. 生成人脸
import sys
sys.path.append('stylegan2/')

from stylegan2 import pretrained_networks
from stylegan2 import dnnlib
from stylegan2.dnnlib import tflib

from pathlib import Path
from PIL import Image
import pickle
import numpy as np

from tqdm import tqdm

model_path = 'gdrive:networks/stylegan2-ffhq-config-f.pkl'
fps = 20
results_size = 400
加载 StyleGAN2 模型:
# Code to load the StyleGAN2 Model
def load_model():
    _G, _D, Gs = pretrained_networks.load_networks(model_path)

    noise_vars = [var for name, var in Gs.components.synthesis.vars.items() if name.startswith('noise')]

    Gs_kwargs = dnnlib.EasyDict()
    Gs_kwargs.output_transform = dict(func=tflib.convert_images_to_uint8, nchw_to_nhwc=True)
    Gs_kwargs.randomize_noise = False

    return Gs, noise_vars, Gs_kwargs


# Generate images given a random seed (Integer)
def generate_image_random(rand_seed):
    rnd = np.random.RandomState(rand_seed)
    z = rnd.randn(1, *Gs.input_shape[1:])
    tflib.set_vars({var: rnd.randn(*var.shape.as_list()) for var in noise_vars})
    images = Gs.run(z, None, **Gs_kwargs)
    return images, z


# Generate images given a latent code ( vector of size [1, 512] )
def generate_image_from_z(z):
    images = Gs.run(z, None, **Gs_kwargs)
    return images
然后,随机生成一些输出:
Gs, noise_vars, Gs_kwargs = load_model()

images, latent_code1 = generate_image_random(42)
image1 = Image.fromarray(images[0]).resize((results_size, results_size))
print(latent_code1.shape)
#(1, 512)
image1.show()
images, latent_code2 = generate_image_random(1234)
image2 = Image.fromarray(images[0]).resize((results_size, results_size))
print(latent_code2.shape)
#(1, 512)

print(latent_code1[0][:5], latent_code2[0][:5])
#(array([ 0.49671415, -0.1382643 ,  0.64768854,  1.52302986, -0.23415337]),
# array([ 0.47143516, -1.19097569,  1.43270697, -0.3126519 , -0.72058873]))

image2.show()
3. Latent Codes 插值
latent space 是某些数据的压缩表示,外形相似的样本在 latent space 应该是互相接近的.
如果 latent space 比较好,则可以在 latent space 中的点进行过渡/插值(transition/interpolate),以得到中间的输出值.
换句话说,可以对两张人脸进行变形. 如图:
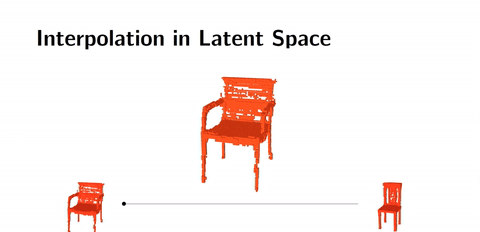
From:https://hackernoon.com/latent-space-visualization-deep-learning-bits-2-bd09a46920df
如下对 latent_code1 和 latent_code2 进行插值:
def linear_interpolate(code1, code2, alpha):
    return code1 * alpha + code2 * (1 - alpha)


interpolated_latent_code = linear_interpolate(latent_code1, latent_code2, 0.5)
print(interpolated_latent_code.shape)
#(1, 512)

images = generate_image_from_z(interpolated_latent_code)
image_inter = Image.fromarray(images[0]).resize((results_size, results_size))
image_inter.show()
动态化该过程:
output_gifs_path = Path('output_gifs')
# Make Output Gifs folder if it doesn't exist.
if not output_gifs_path.exists():
    output_gifs_path.mkdir()


def get_concat_h(im1, im2):
    dst = Image.new('RGB', (im1.width + im2.width, im1.height))
    dst.paste(im1, (0, 0))
    dst.paste(im2, (im1.width, 0))
    return dst


def make_latent_interp_animation(code1, code2, img1, img2, num_interps):
    step_size = 1.0/num_interps

    all_imgs = []
    amounts = np.arange(0, 1, step_size)
    for alpha in tqdm(amounts):
        interpolated_latent_code = linear_interpolate(code1, code2, alpha)
        images = generate_image_from_z(interpolated_latent_code)
        interp_latent_image = Image.fromarray(images[0]).resize((400, 400))
        frame = get_concat_h(img1, interp_latent_image)
        frame = get_concat_h(frame, img2)
        all_imgs.append(frame)
    #
    save_name = output_gifs_path/'latent_space_traversal.gif'
    all_imgs[0].save(save_name, save_all=True, append_images=all_imgs[1:], duration=1000/fps, loop=0)

#
make_latent_interp_animation(latent_code1, latent_code2, image1, image2, num_interps=200)
如:

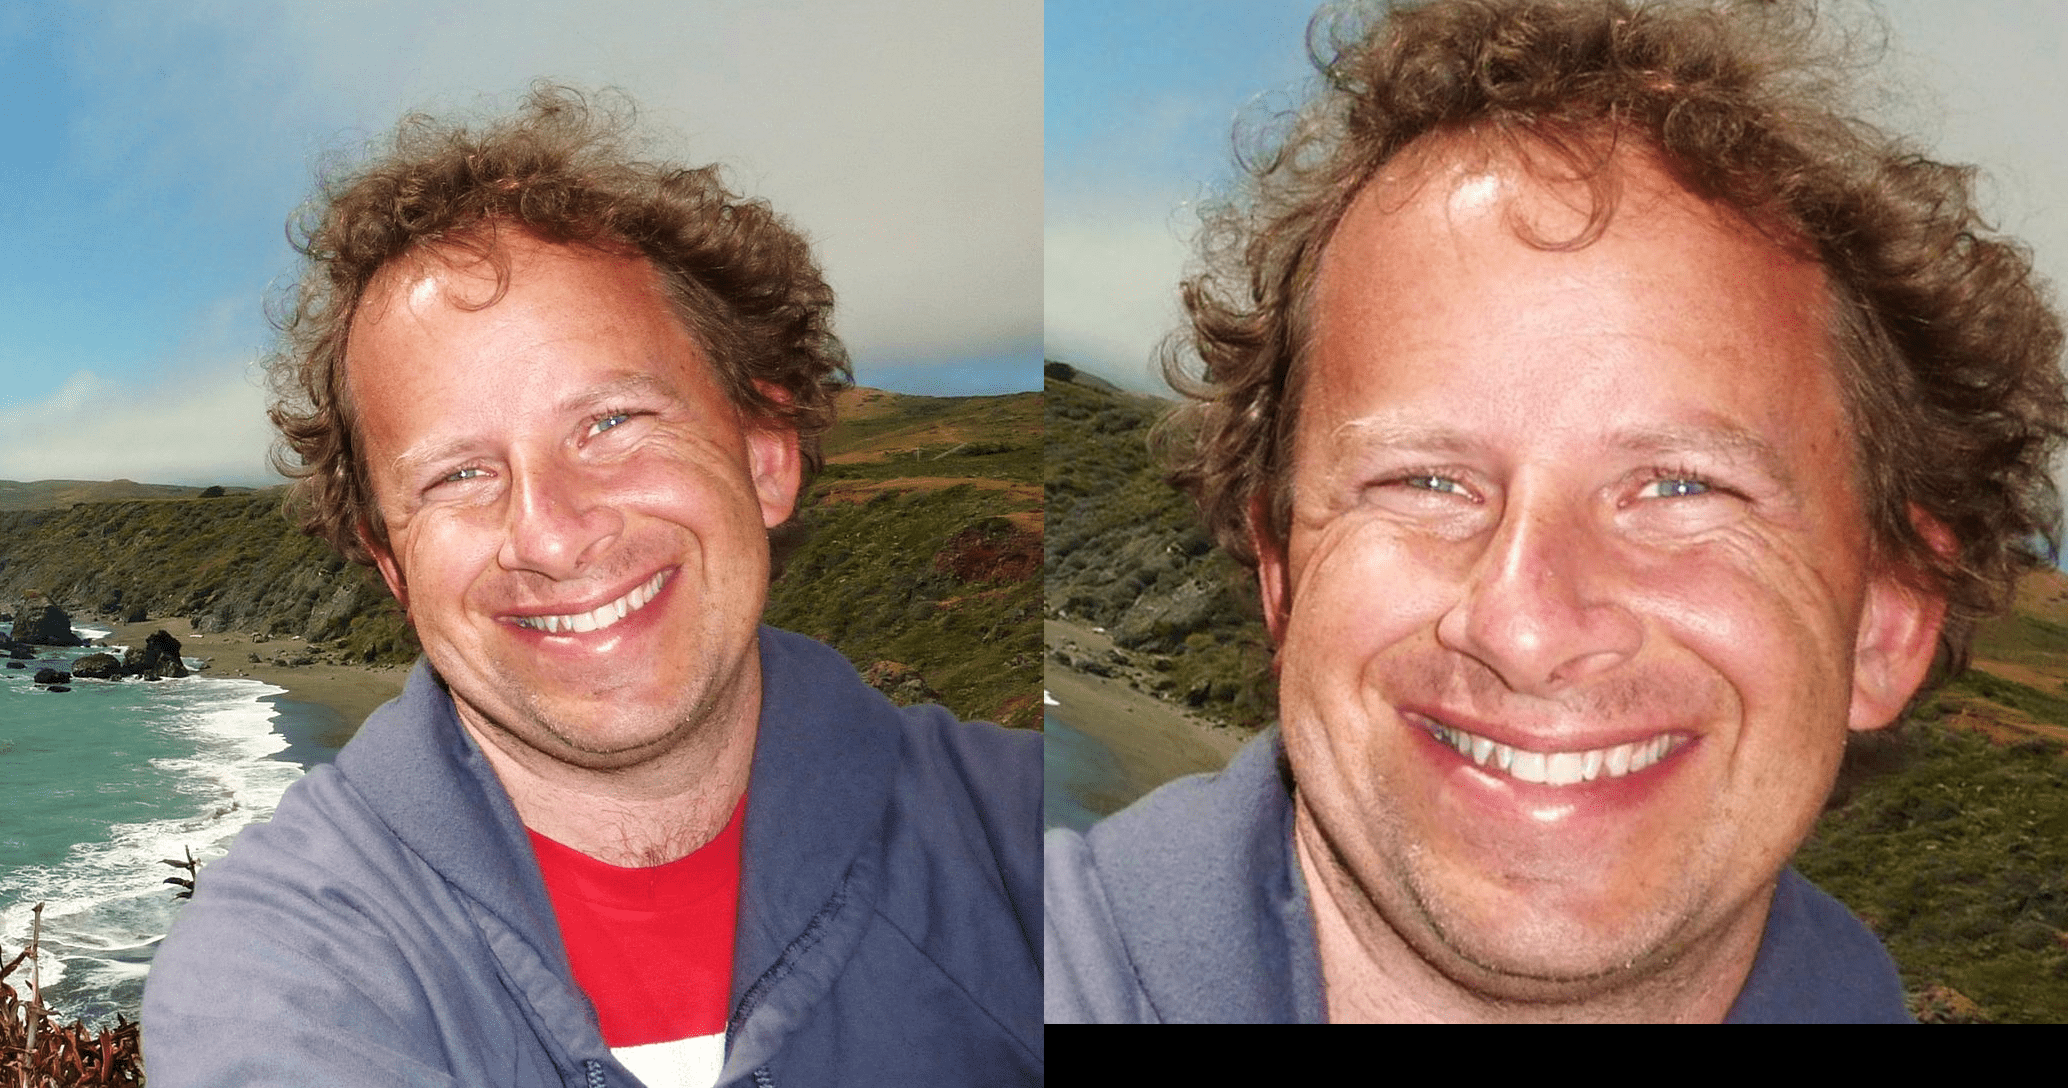
4. 人脸图像对齐
对于自己的人脸图像,而不是随机生成的人脸图像,如何进行投影到 latent space?
首先,采用人脸关键点检测模型,对齐(归一化)图像.
如,
orig_img_path = Path('imgs')
aligned_imgs_path = Path('aligned_imgs')

# Make Aligned Images folder if it doesn't exist.
if not aligned_imgs_path.exists():
    aligned_imgs_path.mkdir()

print(orig_img_path, aligned_imgs_path)

#if not Path('shape_predictor_68_face_landmarks.dat').exists():
#    wget http://dlib.net/files/shape_predictor_68_face_landmarks.dat.bz2
#    bzip2 -dv shape_predictor_68_face_landmarks.dat.bz2


from align_face import align_face

# Align all of our images using a landmark detection model!
all_imgs = list(orig_img_path.iterdir())
for img in all_imgs:
    align_face(str(img)).save(aligned_imgs_path/('aligned_'+img.name))

#
aligned_img_set = list(aligned_imgs_path.iterdir())
aligned_img_set.sort()
aligned_img_set = [Image.open(x) for x in aligned_img_set]

orig_img_set = list(orig_img_path.iterdir())
orig_img_set.sort()
orig_img_set = [Image.open(x) for x in orig_img_set]

#对齐后的图像,转化为输出大小为 1024x1024
get_concat_h(orig_img_set[0], aligned_img_set[0])
get_concat_h(orig_img_set[1], aligned_img_set[1])
如:
5. 投影图像到 Latent Space
#GPU上运行
import sys
sys.path.append('stylegan2/')

from stylegan2 import pretrained_networks
from stylegan2 import dnnlib
from stylegan2.dnnlib import tflib

from pathlib import Path
from PIL import Image
import pickle
import numpy as np
from tqdm import tqdm

model_path = 'gdrive:networks/stylegan2-ffhq-config-f.pkl'
fps = 20
results_size = 400
将数据转换为 StyleGAN2 兼容格式,
python -W ignore stylegan2/dataset_tool.py create_from_images datasets_stylegan2/custom_imgs aligned_imgs/注:
[1] - 将图像投影到 latent space,意味着,可视化出 latent code 使得 Generator 生成的输出如何与输入图像相似
[2] - 问题是,如何可视化出 latent code? VAEs 模型中,可以将图像送入解码器,即可得到 latent code.
[3] - GANs 模型中,没有直接的方式来提取输入图像的 latent codes,但是可以进行优化得到.
对于迭代过程中,主要进行:
- [1] - 用 Generator 从起始 latent vector 生成一些输出
- [2] - 得到 Generator 的输出图像,以及目标图像,共同送入 VGG16 模型(图像特征提取器)
- [3] - 从 VGG16 中得到 Generator 的输出图像特征
- [4] - 从 VGG16 中得到目标图像的特征
- [5] - 根据特征的差异性,计算损失函数
- [6] - BP
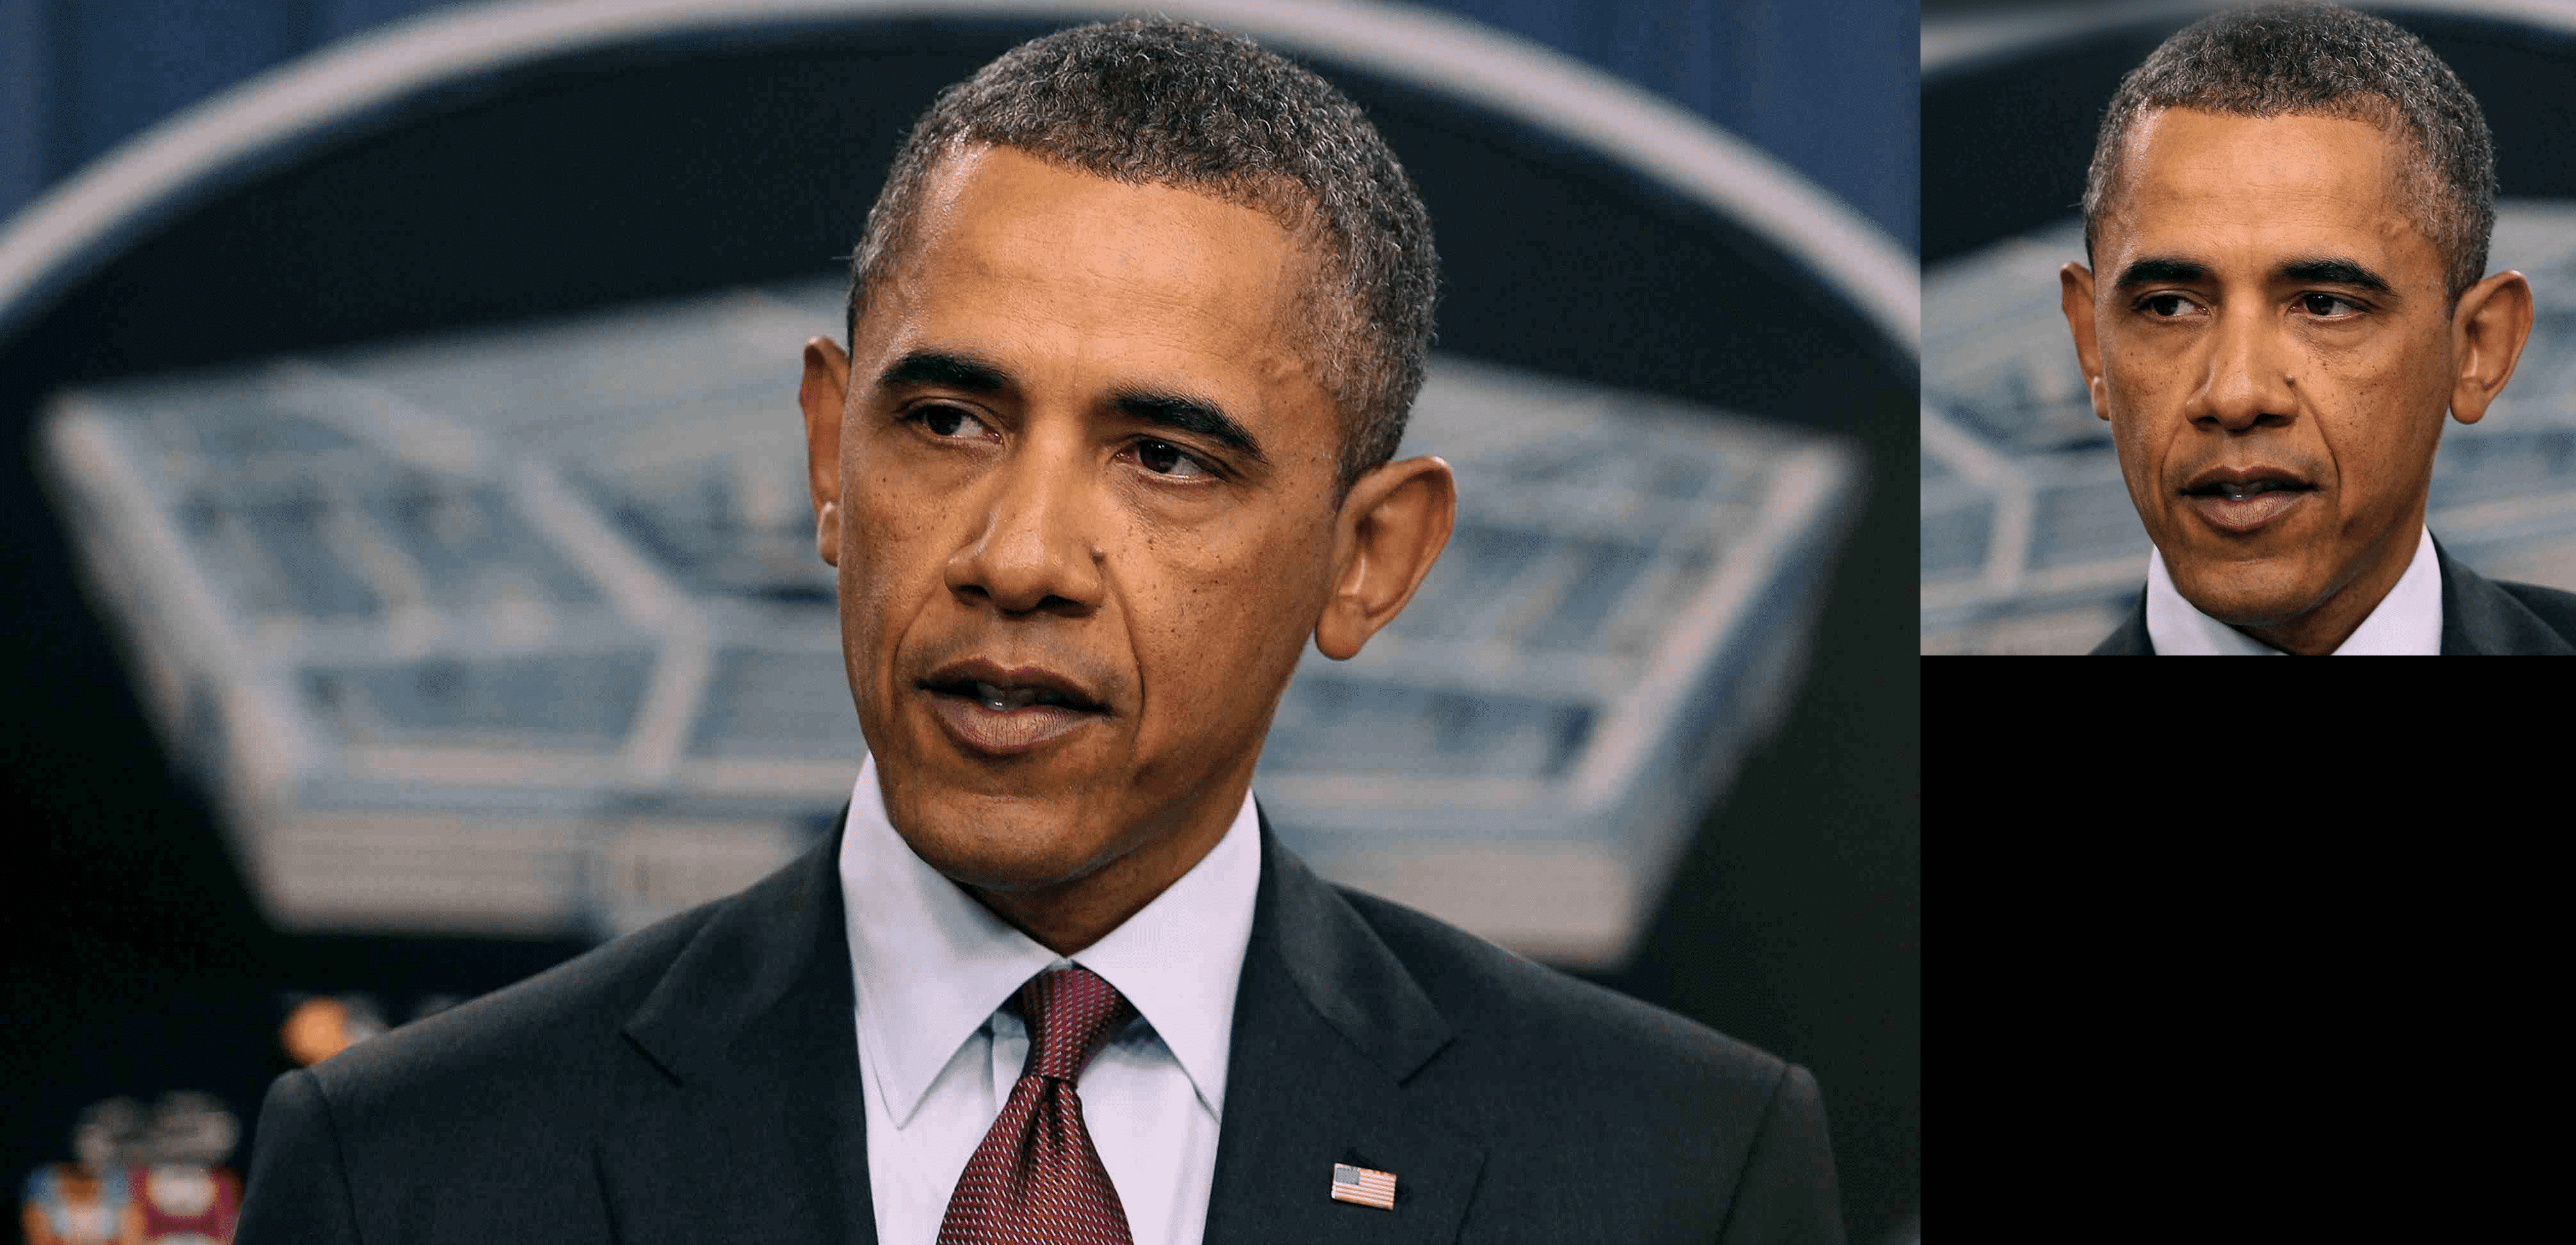
将两张 Jeremy 和 Obama 图像对齐后,投影:
tot_aligned_imgs = 2执行:
python -W ignore stylegan2/epoching_custom_run_projector.py project-real-images --network=$model_path \
  --dataset=custom_imgs --data-dir=datasets_stylegan2 --num-images=$tot_aligned_imgs --num-snapshots 500
动态化过程的相关函数:
def get_concat_h(im1, im2):
    dst = Image.new('RGB', (im1.width + im2.width, im1.height))
    dst.paste(im1, (0, 0))
    dst.paste(im2, (im1.width, 0))
    return dst


def make_project_progress_gifs():
    all_result_folders = list(Path('results/').iterdir())
    all_result_folders.sort()

    last_result_folder = all_result_folders[-1]
    for img_num in range(tot_aligned_imgs):
        all_step_pngs = [x for x in last_result_folder.iterdir() if x.name.endswith('png') and 'image{0:04d}'.format(img_num) in x.name]
        all_step_pngs.sort()

        target_image = Image.open(all_step_pngs[-1]).resize((results_size, results_size))

        all_concat_imgs = []
        for step_img_path in all_step_pngs[:-1]:
            step_img = Image.open(step_img_path).resize((results_size, results_size))
            all_concat_imgs.append(get_concat_h(target_image, step_img))

        #
        out_gif = 'output_gifs/image{0:04d}_project_progress.gif'.format(img_num)
        all_concat_imgs[0].save(out_gif,
                                save_all=True,
                                append_images=all_concat_imgs[1:],
                                duration=1000/fps, loop=0)
#
make_project_progress_gifs()
如:


看下优化的 latent codes:
def get_final_latents():
    all_results = list(Path('results/').iterdir())
    all_results.sort()

    last_result = all_results[-1]

    latent_files = [x for x in last_result.iterdir() if 'final_latent_code' in x.name]
    latent_files.sort()

    all_final_latents = []

    for file in latent_files:
        with open(file, mode='rb') as latent_pickle:
            all_final_latents.append(pickle.load(latent_pickle))

    return all_final_latents

#
latent_codes = get_final_latents()
print(len(latent_codes), latent_codes[0].shape, latent_codes[1].shape)
#(2, (1, 18, 512), (1, 18, 512))
继续,看看从 latent codes 生成的图像是什么样.
def load_model():
_G, _D, Gs = pretrained_networks.load_networks(model_path)
noise_vars = [var for name, var in Gs.components.synthesis.vars.items() if name.startswith('noise')]
Gs_kwargs = dnnlib.EasyDict()
Gs_kwargs.output_transform = dict(func=tflib.convert_images_to_uint8, nchw_to_nhwc=True)
Gs_kwargs.randomize_noise = False
return Gs, noise_vars, Gs_kwargs
def generate_image_from_projected_latents(latent_vector):
images = Gs.components.synthesis.run(latent_vector, **Gs_kwargs)
return images
#
Gs, noise_vars, Gs_kwargs = load_model()
#
output_gifs_path = Path('output_gifs/')
aligned_imgs_path = Path('aligned_imgs/')
aligned_img_set = list(aligned_imgs_path.iterdir())
aligned_img_set.sort()
aligned_img_set = [Image.open(x) for x in aligned_img_set]
#
images = generate_image_from_projected_latents(latent_codes[0])
recreated_img1 = Image.fromarray(images[0]).resize((results_size, results_size))
orig_img1 = aligned_img_set[1].resize((results_size, results_size))
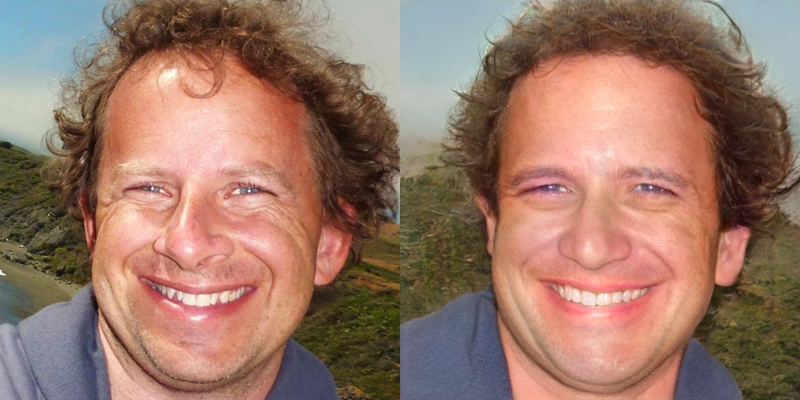
get_concat_h(orig_img1, recreated_img1)如:

images = generate_image_from_projected_latents(latent_codes[1])
recreated_img2 = Image.fromarray(images[0]).resize((results_size, results_size))

orig_img2 = aligned_img_set[0].resize((results_size, results_size))
get_concat_h(orig_img2, recreated_img2)
如:
重新运行下插值动画过程,
def linear_interpolate(code1, code2, alpha):
    return code1 * alpha + code2 * (1 - alpha)


def make_latent_interp_animation_real_faces(code1, code2, img1, img2, num_interps):
    step_size = 1.0/num_interps

    all_imgs = []
    amounts = np.arange(0, 1, step_size)
    for alpha in tqdm(amounts):
        interpolated_latent_code = linear_interpolate(code1, code2, alpha)
        images = generate_image_from_projected_latents(interpolated_latent_code)
        interp_latent_image = Image.fromarray(images[0]).resize((400, 400))
        frame = get_concat_h(img2, interp_latent_image)
        frame = get_concat_h(frame, img1)
        all_imgs.append(frame)

    save_name = output_gifs_path/'projected_latent_space_traversal.gif'
    all_imgs[0].save(save_name, save_all=True, append_images=all_imgs[1:], duration=1000/fps, loop=0)

#
make_latent_interp_animation_real_faces(latent_codes[0], latent_codes[1], recreated_img1, recreated_img2, num_interps=200)
如:

6. Latent Directions/Controls 修改投影图像
已经有学习 latent space 中 latent directions 的方式,(有监督、无监督的都有),以控制特征.
已经有开源的 StyleGAN2 directional latent vectors,可以通过在 latent space 中移动并控制某个特定特征.
[1] - latent directions 的有监督学习
首先,从模型中收集很多的样本(image + latent),并根据目标属性(如 smiling VS not smiling) 进行手工分类图片,并尝试保持样本表示的均衡性.
然后,训练模型,分类或回归 latents 和手工标签.
这样,就可以采用学习的模型函数作为过渡方向(trasnition direction).
From: https://towardsdatascience.com/stylegan-v2-notes-on-training-and-latent-space-exploration-e51cf96584b3
[2] - latent directions 的无监督学习
Unsupervised Discovery of Interpretable Directions in the GAN Latent Space
为了在 latent direction 进行移动,进行如下操作:
latent_code = latent_code + latent_direction * magnitude
# latent_code:
# latent_direction: directional 向量,(18, 512);其表示在 latent space 中移动的方向,并不是移动的大小
#magnitude: 在 latent_direction 方向移动的多少
相比于两个点之间的插值,可以在特定的 latent direction 缓慢移动进行插值.
- 相比于两个 latent codes 的融合,缓慢在 base latent code 上添加更多的 magnitude,并观察其变化.(这里采用 Robert Luxemburg 分享的 latent directions)
def get_control_latent_vectors(path):
    files = [x for x in Path(path).iterdir() if str(x).endswith('.npy')]
    latent_vectors = {f.name[:-4]:np.load(f) for f in files}
    return latent_vectors

#
latent_controls = get_control_latent_vectors('stylegan2directions/')
print(len(latent_controls), latent_controls.keys(), latent_controls['age'].shape)
'''
(16,
 dict_keys(['age', 'eye_distance', 'eye_eyebrow_distance', 'eye_ratio', 'eyes_open', 'gender', 'lip_ratio', 'mouth_open', 'mouth_ratio', 'nose_mouth_distance', 'nose_ratio', 'nose_tip', 'pitch', 'roll', 'smile', 'yaw']),
 (18, 512))
'''

#
def make_latent_control_animation(feature, start_amount, end_amount, step_size, person):
    all_imgs = []

    amounts = np.linspace(start_amount, end_amount, abs(end_amount-start_amount)/step_size)
    for amount_to_move in tqdm(amounts):
        modified_latent_code = np.array(latent_code_to_use)
        modified_latent_code += latent_controls[feature]*amount_to_move
        images = generate_image_from_projected_latents(modified_latent_code)
        latent_img = Image.fromarray(images[0]).resize((results_size, results_size))
        all_imgs.append(get_concat_h(image_to_use, latent_img))

    save_name = output_gifs_path/'{0}_{1}.gif'.format(person, feature)
    all_imgs[0].save(save_name, save_all=True, append_images=all_imgs[1:], duration=1000/fps, loop=0)

#有 16 个 latent "controls"
#如 age
latent_code_to_use = latent_codes[1]
image_to_use = recreated_img2
make_latent_control_animation(feature='age', start_amount=-10, end_amount=10, step_size=0.1, person='jeremy')

#如 age
latent_code_to_use = latent_codes[0]
image_to_use = recreated_img1
make_latent_control_animation(feature='age', start_amount=-5, end_amount=5, step_size=0.1, person='obama')
如:
[1] - 年龄变化


[2] - 性别变化

[3] - 嘴巴闭合变化

[4] - 微笑变化
