论文 - MMDetection: Open MMLab Detection Toolbox and Benchmark - 2019
Github - open-mmlab/mmdetection
mmdetection 实现了分布式训练和非分布式训练,其分别使用的是 MMDistributedDataParallel 和 MMDataParallel .
训练过程中的所有输出,包括 log 文件和 checkpoints 文件,自动保存到 config 配置文件中的 work_dir 路径中.
1. 学习率(lr)设置
[1] - config 文件中的默认学习率是对于 8 GPUs 和 2 img/gpu 而言的(batchsize= 8x2=16).
[2] - 基于 Linear Scaling Rule 策略,可根据具体的 GPUs 数量和每张 GPU 的图片数,得到的 batchsize 的大小,以正比例的设置学习率,如,对于 4GPUs x 2img/gpu = 8 (batchsize),设置 lr=0.01; 对于 16GPUs x 4img/gpu = 64 (batchsize),设置 lr=0.08.
2. 单 GPU 训练
python3 tools/train.py ${CONFIG_FILE} \
    --work_dir ${YOUR_WORK_DIR} #指定work_dir 路径.
3. 多 GPUs 训练
dist_train.sh:
#!/usr/bin/env bash

PYTHON=${PYTHON:-"python3"}

CONFIG=$1
GPUS=$2

$PYTHON -m torch.distributed.launch \
    --nproc_per_node=$GPUS \
    $(dirname "$0")/train.py $CONFIG --launcher pytorch ${@:3}
多 GPUs 训练:
./tools/dist_train.sh ${CONFIG_FILE} ${GPU_NUM} [optional arguments]可选参数(optional arguments) 说明:
[1] - --validate - (强烈推荐),训练过程中,每 k 个 epochs 进行一次验证(默认k=1).
[2] - --work_dir ${WORK_DIR} - config文件中设定的工作路径.
[3] - --resume_from ${CHECKPOINT_FILE} - 从 checkpiont 文件恢复训练.
[4] - resume_from 和 load_from 的区别:
resume_from 同时加载模型权重(model weights) 和优化状态(optimizer status),且 epoch 是继承了指定 checkpoint 的信息. 一般用于意外终端的训练过程的恢复.
load_from 仅加载模型权重(model weights),训练过程的 epoch 是从 0 开始训练的. 一般用于模型 finetuning.
注:
尝试了这种分布式训练,一直出问题,可以试试:
python3 tools/train.py configs/faster_rcnn_r50_fpn_1x.py --gpus 2 --validate4. 多机训练
对于由 slurm 管理的集群上,mmdetection 的运行,可以采用 slurm_train.sh 脚本:
slurm_train.sh :
#!/usr/bin/env bash

set -x

PARTITION=$1
JOB_NAME=$2
CONFIG=$3
WORK_DIR=$4
GPUS=${5:-8}
GPUS_PER_NODE=${GPUS_PER_NODE:-8}
CPUS_PER_TASK=${CPUS_PER_TASK:-5}
SRUN_ARGS=${SRUN_ARGS:-""}
PY_ARGS=${PY_ARGS:-"--validate"}

srun -p ${PARTITION} \
    --job-name=${JOB_NAME} \
    --gres=gpu:${GPUS_PER_NODE} \
    --ntasks=${GPUS} \
    --ntasks-per-node=${GPUS_PER_NODE} \
    --cpus-per-task=${CPUS_PER_TASK} \
    --kill-on-bad-exit=1 \
    ${SRUN_ARGS} \
    python -u tools/train.py ${CONFIG} --work_dir=${WORK_DIR} --launcher="slurm" ${PY_ARGS}
运行:
./tools/slurm_train.sh ${PARTITION} ${JOB_NAME} ${CONFIG_FILE} ${WORK_DIR} [${GPUS}]例如,在 dev 分区,采用 16 GPUs 训练 Mask R-CNN 示例:
./tools/slurm_train.sh dev mask_r50_1x configs/mask_rcnn_r50_fpn_1x.py /nfs/xxxx/mask_rcnn_r50_fpn_1x 165. 定制数据集
对于自定义的数据集,最简单的方式是,将数据集装换为 mmdetection 中已有数据集的格式(如 COCO 和 PASCAL VOC).
5.1. COCO 数据集格式
以包含 5 个类别的定制数据集为例,假设已经被转换为 COCO 格式.
[1] - 新建 mmdet/dataset/custom_dataset.py:
from .coco import CocoDataset
from .registry import DATASETS


@DATASETS.register_module
class CustomDataset(CocoDataset):
    CLASSES = ('a', 'b', 'c', 'd', 'e')
[2] - 编辑 mmdet/datasets/__init__.py,添加:
from .custom_dataset import CustomDataset[3] - 在 config 文件中即可使用 CustomDateset,类似于 CocoDataset.
如:
# dataset settings
dataset_type = 'CustomDataset'
data_root = 'data/custom/'
img_norm_cfg = dict(
    mean=[123.675, 116.28, 103.53], std=[58.395, 57.12, 57.375], to_rgb=True)
data = dict(
    imgs_per_gpu=2,
    workers_per_gpu=2,
    train=dict(
        type=dataset_type,
        ann_file=data_root + 'annotations/custom_train.json',
        img_prefix=data_root + 'custom_train/',
        img_scale=(1333, 800),
        img_norm_cfg=img_norm_cfg,
        size_divisor=32,
        flip_ratio=0.5,
        with_mask=False,
        with_crowd=True,
        with_label=True),
    val=dict(
        type=dataset_type,
        ann_file=data_root + 'annotations/custom_test.json',
        img_prefix=data_root + 'custom_test/',
        img_scale=(1333, 800),
        img_norm_cfg=img_norm_cfg,
        size_divisor=32,
        flip_ratio=0,
        with_mask=False,
        with_crowd=True,
        with_label=True),
    test=dict(
        type=dataset_type,
        ann_file=data_root + 'annotations/custom_test.json',
        img_prefix=data_root + 'custom_test/',
        img_scale=(1333, 800),
        img_norm_cfg=img_norm_cfg,
        size_divisor=32,
        flip_ratio=0,
        with_mask=False,
        with_label=False,
        test_mode=True))
5.2. 非 COCO 数据集格式
如果不想将定制数据集的标注数据转换为 COCO 或 PASCAL 格式,mmdetection 也是支持的.
mmdetection 定义了一个简单的标注数据格式,所有的数据集都是与之兼容的,不管是在线的还是离线的.
mmdetection 的数据标注格式为由 dict 构成的 list 格式,每个 dict 对应于一张图片.
[1] - 对于 testing,其包含 3 个 field:filename(相对路径)、width 和 height.
[2] - 对于training,其包含 4 个 field:filename(相对路径)、width 、height 和 ann. ann 也是一个 dict,其至少包含 2 个 field:boxes 和 labels,均是 numpy arrays 格式. 一些数据集可能会提供其它标注信息,如 crowd/difficult/ignored bboxes,而 mmdetection 采用的是 bboxes_ignore 和 labels_ignore 来表示.
例如,
[
    {
        'filename': 'a.jpg',
        'width': 1280,
        'height': 720,
        'ann': {
            'bboxes': <np.ndarray, float32> (n, 4),
            'labels': <np.ndarray, int64> (n, ),
            'bboxes_ignore': <np.ndarray, float32> (k, 4),
            'labels_ignore': <np.ndarray, int64> (k, ) (optional field)
        }
    },
    ...
]
对于定制数据集,有两种处理方式:
[1] - 在线转换数据标注格式
自定义一个新的 Dataset class,继承于 CustomDataset,并重写 load_annotations(self, ann_file) 和 get_ann_info(self, idx),类似于 mmdet/datasets/coco.py 和 mmdet/datasets/voc.py.
[2] - 离线转换数据标注格式
将定制数据集的标注格式,转化为以上期望的格式,并保存为 pickle 文件或 json 文件,类似于 tools/convert_datasets/pascal_voc.py. 然后,即可使用 CustomDataset.
pascal_voc.py:
import argparse
import os.path as osp
import xml.etree.ElementTree as ET

import mmcv
import numpy as np

from mmdet.core import voc_classes

label_ids = {name: i + 1 for i, name in enumerate(voc_classes())}


def parse_xml(args):
    xml_path, img_path = args
    tree = ET.parse(xml_path)
    root = tree.getroot()
    size = root.find('size')
    w = int(size.find('width').text)
    h = int(size.find('height').text)
    bboxes = []
    labels = []
    bboxes_ignore = []
    labels_ignore = []
    for obj in root.findall('object'):
        name = obj.find('name').text
        label = label_ids[name]
        difficult = int(obj.find('difficult').text)
        bnd_box = obj.find('bndbox')
        bbox = [
            int(bnd_box.find('xmin').text),
            int(bnd_box.find('ymin').text),
            int(bnd_box.find('xmax').text),
            int(bnd_box.find('ymax').text)
        ]
        if difficult:
            bboxes_ignore.append(bbox)
            labels_ignore.append(label)
        else:
            bboxes.append(bbox)
            labels.append(label)
    if not bboxes:
        bboxes = np.zeros((0, 4))
        labels = np.zeros((0, ))
    else:
        bboxes = np.array(bboxes, ndmin=2) - 1
        labels = np.array(labels)
    if not bboxes_ignore:
        bboxes_ignore = np.zeros((0, 4))
        labels_ignore = np.zeros((0, ))
    else:
        bboxes_ignore = np.array(bboxes_ignore, ndmin=2) - 1
        labels_ignore = np.array(labels_ignore)
    annotation = {
        'filename': img_path,
        'width': w,
        'height': h,
        'ann': {
            'bboxes': bboxes.astype(np.float32),
            'labels': labels.astype(np.int64),
            'bboxes_ignore': bboxes_ignore.astype(np.float32),
            'labels_ignore': labels_ignore.astype(np.int64)
        }
    }
    return annotation


def cvt_annotations(devkit_path, years, split, out_file):
    if not isinstance(years, list):
        years = [years]
    annotations = []
    for year in years:
        filelist = osp.join(devkit_path, 'VOC{}/ImageSets/Main/{}.txt'.format(
            year, split))
        if not osp.isfile(filelist):
            print('filelist does not exist: {}, skip voc{} {}'.format(
                filelist, year, split))
            return
        img_names = mmcv.list_from_file(filelist)
        xml_paths = [
            osp.join(devkit_path, 'VOC{}/Annotations/{}.xml'.format(
                year, img_name)) for img_name in img_names
        ]
        img_paths = [
            'VOC{}/JPEGImages/{}.jpg'.format(year, img_name)
            for img_name in img_names
        ]
        part_annotations = mmcv.track_progress(parse_xml,
                                               list(zip(xml_paths, img_paths)))
        annotations.extend(part_annotations)
    mmcv.dump(annotations, out_file)
    return annotations


def parse_args():
    parser = argparse.ArgumentParser(
        description='Convert PASCAL VOC annotations to mmdetection format')
    parser.add_argument('devkit_path', help='pascal voc devkit path')
    parser.add_argument('-o', '--out-dir', help='output path')
    args = parser.parse_args()
    return args


def main():
    args = parse_args()
    devkit_path = args.devkit_path
    out_dir = args.out_dir if args.out_dir else devkit_path
    mmcv.mkdir_or_exist(out_dir)

    years = []
    if osp.isdir(osp.join(devkit_path, 'VOC2007')):
        years.append('2007')
    if osp.isdir(osp.join(devkit_path, 'VOC2012')):
        years.append('2012')
    if '2007' in years and '2012' in years:
        years.append(['2007', '2012'])
    if not years:
        raise IOError('The devkit path {} contains neither "VOC2007" nor '
                      '"VOC2012" subfolder'.format(devkit_path))
    for year in years:
        if year == '2007':
            prefix = 'voc07'
        elif year == '2012':
            prefix = 'voc12'
        elif year == ['2007', '2012']:
            prefix = 'voc0712'
        for split in ['train', 'val', 'trainval']:
            dataset_name = prefix + '_' + split
            print('processing {} ...'.format(dataset_name))
            cvt_annotations(devkit_path, year, split,
                            osp.join(out_dir, dataset_name + '.pkl'))
        if not isinstance(year, list):
            dataset_name = prefix + '_test'
            print('processing {} ...'.format(dataset_name))
            cvt_annotations(devkit_path, year, 'test',
                            osp.join(out_dir, dataset_name + '.pkl'))
    print('Done!')


if __name__ == '__main__':
    main()
6. 模型训练的主要单元
基于 mmdetection 训练检测器的主要单元包括:数据加载(data loading)、模型(model) 和迭代管道( iteration pipeline).
6.1. 数据加载
mmdetection 使用 Dataset 和 DataLoader 进行 multiple workers 的数据加载.
Dataset 返回的是 a dict of data items corresponding the arguments of models' forward method.
由于在目标检测任务中,数据可能不是相同的尺寸(如,image size, gt box size 等),mmdetection 采用了在 mmcv 库中的新的 DataContainer,以收集和分发(collect and distribute)不同尺寸的数据. 参考 data_container.py.
6.2. 模型定义
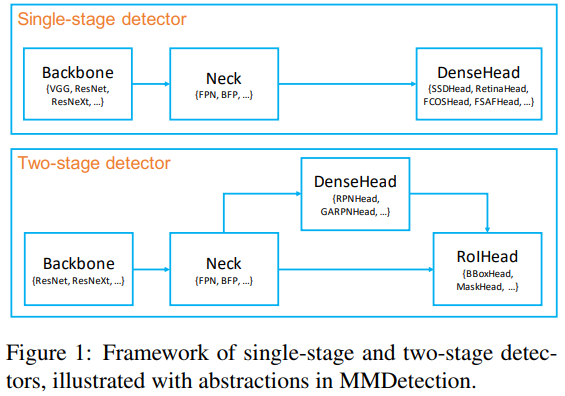
mmdetection 定义了 4 种基本的可定制化模型模块(模型部件):
[1] - backbone:FCN 网络模块,提取特征图,如,ResNet,MobileNet.
[2] - neck:backbones 和 heads 网络之间的模块,如,FPN, APFPN.
[3] - head:特定任务的网络模块,如,bbox 预测和 mask 预测.
[4] - roi extractor:用于从特征图提取 RoI 特征的模块,比如,RoI Align.
基于基本模块,SingleStageDetector 和 TwoStageDetector 通用检测模型设计框架如图:
6.2.1. 构建 backbones 模块
以 MobileNet 开发新部件为例:
[1] - 创建新文件 - mmdet/models/backbones/mobilenet.py:
import torch.nn as nn

from ..registry import BACKBONES


@BACKBONES.register_module
class MobileNet(nn.Module):

    def __init__(self, arg1, arg2):
        pass

    def forward(x):  # should return a tuple
        pass
[2] - 在 mmdet/models/backbones/__init__.py 导入该模块:
from .mobilenet import MobileNet[3] - 在 config 文件中进行使用:
model = dict(
    ...
    backbone=dict(
        type='MobileNet',
        arg1=xxx,
        arg2=xxx),
    ...
6.2.2. 构建 necks 模块
基于 mmdetection 提供的基本模块及检测器设计框架,通过 config 文件即可无痛定义网络模型.
如果需要实现新的网络模块,如 Path Aggregation Network for Instance Segmentation 论文中的 PAFPN(path aggregation FPN),需要做两件事:
[1] - 创建新文件,mmdet/models/necks/pafpn.py :
from ..registry import NECKS

@NECKS.register
class PAFPN(nn.Module):

    def __init__(self,
                in_channels,
                out_channels,
                num_outs,
                start_level=0,
                end_level=-1,
                add_extra_convs=False):
        pass

    def forward(self, inputs):
        # implementation is ignored
        pass
[2] - 修改 config 文件:
原 FPN 设置内容为:
neck=dict(
    type='FPN',
    in_channels=[256, 512, 1024, 2048],
    out_channels=256,
    num_outs=5)
修改为:
neck=dict(
    type='PAFPN',
    in_channels=[256, 512, 1024, 2048],
    out_channels=256,
    num_outs=5)
6.2.3. 定义新模型
mmdetection 定义新模型,需要继承 BaseDetector,其主要定义以下 abstract 方法:
[1] - extract_feat(),给定 image batch,shape 为 (n, c, h, w),提取特征图.
[2] - forward_train(),训练模式的 forward 方法.
[3] - simple_test(),不进行数据增强,单尺度(single scale)测试.
[4] - aug_test(),数据增强(如,multi-scale, flip 等)进行测试.
具体可参考: TwoStageDetector.
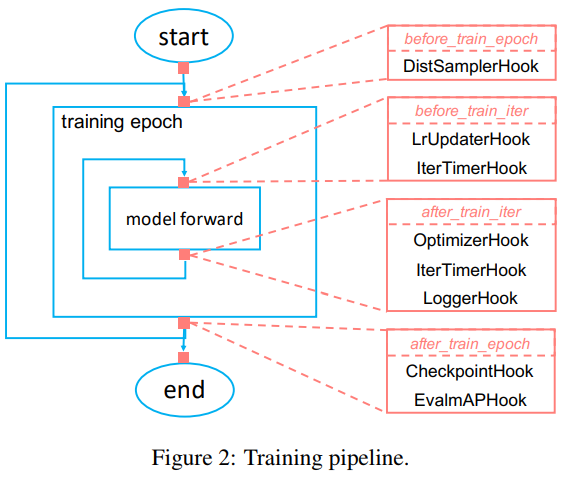
6.3. 迭代管道
mmdetection 对于单机和多机环境,采用分布式训练.
假设服务器有 8 块 GPUs,训练时会启动 8 个进程(processes),每个进程在一个 GPU 上进行运行.
每个进程具有独立的模型、数据加载和优化器(optimizer).
模型参数仅在开始时进行同步一次.
一次 forward 和 backward 计算后,所有 GPUs 的梯度将进行 allreduced,然后优化器更新模型参数.
由于梯度是 allreduced,在迭代结束后,所有进程的模型参数保持一致.
7. 模型测试
7.1. 数据集测试
mmdetection 提供了对 COCO、PASCAL VOC 等整个数据集进行精度评价的测试脚本,并支持:
[1] - 单 GPU 测试
[2] - 多 GPU 测试
[3] - 可视化检测结果.
如:
# single-gpu testing
python tools/test.py ${CONFIG_FILE} ${CHECKPOINT_FILE} [--out ${RESULT_FILE}] [--eval ${EVAL_METRICS}] [--show]

# multi-gpu testing
./tools/dist_test.sh ${CONFIG_FILE} ${CHECKPOINT_FILE} ${GPU_NUM} [--out ${RESULT_FILE}] [--eval ${EVAL_METRICS}]
参数说明:
[1] - RESULT_FILE - 输出结果保存的文件,pickle 格式. 如果不进行指定,则不保存测试结果.
[2] - EVAL_METRICS - 用于评测检测结果的项,可选项为 proposal_fast, proposal, bbox, segm, keypoints.
[3] - --show - 如果指定该参数,检测结果会进行可视化.(仅适用于单 GPU 测试.)
例如,假设已经有训练的 checkpoint 文件,并放于 checkpoints/ 路径.
[1] - 测试 Faster R-CNN,并可视化检测结果.
python tools/test.py configs/faster_rcnn_r50_fpn_1x.py \
    checkpoints/faster_rcnn_r50_fpn_1x_20181010-3d1b3351.pth \
    --show
[2] - 测试 Mask R-CNN,并计算 bbox 和 mask AP.
python tools/test.py configs/mask_rcnn_r50_fpn_1x.py \
    checkpoints/mask_rcnn_r50_fpn_1x_20181010-069fa190.pth \
    --out results.pkl --eval bbox segm
[3] - 在 8 GPUs 上测试 Mask R-CNN,计算 bbox 和 mask AP.
./tools/dist_test.sh configs/mask_rcnn_r50_fpn_1x.py \
    checkpoints/mask_rcnn_r50_fpn_1x_20181010-069fa190.pth \
    8 --out results.pkl --eval bbox segm
7.2. 图片测试
#!/usr/bin/python3
#!--*-- coding:utf-8 --*--
import os
from mmdet.apis import init_detector, inference_detector, show_result
import time
import random

#配置文件
config_file = 'configs/cascade_rcnn_r101_fpn_1x.py'
checkpoint_file = 'checkpoints/cascade_rcnn_r101_fpn_1x_20181129-d64ebac7.pth'

#加载模型
model = init_detector(config_file, checkpoint_file, device='cuda:0')

#测试单张图片
img = '/path/to/test.jpg'
#或
#img = mmcv.imread(img), which will only load it once
start = time.time()
result = inference_detector(model, img)
print('[INFO]timecost: ', time.time() - start)
show_result(img, result, model.CLASSES)

#测试多张图片
imgs = ['test1.jpg', 'test2.jpg']
for i, result in enumerate(inference_detector(model, imgs)):
    show_result(imgs[i], result, model.CLASSES,
print('[INFO]Done.')
11 条评论
mmdetection 训练一轮生成eco_1后,再进行第二轮训练后报这么个错, if isinstance(segmsi,bytes):list index out of range,怎么去解决呢?
segms 是不是为空了?
博主你好,我想请教一下如何将自己设计的模型利用mmdet来训练和测试?
mmdetection 是模块化设计的,只需要把定制的模型替换 mmdetection 的模型创建和加载处即可.
想知道+1
博主,我想问下每张GPU的图片数是什么参数
哪个basebone 模型呢,训练还是测试?
$ python tools/train.py configs/faster_rcnn_r50_fpn_1x_custom.py
2019-10-15 00:18:10,389 - INFO - Distributed training: False
2019-10-15 00:18:10,653 - INFO - load model from: torchvision://resnet50
2019-10-15 00:18:10,788 - WARNING - The model and loaded state dict do not match exactly
unexpected key in source state_dict: fc.weight, fc.bias
loading annotations into memory...
Done (t=0.14s)
creating index...
index created!
2019-10-15 00:18:14,174 - INFO - Start running, host: nw@alien13r3, work_dir: /home/nw/mmdetection/work_dirs/faster_rcnn_r50_fpn_1x_custom
2019-10-15 00:18:14,174 - INFO - workflow: [('train', 1)], max: 12 epochs
(It got stuck here)
I am trying to train the model using my own dataset. I have modified them into coco format, and made changes following the instructions posted here. By running the following training script, I encountered the following issue:
$ python tools/train.py configs/faster_rcnn_r50_fpn_1x_custom.py
Traceback (most recent call last):
File "tools/train.py", line 9, in
File "/home/nw/anaconda3/envs/CV/lib/python3.7/site-packages/mmdet-1.0rc0+c5c7ef9-py3.7-linux-x86_64.egg/mmdet/apis/__init__.py", line 2, in
File "/home/nw/anaconda3/envs/CV/lib/python3.7/site-packages/mmdet-1.0rc0+c5c7ef9-py3.7-linux-x86_64.egg/mmdet/apis/inference.py", line 11, in
File "/home/nw/anaconda3/envs/CV/lib/python3.7/site-packages/mmdet-1.0rc0+c5c7ef9-py3.7-linux-x86_64.egg/mmdet/core/__init__.py", line 3, in
File "/home/nw/anaconda3/envs/CV/lib/python3.7/site-packages/mmdet-1.0rc0+c5c7ef9-py3.7-linux-x86_64.egg/mmdet/core/evaluation/__init__.py", line 5, in
File "/home/nw/anaconda3/envs/CV/lib/python3.7/site-packages/mmdet-1.0rc0+c5c7ef9-py3.7-linux-x86_64.egg/mmdet/core/evaluation/eval_hooks.py", line 13, in
File "/home/nw/anaconda3/envs/CV/lib/python3.7/site-packages/mmdet-1.0rc0+c5c7ef9-py3.7-linux-x86_64.egg/mmdet/datasets/__init__.py", line 1, in
File "/home/nw/anaconda3/envs/CV/lib/python3.7/site-packages/mmdet-1.0rc0+c5c7ef9-py3.7-linux-x86_64.egg/mmdet/datasets/custom_dataset.py", line 5, in
File "/home/nw/anaconda3/envs/CV/lib/python3.7/site-packages/mmdet-1.0rc0+c5c7ef9-py3.7-linux-x86_64.egg/mmdet/utils/registry.py", line 44, in register_module
File "/home/nw/anaconda3/envs/CV/lib/python3.7/site-packages/mmdet-1.0rc0+c5c7ef9-py3.7-linux-x86_64.egg/mmdet/utils/registry.py", line 40, in _register_module
KeyError: 'CustomDataset is already registered in dataset'
如果数据已经转换为 coco-styles,在 yaml 配置文件中默认 dataset_type = 'CocoDataset' 就可以了.
Thanks. It starts to train. But it got stuck from the beginning with this message:
"2019-10-15 00:18:10,389 - INFO - Distributed training: False
2019-10-15 00:18:10,653 - INFO - load model from: torchvision://resnet50
2019-10-15 00:18:10,788 - WARNING - The model and loaded state dict do not match exactly
unexpected key in source state_dict: fc.weight, fc.bias
"